Notification e-mails |

|

|

|

|
|
Notification e-mails |

|

|

|

|
|
|
||
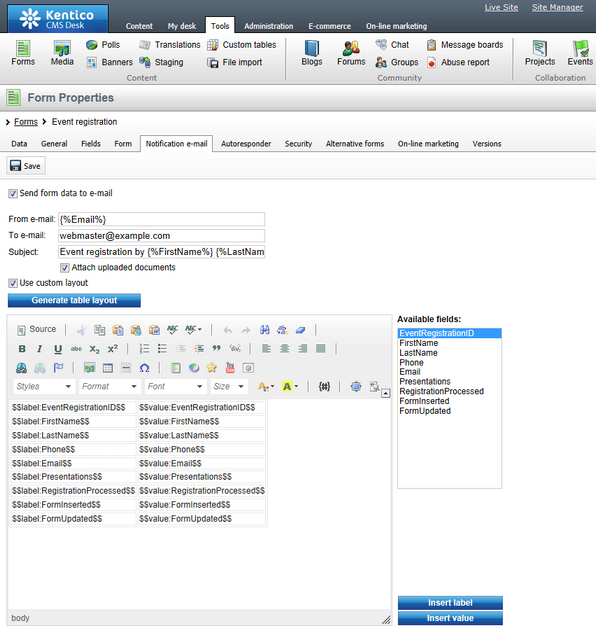
Notification e-mails can be configured on the Notification e-mail tab of a form's editing interface. To enable them, you first need to enable the Send form data to e-mail option. Then you need to configure the following settings:
•From e-mail - the e-mail address from which the notifications will be sent. A typical option is to use the address of the user who submitted the form. This can be done by entering a macro expression, which retrieves the value from the field in the form where users enter their e-mail address, as described in the Using macros with forms topic.
•To e-mail - e-mail address where notification e-mails should be sent. Typically the address of the person responsible for management of form records. You can specify multiple addresses separated by semicolons.
•Subject - subject of the notification e-mails.
•Attach uploaded documents - enable this option if you want to attach files submitted via the form (if there are any) to the notification e-mails.
•Use custom layout - if disabled, the body of the notification e-mails will contain all field names with the entered values, each on a single line. If enabled, you can define a custom layout for the notifications in the text area displayed below.
•Generate table layout - this button generates a table containing all field names in the left column and their values in the right column. Macros for particular field names and values can also be entered separately by selecting a field from the Available fields listbox and clicking the Insert label or Insert value buttons.
Macros may be utilized in the values of any of these fields. Once all the options are configured, click ![]() Save to save your configuration.
Save to save your configuration.
