|
|

Bi-directional staging |

|

|

|

|
|
Bi-directional staging |
|
|

|
|
|
|
Bi-directional staging |
|
|
|
|
|
Bi-directional staging |
|
|
|
|
|
|
||
Bi-directional content staging, i.e. content staging where servers are not exclusively source or target ones, but can act both ways, is achievable with some extra settings. The advantage of such configuration is that you can make changes not only on the source server, but also on the other server(s), while the changes are transferred to the rest of the servers too.
There are two types of bi-directional content staging, depending on the number of servers between which you want to synchronize:
•Simple - used for synchronization between 2 servers only
•Advanced - used for synchronization between more than 2 servers
Both configuration procedures are described in the text below, click the respective link to scroll directly to the beginning of the description.
If you want to perform content staging bi-directionally between two servers, i.e. you want to transfer changes made on Server 1 to Server 2 and also in the other direction from Server 2 to Server 1, you need to configure both servers as a source and a target server at the same time, as described in the Staging configuration topic.
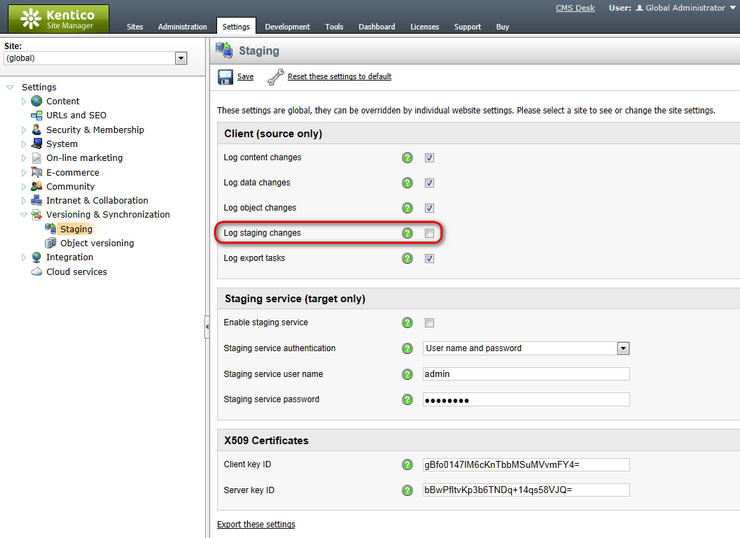
On top of it, you also need to disable the Log staging changes option in Site Manager -> Settings -> Versioning & Synchronization -> Staging on both servers.
If this option is enabled, changes made to the system via content staging synchronization (i.e. transferred from Server 1 to Server 2) are logged as new synchronization tasks on the target server (on Server 2). Now if you perform synchronization in the reversed direction, i.e. back from Server 2 to Server 1, these tasks are also performed and logged back on Server 1 as new staging tasks. This goes on and on in a never-ending loop, which results in the tasks remaining and not being deleted on both servers.
In order to prevent this behavior, you need to disable the Log staging changes option on both servers so that the staging changes are not logged as new synchronization tasks.
Bi-directional content staging is also possible on more than two servers. In this case, a list of servers where a staging task has already been processed is transferred with each task. This prevents redundant staging tasks from being logged for servers where the changes have already been performed.
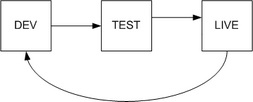
The rule is that there has to be only one path between any two servers in both directions. The following figures show examples of supported server topologies. The rectangles represent particular servers, while the arrows indicate the flow of content staging synchronization tasks.
The first option is to have the servers connected using star topology.


Another possible topology is the circle topology.
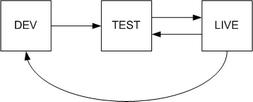
Other topologies are not supported. The following diagram shows an unsupported environment. It doesn’t follow the rule which says that there should be only one path between any two servers. There are two paths from the LIVE server to the TEST server, which breaks the rule.
Follow the instructions below to configure bi-directional staging for three servers—development server, test server and live server, using star topology.
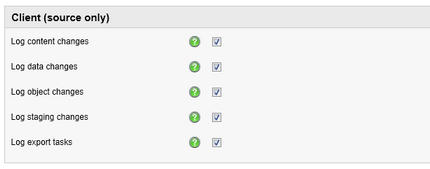
1. On each of the servers that you want to be part of the bi-directional staging, navigate to Site Manager -> Settings -> Versioning & Synchronization -> Staging.
2. Configure the servers as Source by turning all the check-boxes on.
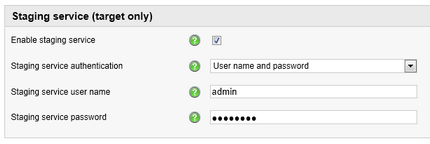
3. Configure the servers as Target, using the user name and password authentication.
1. Into the AppSettings section of the web.config file of the server, enter the following value to name the server Dev.
<add key="CMSStagingServerName" value="Dev" /> |
2. Navigate to CMS Desk -> Tools -> Staging.
3. Switch to the Servers tab and add New server (![]() ).
).
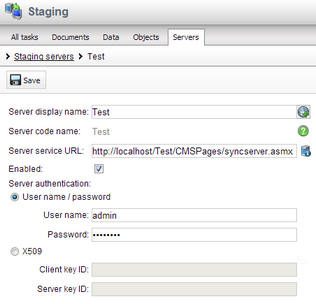
4. Configure the new server to target the Test server. You will configure the Test server later.
Make sure the value of Server code name is set to Test, which is the value that you will use in the Test server's web.config file.
1. Into the AppSettings section of the web.config file of the server, enter the following value to name the server Test.
<add key="CMSStagingServerName" value="Test" /> |
2. Navigate to CMS Desk -> Tools -> Staging.
3. Switch to the Servers tab and add New server (![]() ).
).
4. Configure the new server to target the Dev server that you created previously.
Make sure the value of Server code name is set to Dev, which is the value used in the Dev server's web.config file.
5. Add another New server (![]() ).
).
6. Configure the new server to target the Live server. You will configure the Live server later.
Make sure the value of Server code name is set to Live, which is the value that you will use in the Live server's web.config file.
1. Into the AppSettings section of the web.config file of the server, enter the following value to name the server Live.
<add key="CMSStagingServerName" value="Live" /> |
2. Navigate to CMS Desk -> Tools -> Staging.
3. Switch to the Servers tab and add New server (![]() ).
).
4. Configure the new server to target the Test server that you created previously.
Make sure the value of Server code name is set to Test, which is the value that you will use in the Test server's web.config file.
You have now set up bi-directional staging between three servers.