|
|

Role management |

|

|

|

|
|
Role management |
|
|

|
|
|
|
Role management |
|
|
|
|
|
Role management |
|
|
|
|
|
|
||
Roles are objects that define authorization options for users, i.e. which actions they are allowed to perform on the website and within the Kentico CMS administration interface. Roles provide an interface that maps permissions to users in a way that can easily be reused. Each role can be assigned to any amount of users and vice versa, a user can be a member of an unlimited number of roles.
The management interface for roles can be found in the Administration -> Roles section, both in CMS Desk and Site Manager.
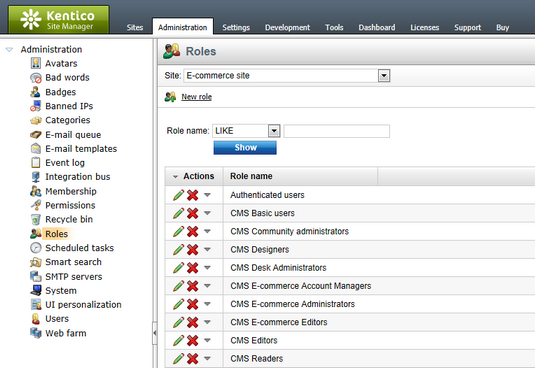
Roles can either be assigned to a specific site or defined as global objects that are available for all sites. In CMS Desk, only roles that belong under the current site can be managed. When in Site Manager, you can select the site context using the Site drop‑down list at the top of the page. To access the list of all global roles in the system, choose the (global) option. Using global roles can save a lot of time when working with a large number of sites that require similar types of authorization options. Please note that global roles may only be assigned to users by global administrators.
It is possible to edit (![]() ) or delete (
) or delete (![]() ) the roles displayed in the list. New roles can be created for the selected site (or globally) by clicking the
) the roles displayed in the list. New roles can be created for the selected site (or globally) by clicking the ![]() New role link. You can specify the following properties when adding a new role:
New role link. You can specify the following properties when adding a new role:
•Role display name - sets a name for the role displayed to users in the administration interface.
•Role code name - sets a name that serves as an identifier for the role.
•Role description - can be used to enter an optional text description for the role.
•Is domain role - indicates if the role was imported from Active Directory.
|
Code names of global roles
Code names are only checked for uniqueness within the context of individual sites, which means that it is possible for a global role to have the same code name as a site‑specific role.
If you need to specify a global role using its code name in your custom website code or via the API, you can add the period character (".") as a prefix. This ensures that only the global role will be selected and any site roles with the same code name will be ignored (for example .Content_admin). |
There are four tabs available when editing (![]() ) a role:
) a role:
On this tab you can edit the same properties that were specified when the role was created.
Here you can add or remove users to/from the currently edited role. These users will be authorized to perform actions according to the permissions granted to the role on the Permissions tab. Roles can either be assigned to users permanently or only until a specified date and time.

If you wish to add users, click the Add users button and check the boxes next to the appropriate users in the displayed selection dialog.
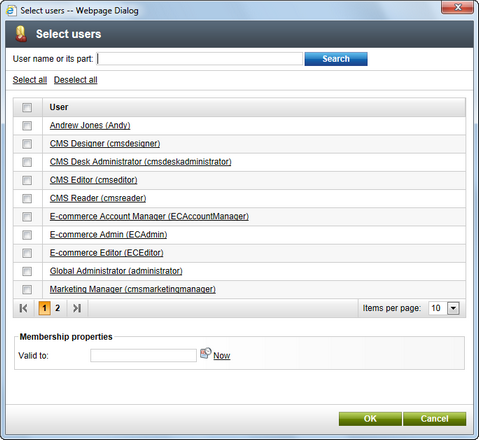
Only users who are assigned to the same site as the role can be chosen (global roles may be assigned to all users in the system). You can enter a name or its part into the textbox above the list and click Search to quickly find any user. The Valid to field at the bottom of the dialog can be used to assign users to the role for a limited time only. The ![]() Calendar button can be clicked to easily select the exact date and time when the role should expire for the user. If this field is left empty, the users will be assigned to the role for an unlimited time period. Click OK to apply any changes.
Calendar button can be clicked to easily select the exact date and time when the role should expire for the user. If this field is left empty, the users will be assigned to the role for an unlimited time period. Click OK to apply any changes.
The ![]() Change validity action that is available for every listed user may be used to prolong or shorten the time interval for which the user should be assigned to the role. This way you can set an expiration date or reactivate expired roles for users.
Change validity action that is available for every listed user may be used to prolong or shorten the time interval for which the user should be assigned to the role. This way you can set an expiration date or reactivate expired roles for users.
Users can be removed from the role at any time using the checkboxes in the list together with the Remove selected button.
On this tab you can configure which permissions should be assigned to the given role. If you wish to add permissions, select the type of the permission that you wish to assign using the two drop-down lists. Once this is done, individual permissions for the specified module or document type will be displayed below and can be enabled by checking the corresponding boxes.
From the this tab, you can choose which parts of the CMS Desk interface will be displayed to members of the given role. You can also change the settings of the WYSIWYG Editor for this particular role.
Individual interface elements can be configured from the Dialogs sub‑tab. This is where you can select a module from the Module drop-down list and then enable or disable the visibility of individual dialogs by checking the corresponding boxes. Only dialogs that are checked will be displayed to users assigned to the given role. You can easily reach nested dialogs by clicking the ![]() Expand all and
Expand all and ![]() Collapse all links, respectively. You can also expand and collapse dialogs on different levels of the dialogs tree. If you would like to adjust WYSIWYG Editor settings for the given role, switch to the Editor tab. You can make adjustments in a similar way as with dialogs.
Collapse all links, respectively. You can also expand and collapse dialogs on different levels of the dialogs tree. If you would like to adjust WYSIWYG Editor settings for the given role, switch to the Editor tab. You can make adjustments in a similar way as with dialogs.
For more information, please see the UI personalization chapter.
