|
|

Configuration for REST |

|

|

|

|
|
Configuration for REST |
|
|

|
|
|
|
Configuration for REST |
|
|
|
|
|
Configuration for REST |
|
|
|
|
|
|
||
Once you meet the pre-requisites for using the REST service, you need to make additional settings on the level of the Kentico CMS instance:
1. First, you need to add an attribute to the <modules> element in the system.webServer section of your web.config file:
<modules runAllManagedModulesForAllRequests="true"> |
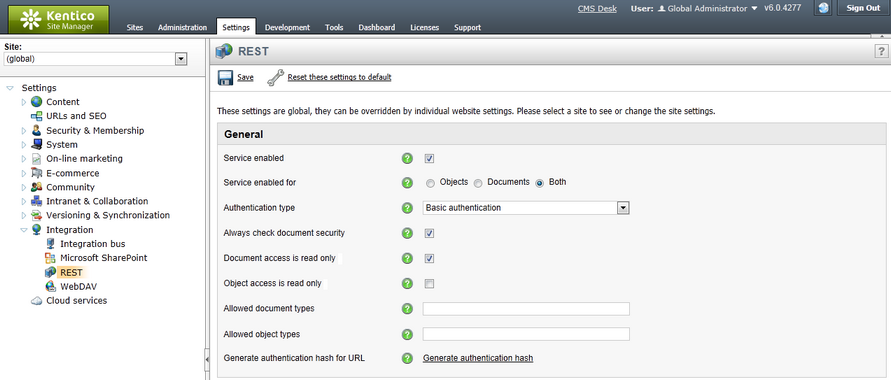
2. Go to Site Manager -> Settings -> Integration -> REST and adjust related settings.
The following settings are available:
Service enabled |
Enables or disables the Kentico CMS REST service. |
Service enabled for |
Allows to choose if the REST service should be used for access to objects, documents or both. |
Authentication type |
Determines which type of authentication will be used by the REST service. Supported types are Basic and Forms authentication. |
Always check document security |
If disabled, security is not checked when accessing published versions of documents. If enabled, security is always checked. |
Document access is read only |
If enabled, only GET document requests can be processed by the service and documents can't be modified by the service. |
Object access is read only |
If enabled, only GET object requests can be processed by the service and objects can't be modified by the service. |
Allowed document types |
List of document types which will be accessible by the service. If the field is empty, all document types will be accessible. |
Allowed object types |
List of object types which will be accessible by the service. If the field is empty, all object types will be accessible. |
Generate authentication hash for URL |
Click the link to open a dialog where you can generate an authentication hash for a specified URL. This hash can be used instead of authentication afterwards to access specified data. |
If you are planning to upload large-size data into Kentico CMS through the REST service, it is required to specify the required data size limit in the instance's web.config file. This can be done by adding the following piece of code directly under the root element of the web.config file.
Please note that the code sample below sets all limits to 10 MB, while you may need to specify different values according to your specific needs. The baseAddress in the code below has also only a sample value and needs to be replaced with the actual root address of the REST service.
<system.serviceModel> <bindings> <!-- Customizations for REST service --> <webHttpBinding> <!-- Limits set to 10 MB (specified value in bytes) --> <binding name="RESTQuotaBinding" maxReceivedMessageSize="10485760" maxBufferPoolSize="10485760" maxBufferSize="10485760" closeTimeout="00:03:00" openTimeout="00:03:00" receiveTimeout="00:10:00" sendTimeout="00:03:00"> <readerQuotas maxDepth="32" maxStringContentLength="10485760" maxArrayLength="10485760" maxBytesPerRead="10485760" /> <security mode="None" /> </binding> </webHttpBinding> </bindings> <services> <service name="CMS.RESTService.RESTService"> <host> <baseAddresses> <add baseAddress="http://<your website domain>/rest" /> </baseAddresses> </host> <endpoint address="" bindingConfiguration="RESTQuotaBinding" binding="webHttpBinding" contract="CMS.RESTService.IRESTService" /> </service> </services> </system.serviceModel> |