|
|

Managing campaigns |

|

|

|

|
|
Managing campaigns |
|
|

|
|
|
|
Managing campaigns |
|
|
|
|
|
Managing campaigns |
|
|
|
|
|
|
||
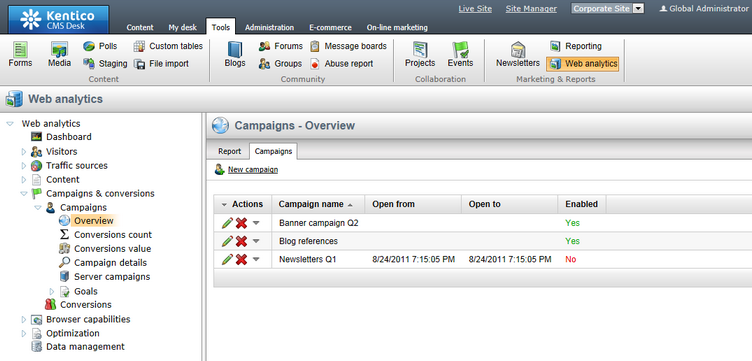
Each marketing campaign is represented in the system by a corresponding object. To configure these objects, go to CMS Desk -> Tools -> Web analytics and expand the Campaigns & conversions -> Campaigns category in the tree. Now select one of the displayed items and switch to the Campaigns tab on the right side of the page (alternatively, this interface may be accessed through CMS Desk -> On‑line marketing -> Campaigns).
Here you can view the list of all campaigns defined for the current website and manage them as needed.
To create a new campaign, click the ![]() New campaign link and fill in the following properties:
New campaign link and fill in the following properties:
•Campaign display name - the name of the campaign displayed in the administration interface (in campaign lists and reports).
•Campaign name - sets a code name that serves as a unique identifier for the campaign. It is also stored as the value of the Campaign browser cookie used to identify visitors who came to the website through the given campaign.
•Campaign description - can be used to enter a text description for the campaign in order to give information about its purpose, goals, etc.
•Open from/to - sets the time interval during which the campaign should be active. The Calendar button (![]() ) can be used to select an exact date and time.
) can be used to select an exact date and time.
•Enabled - this property may be used to manually start or stop the campaign. Visitor statistics and actions will not be logged for disabled campaigns.
Click OK. The General tab of the campaign's editing interface will now be displayed, where you can modify the fields listed above at any time. Several additional properties are also available.
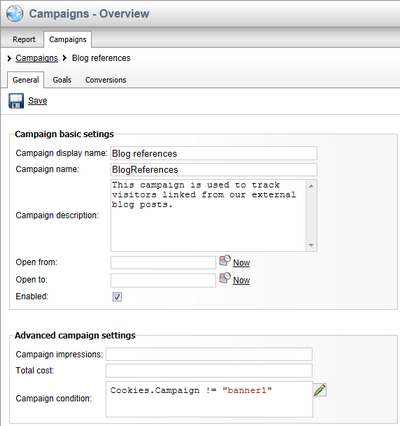
The Campaign impressions and Total cost values may be used to help evaluate the campaign and calculate its goals (for more information, please see Evaluating campaigns).
An important property is the Campaign condition, which allows you to specify a macro condition that must be fulfilled in order for visitors to be included in the campaign. Through the edit icon (![]() ), you can use the Macro condition editor, which provides a graphical interface that makes it easier to build complex conditions.
), you can use the Macro condition editor, which provides a graphical interface that makes it easier to build complex conditions.
For example: Cookies.Campaign != "banner1"
This sample condition checks the value of the Campaign cookie and prevents the edited campaign from being assigned to visitors who are already being tracked by a different campaign named banner1. You can write any other type of condition according to your specific requirements. For details about available macro options and syntax, please refer to the Development -> Macro expressions chapter.
If you switch to the Conversions tab, you can configure which conversions should be tracked by the campaign. There are two possible options:
•All conversions will be tracked for the campaign - if chosen, any conversion hit logged on the entire website will be included in the campaign's statistics.
•Only the selected conversions will be tracked for the campaign - this option allows you to limit which conversions should be tracked. Specific conversions may be assigned to the campaign by clicking the Add conversions button and choosing from the list in the displayed dialog.
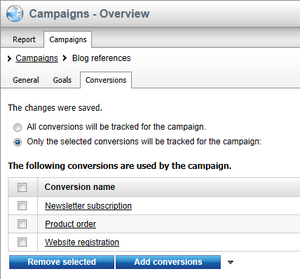
In both cases, only conversions performed by visitors who arrive on the website as a result of the given campaign will be logged.
In order to correctly identify visitors who access the website through a marketing campaign and ensure that they are assigned to the appropriate campaign tracking object, you can use one of the three approaches described below.
1. URL parameter
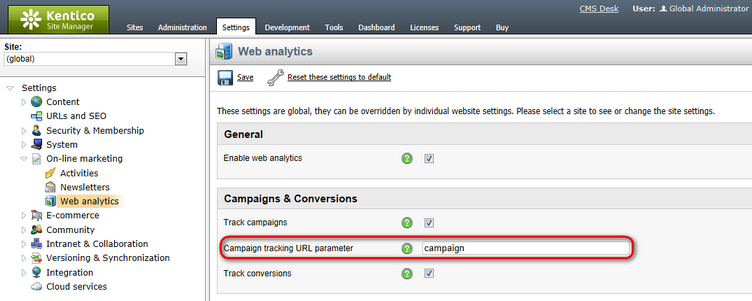
This method utilizes a URL query string parameter to indicate that the traffic source is a campaign. All you need to do is enter the name of the parameter that you wish to use into the Site Manager -> Settings -> On‑line marketing -> Web analytics -> Campaign tracking URL parameter setting (e.g. campaign).
Then, ensure that all link URLs used in the campaign's marketing materials contain this parameter, with the name of the appropriate campaign object as the value. For example:
http://www.mywebsite.com/Home.aspx?campaign=banner1
http://www.mywebsite.com/News.aspx?campaign=newsletterJune
This type of campaign tracking is not limited to a specific document and works for all pages on the website.
2. Document specific campaigns
Alternatively, you can configure a document to behave as a campaign landing page. When this type of page is viewed by a user, a specified campaign will automatically be assigned. A visit will also be logged for the campaign every time the document is requested.
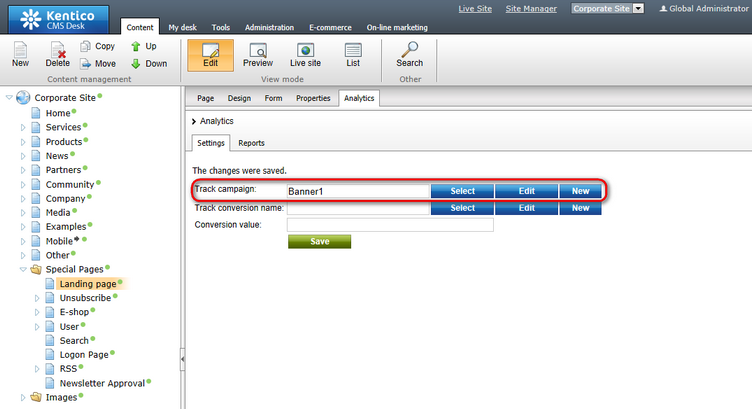
To enable this functionality for a page, go to CMS Desk -> Content -> Edit, select the given document from the content tree and switch to its Analytics -> Settings tab. Here, enter the name of a campaign into the Track campaign field. The Select button allows you to choose from a list of existing campaign objects available for the website. Edit and New may be used to manage campaigns directly from this dialog.
To ensure accurate campaign tracking, it is recommended to create a special page that will not be available in the website's standard navigation, since the campaign will be assigned to all users who view this page (and repeated views by the same user will also be logged as campaign visits). When using this approach, all of the campaign's links need to be directed at this special landing page.
3. Campaigns for document aliases
You can also define campaign tracking for a page's specific document alias. This approach is useful if you wish for the campaign to link visitors to an easily accessible page, but want to avoid using a query string parameter. The campaign will only be assigned to users who access the document through this alias.
To add a document alias to a page, select it from the content tree in CMS Desk and go to Properties -> URLs. Here, click the ![]() Add new alias link and configure its settings in the displayed dialog. Select Standard URL or wildcard, enter a suitable path into the Path or pattern field and then specify the name of the campaign in the Track campaign property.
Add new alias link and configure its settings in the displayed dialog. Select Standard URL or wildcard, enter a suitable path into the Path or pattern field and then specify the name of the campaign in the Track campaign property.

Click OK to create the alias. Now you can use the URL of this alias in the campaign's links, for example: http://www.mywebsite.com/Campaigns/Home.aspx
The campaign tracking methods are listed in the order of their priority. So if a campaign is specified for a document through Settings -> Analytics, but the page is accessed via a URL containing a tracking parameter, the campaign specified via the parameter will be assigned to the given visitor.
|
Automatic campaign creation
When a visitor comes to the website through an undefined campaign (typically specified via the tracking URL parameter), it will be ignored by default and no campaign tracking will be performed.
If you wish to change this behaviour, edit your application's web.config file and add the following key to the /configuration/appSettings section:
Once this is done, unknown campaigns will automatically be added to the list of campaign objects for the given website.
Campaigns created this way will be enabled by default and active for an unlimited time interval, but they can be configured using the same approach as mentioned above at any time. |
