|
|

Importing a site or objects |

|

|

|

|
|
Importing a site or objects |
|
|

|
|
|
|
Importing a site or objects |
|
|
|
|
|
Importing a site or objects |
|
|
|
|
|
|
||
After you export some site or objects using the Export site wizard or Export objects wizard, you can import it using the Import site or objects wizard. Before you start the wizard, you need to copy your exported packages into the <web project>\CMSSiteUtils\Import folder.
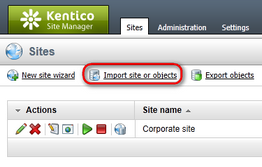
1. Go to Site Manager -> Sites and click Import site or objects.
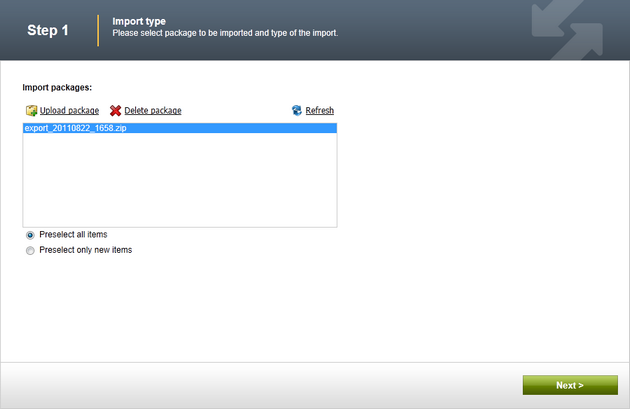
2. In the first step of the wizard, you need to choose the import package that you want to import. Packages that are already stored in the in <web project>\CMSSiteUtils\Import folder are listed in the Import packages listbox.
You can upload additional packages to the folder (and hence add them to the list) using the Upload package (![]() ) link. You can also add the package to the folder manually and click the Refresh (
) link. You can also add the package to the folder manually and click the Refresh (![]() ) link for it to get displayed in the list. Packages can be deleted (both from the list and from the file system) using the Delete package (
) link for it to get displayed in the list. Packages can be deleted (both from the list and from the file system) using the Delete package (![]() ) button.
) button.
With a package selected, you can choose from the following options:
Preselect all items |
If selected, all items in the package will be preselected in the next step. |
Preselect only new items |
If selected, only items that are not already in the database will be preselected. |
Make the desired selection and proceed to the next step by clicking the Next button.
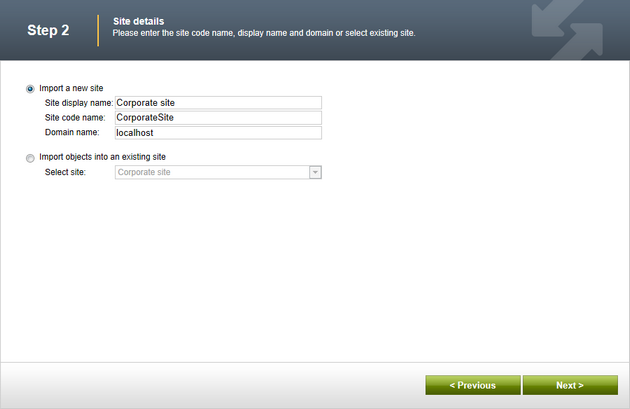
3. Step 2 will be displayed only when you are importing a site package. In case that you are importing a package containing only global objects, Step 3 will be displayed instead.
You have the following two options in Step 2:
Import a new site |
When chosen, a new site will be created based on the contents of the package. You have to enter the site's display name, code name and domain name. |
Import objects into an existing site |
When chosen, contents of the package will be imported into the site chosen by the check-box below. |
Click the Next button to proceed to the next step.
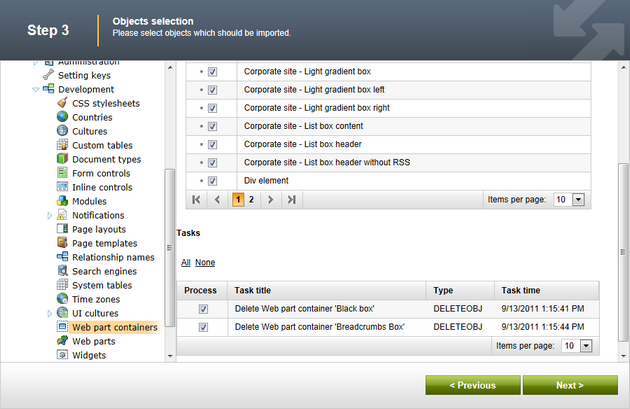
4. In Step 3, you can select which of the objects from the package will be imported. The tree on the left represents object categories. These reflect the sections of the administration interface under that the objects can be found. By selecting a category, a set of check boxes appears in the right part of the screen, letting you select which objects will be imported. Objects that already exist on the target server are marked with *. If you leave the check-box of such object checked, this existing object will be overwritten with the newly imported one.
If you select the root of the tree (Import objects), a number of global choices will be offered to you:
Global selection |
|
Load default selection |
If clicked, object preselection will be done based on your choice in Step 1. |
Select all objects |
If clicked, all objects will be preselected. |
Select only new objects |
If clicked, only objects not existing in the database will be preselected. |
Deselect all objects |
If clicked, all objects will be deselected. |
Import settings |
|
Update site definition |
Displayed only when importing to an existing site. If enabled, all settings stored as a part of the site object will be updated with those contained in the package. These settings are contained in the Site\cms_site.xml file inside the export package. |
Assign all objects to the imported site (recommended) |
If enabled, all imported site-related objects will be assigned to the imported site. |
Run the site after import |
If enabled, the imported site will be run after the import process finishes. |
Delete incomplete site when import fails |
If enabled, incompletely imported site will be deleted when the import process fails. |
Do not import objects where parent object is missing |
If enabled, child objects whose parent objects are not found will be skipped and the import process will continue. |
Import tasks (recommend) |
If enabled, delete tasks (incremental deployment) included in the package will be performed. |
Import files (recommended) |
Some objects in the database are linked with physical files in the file system. If you check this check-box, such files contained in the package will be imported too. |
Import global folders |
If checked, global files originally found under the folders listed below will be imported: - <web project>\App_Code\Global - <web project>\CMSGlobalFiles |
Import assembly files |
If enabled, bound assembly files will be imported together with notification gateways, payment options, integration connectors, scheduled tasks and smart search indexes if they are included in the package. |
Import site folders |
If checked, files originally found under the folders listed below will be imported: - <web project>\App_Code\<site code name> - <web project>\<site code name> |
Log staging synchronization tasks |
Indicates if staging tasks reflecting changes made by the import should be logged on the target server (typically when you want to synchronize the imported data to other staging servers). |
Log integration tasks |
Indicates if outgoing integration tasks should be logged for changes made by the import (typically when you want to transfer the imported data to a system connected via System integration bus). |
Overwrite system queries |
If checked, system queries will be overwritten by those contained in the package. See the info box below for more details. |
|
Overwrite system queries
This option is only displayed when importing from version older than the current one. If checked, all queries from the package will be imported and will overwrite the current ones; if the package contains your own custom queries that you added to the system, it is necessary to have this option enabled.
|

5. The following categories contain extra options to be set:
Custom tables |
|
Import custom table data |
If checked, custom table records (the actual data stored in the tables) included in the package will be imported together with the respective custom tables. If you are importing to an existing site, this option is disabled by default. |
Documents |
|
Import new documents |
If enabled, documents included in the import package will be imported.
Please note: when importing into an existing site, only new documents can be imported. Modified documents that are already present on the target server will not be overwritten. |
Import document histories |
If enabled, document histories (i.e. previous versions of documents) will be imported. |
Import document relationships |
If enabled, document relationships will be imported. |
Import document-level permissions |
If enabled, document security settings made in CMSDesk -> Content -> Edit -> Properties -> Security will be imported. |
Import blog comments |
If enabled, blog comments will be imported together with blog post documents. |
Import event attendees |
If checked, event attendees will be imported together with all imported events. |
Import all user personalization |
If checked, user personalization of all users will be imported, even for users who are not selected to be imported. If you are importing to an existing site, this option is de-selected by default. |
Forms |
|
Import form data |
If enabled, forms data included in the package will be imported together with the forms. |
Import physical files data |
If checked, physical files saved within form records (if there are some) will also be imported. |
Forums |
|
Import forum posts |
If enabled, forum posts included in the package will be imported together with the forums. |
Groups |
|
Import all group memberships |
If enabled, user memberships will be imported together with the selected groups. |
Message boards |
|
Import board messages |
If enabled, board messages included in the package will be imported together with the message boards. |
Media libraries |
|
Import media files |
If enabled, media files (stored in database) included in the package will be imported together with the media libraries. |
Import physical files |
If enabled, physical files (stored in the file system) included in the package will be imported together with the media libraries. |
Page templates |
|
Import all site specific page template scopes |
If checked, site-specific page template scopes will be imported for all page templates, even if a page template itself is not selected to be imported. This check-box is only displayed with page templates in the Global section of the tree and only when the import package contains an exported website, not only separate objects. If you are importing to an existing site, this option is de-selected by default. |
Import web part and zone variants with the selected page templates |
If checked, web part and zone variants (from MVT testing or Content personalization) included in the package will be imported together with the selected page templates. |
Users |
|
Import user dashboards |
Indicates if user dashboards should be imported together with the imported users. If you are importing to an existing site, this option is de-selected by default so that existing dashboards are not overwritten. |
Import all user site specific dashboards |
If checked, all user dashboards will be imported, even if the respective users are not selected to be imported. This check-box is only displayed when the import package contains an exported website, not only separate objects. If you are importing to an existing site, this option is de-selected by default so that existing dashboards are not overwritten. |
Workflows |
|
Import all workflow scopes |
If checked, all workflow scopes will be imported, even if a respective workflows are not selected. Import web part and zone variants with the selected page templates. This check-box is only displayed when the import package contains an exported website, not only separate objects. If you are importing to an existing site, this option is de-selected by default. |
6. If you have the "Log export tasks" option enabled in Site Manager -> Settings -> Versioning & Synchronization -> Staging, a list of tasks may also be displayed under the objects list. This happens when some global objects were deleted (just as the two Web part containers in the screenshot below). If you leave the check-boxes checked, these objects will be deleted on the target server.
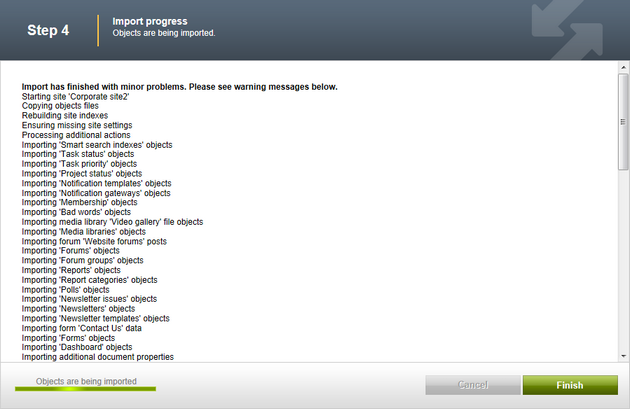
7. Finally, click Next to execute the import process. An import log will be displayed, showing the progress of importing (you can abort importing by clicking the Cancel button any time). Click the Finish button. You will be redirected back to Site manager -> Sites, where the newly imported site will be running.
|
Please note
Packages from different versions of Kentico CMS have different structure. When importing packages from an older version of Kentico CMS to a newer one, structure of the package is always converted to the newer format automatically.
Please pay special attention when importing Form user control, Inline control and Web part objects from older packages. If possible, avoid overwriting your current objects of these types with objects from older packages, as it may cause incompatibility problems.
|
If the imported site uses the same domain name or alias as one of the websites that already run on your server, you may get an error message at the end of the import:
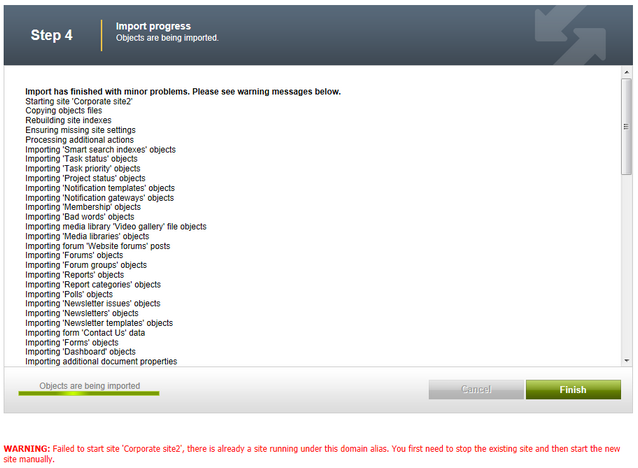
In such case, you need to go to the Sites section, change the domain name or domain alias and start the new website manually using the Start site button.
|
Application restart
At the end of the import process, you may get the following error message:
"Application has been restarted and the logging of the import process has been terminated. Please see context help in this section for more details and how to solve this issue."
If so, you will have to finish the import process manually:
1. Open the import package and extract all contents of the <package>\Data\Files folder.
2. Remove the .export extension from names of all files in all extracted sub-folders.
3. Rename all folders named ##SITENAME## to the code name of the target website and copy them to the root of the web project.
4. Copy all contents of the cms_attachments folder (if it is present among the extracted folders) to the location in the target project where document attachments are stored (as configured in Site Manager -> Settings -> System -> Files). Please note that this is applicable only when the system is configured to store document attachments in the file system (not in the DB).
5. Copy all contents of each folder named as an object type (e.g. cms_avatar, cms_documenttype, forums_forum, etc.) to the root of the web project.
|


