|
|

Defining a workflow |

|

|

|

|
|
Defining a workflow |
|
|

|
|
|
|
Defining a workflow |
|
|
|
|
|
Defining a workflow |
|
|
|
|
|
|
||
Workflow settings can be managed in Site Manager -> Development -> Workflows.
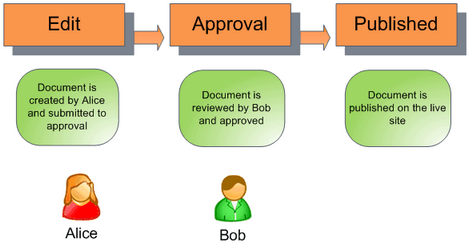
In this topic, we will create a sample workflow which will be used in the following topics. The workflow can be described as follows:
•Any editor will be able to create a news item in the /News section of the website.
•Then, the news item must be approved by one of the members of the PR Managers role. Users authorized to approve the document in the given step are also authorized to modify the document in the step.
•Approved news item is published on the website.
This a simple example of a typical real-world workflow containing custom steps. It is also possible to configure a workflow so that it contains no custom steps and is used just for versioning purposes. Configuration of such workflow is described in the Versioning without workflow topic.
Before we configure the workflow, we will create testing users and testing roles whose members the users will be.
1. Go to Site Manager -> Administration -> Users and click New user (![]() ). Create a new user with following details:
). Create a new user with following details:
•User name: Alice
•Full name: Alice Murphy
•E-mail: <your e-mail>
•Enabled: yes
•Is editor: yes
Click OK. Go to the Sites tab and assign the user to your current website. Go to the Roles tab and assign the user to the CMS Editors role of the given website.
2. Create another user with the following details:
•User name: Bob
•Full name: Bob Johnson
•E-mail: <your e-mail - you may want to use a different e-mail for testing purposes>
•Enabled: yes
•Is editor: yes
Click OK. Go to the Sites tab and assign the user to your current website. Go to the Roles tab and assign the user to the CMS Editors role of the given website.
3. Go to Site Manager -> Administration -> Roles, choose the appropriate site from the Site drop-down-list and click New role (![]() ). Enter the following details:
). Enter the following details:
•Role display name: PR Managers
•Role code name: PRManagers
Switch to the Users tab and add user Bob Johnson to this role. As you can see, Alice is the news editor (because of the CMS Editors role) and Bob is the PR Manager who will approve the news (PR Managers role) and he can also edit the news (CMS Editors role).
|
Please note
The PR Managers role has no permissions configured for the purpose of this example. This means that if a user was a member of just this single role, they would not be able to perform a full range of tasks such as creating, editing or deleting documents, etc. In your real website, you would typically need to go to Site Manager -> Administration -> Permissions and grant appropriate permissions to the role, especially those in the Modules -> CMS Content permission matrix.
Please see the Development -> Membership, permissions and security -> Permissions chapter for detailed information on how to do this. |
With the testing users and roles defined, we may start creating the actual workflow.
4. Go to Site Manager -> Development -> Workflows, click New workflow (![]() ) and enter the following values:
) and enter the following values:
•Display name: News approval
•Code name: NewsApproval
•Automatically publish changes: disabled
•Use check-in/check-out: No
Click OK to create the workflow.
If you switch to the Steps tab, you should see that each workflow has three default steps:
•Edit - the document was created or modified after it was published.
•Published - the document is published on the live site. When you edit such a document, it's automatically moved to the Edit step.
•Archived - the document is not published on the live site, but it remains in the content repository.
We will add one extra custom step to the workflow.
5. Switch to the Steps tab and click Add workflow step (![]() ). Enter the following details in the displayed dialog:
). Enter the following details in the displayed dialog:
•Display name: Approval
•Code name: Approval
Click OK. In the workflow step editing interface, switch to the Roles tab. Choose the appropriate website in the drop-down list and add the PR Managers role to the list. Now the PR Managers are authorized to edit, approve or reject documents in this step.
When you view the list of workflow steps now, it looks as in the screenshot below. As you can see, the custom steps are placed between the Edit and Published steps. If there is more than one step, you can change their order using the up (![]() ) and down (
) and down (![]() ) arrows.
) arrows.

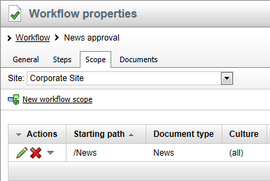
Workflow scopes define which documents should the workflow be applied to.
6. Switch to the Scopes tab, choose the appropriate website from the drop-down list and click New workflow scope (![]() ). Enter the following details:
). Enter the following details:
•Starting alias path: /news (this is the section of the website for which the workflow will be applied)
•Document type: News
•Culture: (all)
Click OK.
You have configured the workflow process for the news documents. In the Using workflow topic, you will learn how the workflow works in our sample scenario.
|
Using workflow for the root document
It is possible to set up a workflow so that it is applied to the root document of your content tree. This may be useful in some cases, but you always have to be careful if you choose this setup.
The reason for this is that the root document provides not only the master page, but also base settings for all documents that inherit them. If you setup workflow on the root, it may eventually happen that the document gets unpublished for some time if an editor is not careful. This can break the entire site for all public visitors for that time.
|
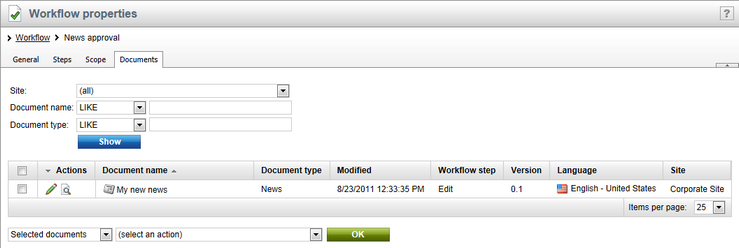
On the Documents tab of a workflow's editing interface, you can see a list of documents that are using the workflow. Clicking a document in the list opens it for editing in CMS Desk -> Edit.
The following actions can be performed with documents in the list. These actions are also useful if you want to finish the documents' workflow:
•Publish and finish workflow - the new version of the document will be approved and published
•Remove workflow and keep currently published data - the original version of the document remains published and all the changes will be discarded
Based on the selection in the first drop-down list, these actions can be performed for:
•All documents - the action will be performed with all documents
•Selected documents - the action will be performed with documents selected by the check-boxes (![]() )
)