|
|

Creating custom tables |

|

|

|

|
|
Creating custom tables |
|
|

|
|
|
|
Creating custom tables |
|
|
|
|
|
Creating custom tables |
|
|
|
|
|
|
||
In the following example, we will create a new custom table using the New custom table wizard. It will be a simple table for storing information about people. Each data record in the table will contain a person's first name, last name and date of birth.
1. Go to Site Manager -> Development -> Custom tables and click the New custom table (![]() ) link.
) link.
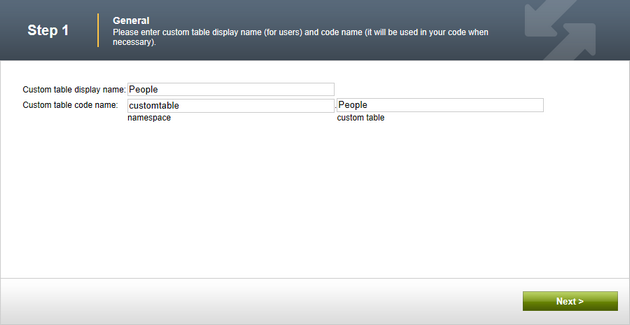
2. The New custom table wizard starts. In the first step, you are asked to fill in the custom table's display name (used in Kentico CMS user interface) and code name (used in website code). The code name is always preceded by a namespace, which allows you to have different tables of the same name used in different contexts. Enter the following details:
•Custom table display name: People
•Custom table code name: customtable.People
and click Next to continue.
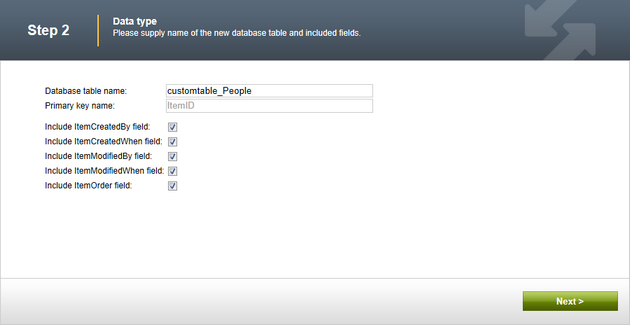
3. In the second step, you are asked to fill in the database table name, i.e. the actual name of the table in the system database. A name in the <namespace>_<code name> format is pre-filled automatically. The primary key name cannot be changed by default. Using the check-boxes below, you can determine which of the default fields should be included in the table:
•ItemCreatedBy - user name of the user who created the item
•ItemCreatedWhen - date and time of when the item was created
•ItemModifiedBy - user name of the user who last modified the item
•ItemModifiedWhen - date and time of last modification
•ItemOrder - order of the item when table content list is displayed; the lower number, the earlier position in the list
For the purposes of this example, leave default values for all options and click Next to continue.
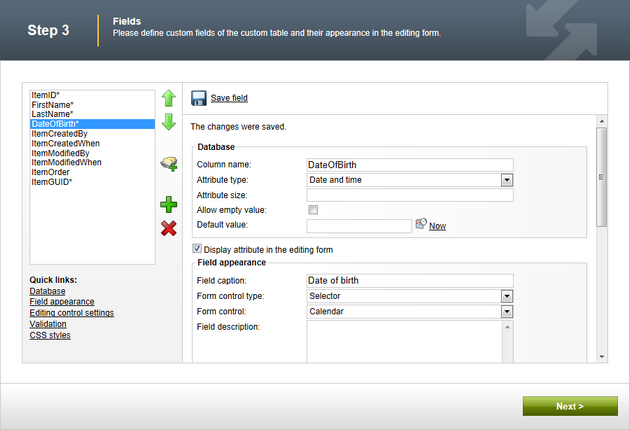
4. In the third step, the field editor is displayed. It lets you define which columns will be included in the database table. Create three fields using the New attribute (![]() ) button with the following properties:
) button with the following properties:
•Column name: FirstName
•Attribute type: Text
•Attribute size: 100
•Field caption: First name
•Form control type: Input
•Form control: Text box
•Column name: LastName
•Attribute type: Text
•Attribute size: 100
•Field caption: Last name
•Form control type: Input
•Form control: Text box
•Column name: DateOfBirth
•Attribute type: Date and time
•Field caption: Date of birth
•Form control type: Selector
•Form control: Calendar
•Editing control settings -> Edit time: unchecked
It is necessary to click the ![]() Save field button to create each individual field.
Save field button to create each individual field.
When you are finished, click Next to proceed to the following step.
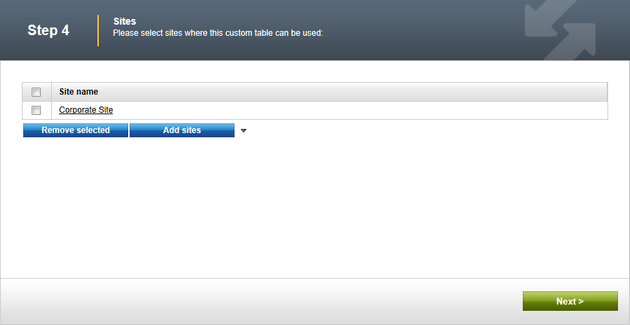
5. In Step 4, you only have to select in which sites will the custom table be available. Click Add sites and choose Corporate Site in the pop-up dialog. Finally click Next to proceed to the following step.
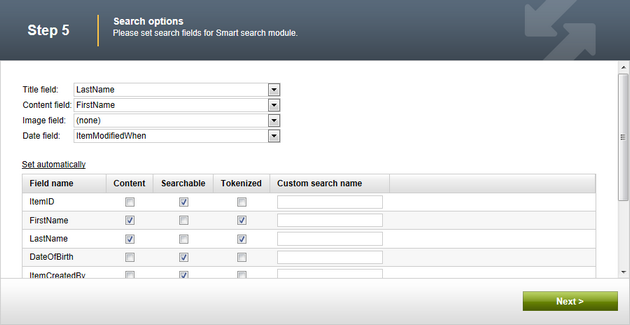
6. Step 5 offers you the option of configuring the indexing of data in the custom table by the Smart Search module. The four drop-downs at the top determine which fields of the table will be displayed in search results. Change the values to the following:
•Title field: LastName
•Content field: FirstName
•Image field: none
•Date field: ItemModifiedWhen
Leave the rest of the settings at default values and click Next. For more information about settings in this step, please refer to Modules -> Smart search -> Object settings.
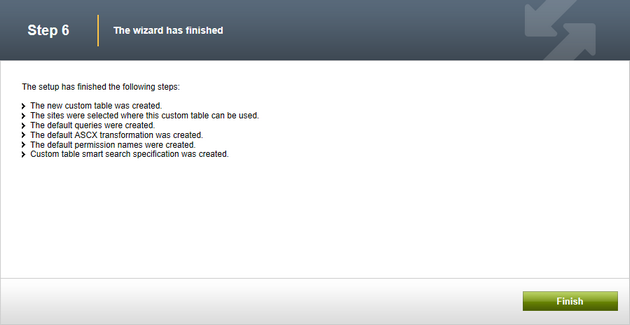
7. The fifth step gives you an overview of what has been done automatically by the wizard. To finish the wizard, click Finish. You will be redirected back to the list of custom tables in Site Manager -> Development -> Custom tables.