|
|

Creating the Master page |

|

|

|

|
|
Creating the Master page |
|
|

|
|
|
|
Creating the Master page |
|
|
|
|
|
Creating the Master page |
|
|
|
|
|
|
||
As we have the site created and the pre-development tasks carried out, we can start defining the master page. The master page is represented by the root of the content tree. It is the page from which all other pages inherit the default content, such as the main menu, header image, etc. Like this, you can avoid laborious adding and setting of these elements for all pages. Instead, you only use them on the master page and all other pages will inherit it.
In Step 5 of the New site wizard, we chose to use the Blank master page page template. This is the most simple master page with two web part zones. As we want the master page to be a bit more complex, we will have to modify its layout.
Further information on master pages can be found in chapters The master page concept and Editing the master page of Kentico CMS Developer's Guide.
1. The master page uses the Blank master page page template. If you made any changes to the page now, the changes would be reflected on the page template too so that the original page template definition would be overwritten and could not be reused anymore.
To prevent this, you need to save the page as a new page template. We will stick to this practice throughout the whole guide.
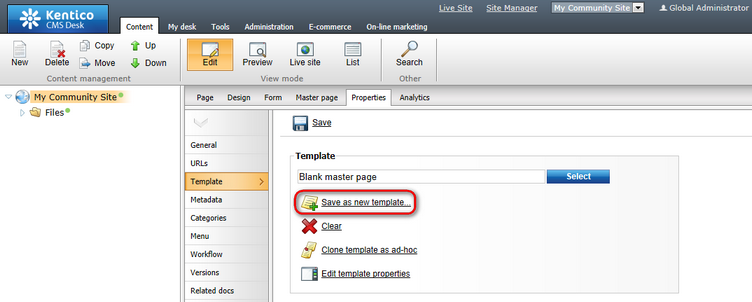
Go to CMS Desk -> Edit, select the master page from the content tree and switch to the Properties -> Template tab. Click the Save as new template link.
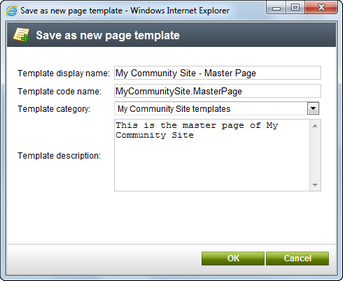
2. In the pop-up window, enter the following details:
•Template display name: My Community Site - Master Page
•Template code name: MyCommunitySite.MasterPage
•Template category: My Community Site templates
•Template description: some text describing the template
Click OK.
3. Now we can start making modifications to the page. First, we will re-define the page layout so that we get more web part zones on the page. Switch to the Master page tab and replace the original layout in the main text area (within the <body> tags) with the following piece of code.
Click Save to save the changes.
<!-- Top info --> <div class="zoneTopInfo"> <cc1:CMSWebPartZone ID="zoneTopInfo" runat="server" /> </div> <div class="mainDiv"> <div class="zoneTopMembership"> <cc1:CMSWebPartZone ID="zoneTopMembership" runat="server" /> </div> <div class="zoneTop"> <cc1:CMSWebPartZone ID="zoneTopImage" runat="server" /> </div> <div class="zoneTopMenu"> <cc1:CMSWebPartZone ID="zoneTopMenu" runat="server" /> <div class="clear"> </div> </div> <div class="zoneMain"> <cc1:CMSWebPartZone ID="zoneContent" runat="server" /> </div> <div class="zoneBottom"> <cc1:CMSWebPartZone ID="zoneBottom" runat="server" /> </div> </div> |
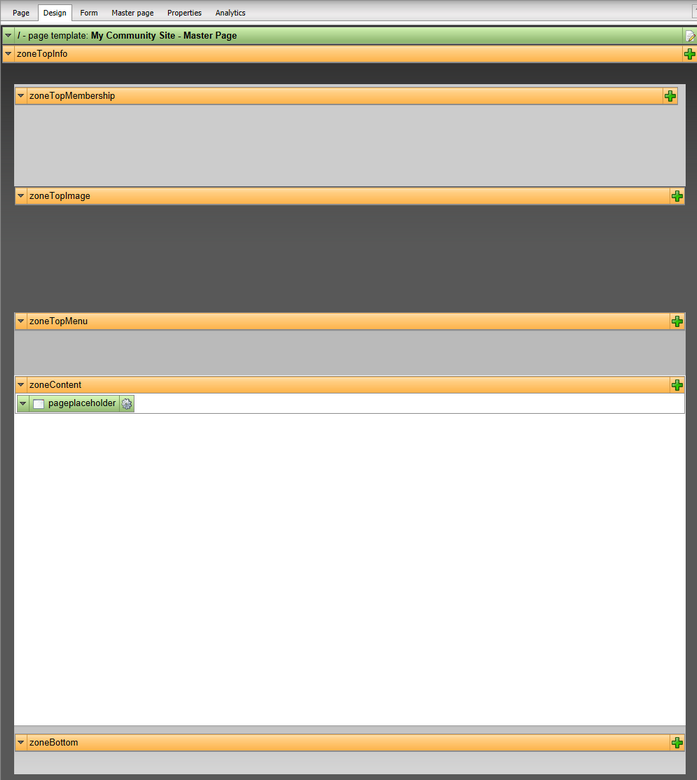
4. If you switch to the Design tab now, you should see that the master page has been populated with several web part zones. The layout is now ready and we can start populating the page with web parts.
5. Let's start from the top where the logon bar with links to CMS Desk and Site Manager is located.
Click the Add web part (![]() ) icon of zoneTopInfo. In the pop-up window, choose the Text -> Static text web part and click OK.
) icon of zoneTopInfo. In the pop-up window, choose the Text -> Static text web part and click OK.
In the web part properties window, you only need to set the value of the Text property. Use the following code for the value:
<div style="border: 1px solid #cecfce;background:#f7f3ef;color:#555555;font-weight:bold;padding:3px;font-size:10px;text-align:center"> Sign in to <a href="~/CMSPages/logon.aspx?ReturnUrl=~/cmsdesk/default.aspx&username=administrator">CMS Desk</a>. Sign in to <a href="~/CMSPages/logon.aspx?ReturnUrl=~/cmssitemanager/default.aspx&username=administrator">CMS Site Manager</a>. The default account is administrator with blank password. </div> |
Leave the rest of the properties at their default values and click OK. You should see the logon bar appear in the web part zone.
![]()
6. Let's move on to zoneTopMemebership. This web part zone will contain the sign in/out link, link to the current user's private messaging inbox, link to the current user's profile editing page and information about the current user with link to their public profile.
Click the Add web part (![]() ) icon, choose the Membership -> Sign out button web part and click OK. Set the following properties of the web part, leave the rest at the default values:
) icon, choose the Membership -> Sign out button web part and click OK. Set the following properties of the web part, leave the rest at the default values:
•Show as link: enabled
•Button text for sign out: Sign out
•Show only when authenticated: disabled
•Sign in page path: /Logon
•Return page path: /Home
•Content before: <div class="signOut">
•Content after: </div>
Click OK.
Click the Add web part (![]() ) icon again, choose the Messaging -> Messaging info panel web part and click OK. Set the following properties of the web part, leave the rest at the default values:
) icon again, choose the Messaging -> Messaging info panel web part and click OK. Set the following properties of the web part, leave the rest at the default values:
•Display to roles: _authenticated_
•Inbox link URL: ~/Members/Management/Messages.aspx
•Show outbox: disabled
•Show new message: disabled
•Content before: <div class="messagesPanel">
•Content after: " | </div>" (do not enter the parentheses, these are here to indicate that the string begins with a blank space)
Click OK.
Click the Add web part (![]() ) icon again, this time, choose the Text -> Static HTML web part and click OK. Set the following properties of the web part, leave the rest at their default values:
) icon again, this time, choose the Text -> Static HTML web part and click OK. Set the following properties of the web part, leave the rest at their default values:
•Display to roles: _authenticated_
•Content before: <div class="myAccountInfo">
•Content after: " | </div>" (do not enter the parentheses, these are here to indicate that the string begins with a blank space)
•Text: place the cursor into the text area, click the Source (![]() ) icon on the WYSIWYG editor toolbar and replace the original HTML code with the following code:
) icon on the WYSIWYG editor toolbar and replace the original HTML code with the following code:
<a title="My profile" href="/KenticoCMS_5.5/Members/Management.aspx">Edit my profile</a> |
You will also need to replace the KenticoCMS_5.5 string with the name of the virtual directory where your Kentico CMS project is located.
Click OK.
Click the Add web part (![]() ) icon again and finally choose the Membership -> Current user web part. Click OK. Set the following properties of the web part, leave the rest at their default values:
) icon again and finally choose the Membership -> Current user web part. Click OK. Set the following properties of the web part, leave the rest at their default values:
•Authenticated URL link: ~/Members/{%CurrentUser.UserName|(encode)true%}.aspx
•User text CSS class: userName
•Content before: <div class="currentUser">
•Content after: " | </div>" (do not enter the parentheses, these are here to indicate that the string begins with a blank space)
Click OK.
7. Next on is the zoneTopImage web part zone, where the header image should be placed. Click the Add web part (![]() ) icon of this web part zone and choose the Text -> Editable image web part. Set its following properties, the rest can be left at their default values:
) icon of this web part zone and choose the Text -> Editable image web part. Set its following properties, the rest can be left at their default values:
•Image width: 960
•Image height: 148
•Alternate text: Community Site
Click OK.
Now switch to the Page tab. The added web part is represented here only by the two link buttons as in the screenshot below. Click the Select button of the added web part.
![]()
7. In the pop-up window, select the previously uploaded community_header_img.jpg and click the Select button.
8. The header image is now at its place. Click Save to save the master page.

9. Now we need to populate the zoneTopMenu web part zone where the search box and the main menu will reside. Click the Add web part (![]() ) icon of this web part zone and choose the Full-text search -> Smart search box web part. Set the following properties of the web part, the rest can be left at their default values:
) icon of this web part zone and choose the Full-text search -> Smart search box web part. Set the following properties of the web part, the rest can be left at their default values:
•Disable view state: enabled
•Search button text: Search
•Search button CSS class: buttonSearch
•Search textbox CSS class: inputSearch
•Search results page URL: ~/Search.aspx
•Show search label: disabled
Click OK.
10. Let's add the main menu now. Click the Add web part (![]() ) icon of the zoneTopMenu web part zone again and choose the Navigation -> CSS list menu web part. Set the following properties of the web part, the rest can be left at their default values:
) icon of the zoneTopMenu web part zone again and choose the Navigation -> CSS list menu web part. Set the following properties of the web part, the rest can be left at their default values:
•Path: /%
•Document types: CMS.MenuItem;CMS.Blog
•Maximum nesting level: 1
•Render CSS classes: enabled
11. The zoneContent web part zone is where content of all the pages will be loaded. To achieve this behavior, you need to have the Page placeholder web part in the web part zone. As you can see, the web part has been added to the web part zone automatically, so you can go on to zoneBottom.
12. Finally, we will add the Kentico logo into the zoneBottom web part zone. Click the Add web part (![]() ) icon and choose the General -> Powered by Kentico web part. Replace the value of the Text property with the following code:
) icon and choose the General -> Powered by Kentico web part. Replace the value of the Text property with the following code:
<a href="http://www.kentico.com" title="Kentico CMS for ASP.NET - the WEB 2.0 Content Management System for .NET developers"><img border="0" src="~/App_Themes/CommunitySite/Images/Powered_by_kentico_cms.gif" alt="This website uses Kentico CMS, the content management system for ASP.NET developers." /></a> |
Click OK.
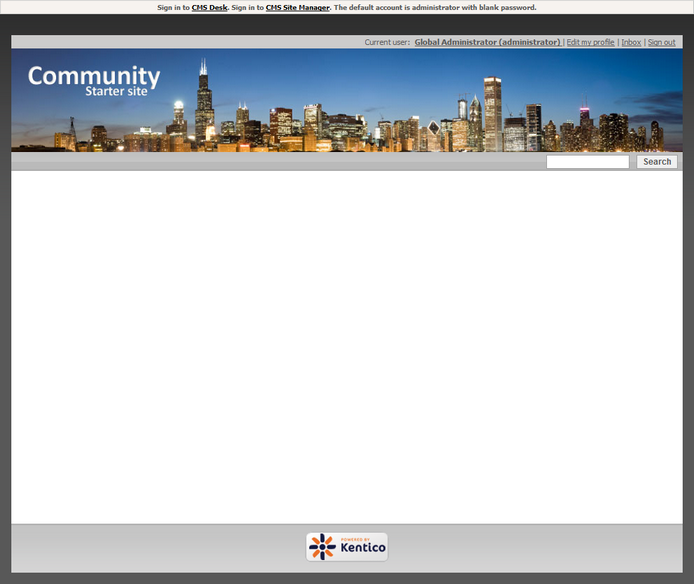
13. And that's us finished with the master page. If you switch to the Live site mode now, you should see the page appear as in the screenshot below. The main menu is not visible yet as there are no pages defined. The rest of the page is already at its required appearance. Content of all site's pages will be loaded into the main white zone where the Page placeholder web part resides.