|
|

Creating the Home page |

|

|

|

|
|
Creating the Home page |
|
|

|
|
|
|
Creating the Home page |
|
|
|
|
|
Creating the Home page |
|
|
|
|
|
|
||
In this chapter, you will see how to create the Home page. This is the initial landing page - the page that the site visitors will see at first when they enter the URL of your site into the browser. It is important to set the alias path of this page in Site Manager -> Settings -> Content -> Default alias path, as described here.
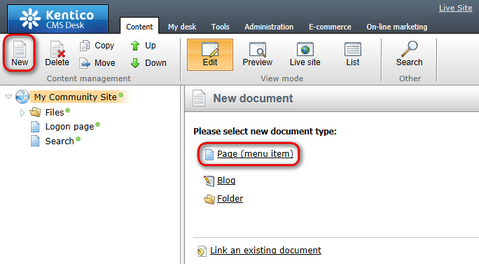
1. Go to CMS Desk, select the root of the content tree and click New. Choose the Page (menu item) document type.
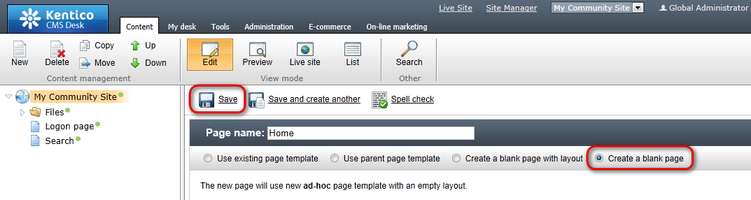
2. Choose the Create a blank page option. For Page name, enter Home and click Save.
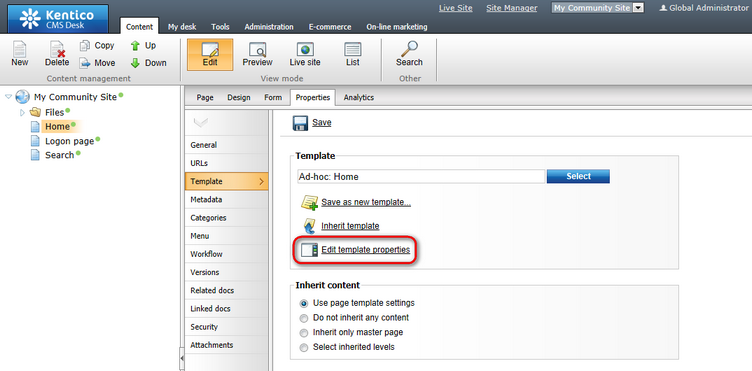
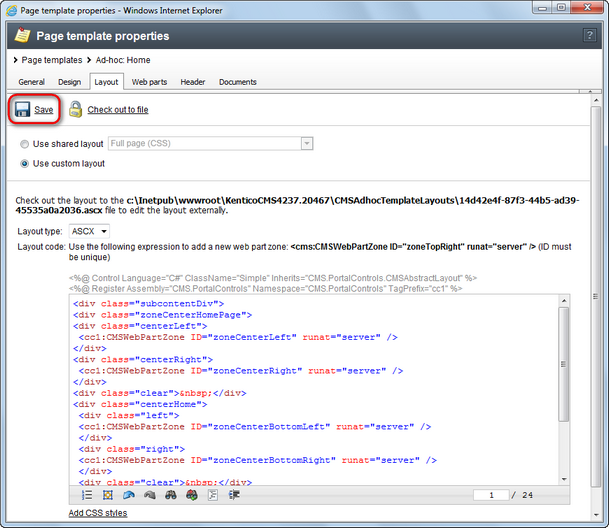
3. Switch to the Properties -> Template tab and click the Edit template properties link.
4. In the pop-up Page template properties window, switch to the Layout tab and replace the original layout with the following code:
<div class="subcontentDiv"> <div class="zoneCenterHomePage"> <div class="centerLeft"> <cc1:CMSWebPartZone ID="zoneCenterLeft" runat="server" /> </div> <div class="centerRight"> <cc1:CMSWebPartZone ID="zoneCenterRight" runat="server" /> </div> <div class="clear"> </div>
<div class="centerHome"> <div class="left"> <cc1:CMSWebPartZone ID="zoneCenterBottomLeft" runat="server" /> </div> <div class="right"> <cc1:CMSWebPartZone ID="zoneCenterBottomRight" runat="server" /> </div> <div class="clear"> </div> </div>
</div> <div class="zoneRight"> <cc1:CMSWebPartZone ID="zoneRight" runat="server" /> </div> <div class="clear"> </div> </div> |
Click Save.
5. Switch to the Design tab. You should see an empty page with five web part zones. Let's start with zoneRight, where the right side column with various info boxes will be placed. Click the Add web part (![]() ) icon of the zoneRight web part zone and choose the Membership -> Logon miniform web part. Set the following properties of the web part, leave the rest of them as they are:
) icon of the zoneRight web part zone and choose the Membership -> Logon miniform web part. Set the following properties of the web part, leave the rest of them as they are:
•Display to roles: _notauthenticated_
•Logon failure text: Error logging in.
•Web part container: Community Site - Red Box
•Web part container title: Sign in
Click OK. The next web part to add is the handy Shortcuts web part, displaying shortcuts to various actions and sections depending on the current context. Click the Add web part (![]() ) icon again, choose the Community -> Shortcuts web part and click OK. In the web part properties window, set the following properties:
) icon again, choose the Community -> Shortcuts web part and click OK. In the web part properties window, set the following properties:
•Display Join/Leave the group link: disabled
•Display Friendship links: disabled
•Display Add to contact list link: disabled
•Display Add to ignore list link: disabled
•Display manage group link: disabled
•Display Sign in link: disabled
•My messages path: /Members/Management/Messages
•My friends path: /Members/Management/Friends
•My invitations path: /Members/Management/Invitations
•Sign out path: /Home
•Web part container: Community Site - Red Box
•Web part container title: Shortcuts
Click OK. Let's go on with the scrolling news. This will be the Scrolling text web part set up so that it displays news from the News section. The News section will be created later on in this guide. Click the Add web part (![]() ) icon again, choose the Listings and viewers -> Scrolling text web part and click OK. In the web part properties window, set the following properties:
) icon again, choose the Listings and viewers -> Scrolling text web part and click OK. In the web part properties window, set the following properties:
•Path: /News/%
•Document types: CMS.News
•ORDER BY expression: NewsReleaseDate DESC
•Select top N documents: 5
•Transformation: CMS.News.Preview
•Cache dependencies: nodes|{%currentsite.sitename|(tolower)%}|cms.news|all
•Width (px): 150
•Height (px): 150
•Script stop time (milliseconds):4000
•Web part container: Community Site - Blue Box
•Web part container title: Latest News
Leave the rest of the properties at their default values and click OK.
So now we have a web part displaying the latest five news items. Let's have a similar info box displaying the latest groups. Again, the Groups section is not created yet, but we will get to it later in this guide. Click the Add web part (![]() ) icon again, choose the Community -> Groups viewer web part and click OK. In the web part properties window, set the following properties:
) icon again, choose the Community -> Groups viewer web part and click OK. In the web part properties window, set the following properties:
•Disable view state: enabled
•Transformation name: Community.Transformations.GroupsPreviewList
•Show filter: disabled
•ORDER BY condition: GroupCreatedWhen DESC
•No record found text: There are currently no groups.
•Web part container: Community Site - Gray Box
•Web part container title: Latest Groups
•Content after: <div class="clear"></div> <div><a href="~/Groups.aspx">View all</a></div>
Leave the rest of the properties at their default values and click OK.
One more info box to go. This time, it will be displaying three latest registered site users. Click the Add web part (![]() ) icon again, choose the Membership -> Users viewer web part and click OK. In the web part properties window, set the following properties:
) icon again, choose the Membership -> Users viewer web part and click OK. In the web part properties window, set the following properties:
•Disable view state: enabled
•Transformation name: Community.Transformations.MembersPreviewList
•No record found text: There are currently no members.
•Show filter: disabled
•ORDER BY condition: UserCreated DESC
•Selected columns: UserID,UserNickName,UserGender,UserDateOfBirth,UserAvatarID,UserCreated,UserName,AvatarGuid
•Use default cache dependencies: enabled
•Web part container: Community Site - Gray Box
•Web part container title: Latest Members
•Content after: <div class="clear"></div><div><a href="~/Members.aspx">View all</a></div>
Leave the rest of the properties at their default values and click OK.
That's us finished with the info boxes in this web part zone. However, we will place the sample poll created in this chapter to the bottom of the web part zone. Click the Add web part (![]() ) icon for the last time, choose the Polls -> Poll web part and click OK. In the web part properties window, set the following properties:
) icon for the last time, choose the Polls -> Poll web part and click OK. In the web part properties window, set the following properties:
•Poll name: Continents
•Web part container: Community Site - Blue Box
•Web part container title: Poll
Click OK. That's us finished with the zoneRight web part zone. Now we can move on and populate the other web part zones.
6. We will place the community_home_img.jpg image, which we uploaded earlier in this chapter, to the zoneCenterRight web part zone. Click the Add web part (![]() ) icon, choose the Text -> Editable image web part and click OK. In the web part properties window, set the following properties:
) icon, choose the Text -> Editable image web part and click OK. In the web part properties window, set the following properties:
•Alternate text: Community photo
Click OK.
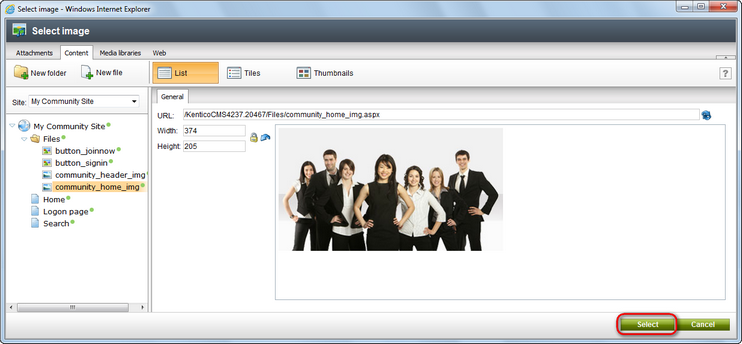
Switch to the Page tab and click the Select link of the Editable image web part.
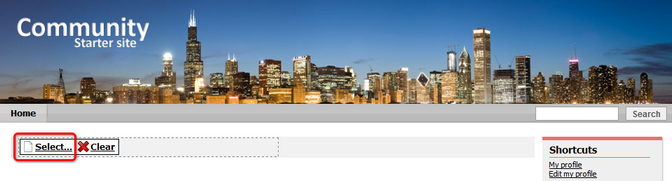
Select the file from the content tree and click the Select link. Click Save to save the content of the page.
7. The zoneCenterLeft web part zone will host the welcome text and links for sing-in and registration. Click the Add web part (![]() ) icon, choose the Text -> Editable text web part and click OK. You can left all web part's properties at the default values and click OK.
) icon, choose the Text -> Editable text web part and click OK. You can left all web part's properties at the default values and click OK.
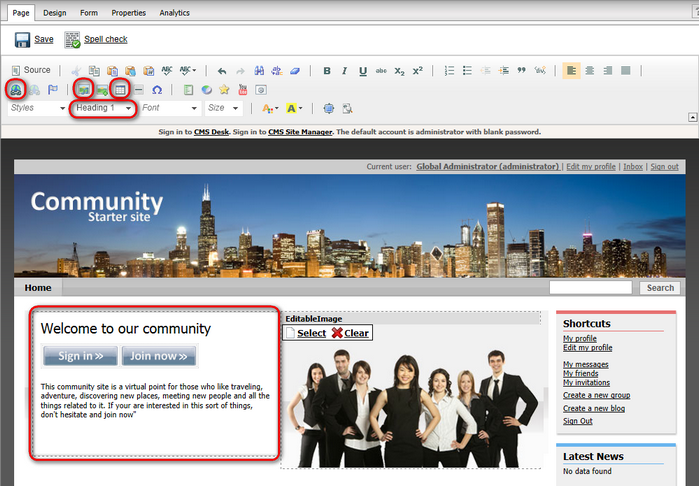
8. Switch to the Page tab. Using the WYSIWYG editor, try to achieve the same result that you can see in the screenshot below. You can find detailed description of the WYSIWYG editor's capabilities in Kentico CMS Developer's Guide -> Content management -> WYSIWYG editor. However, you can see the controls that you will use highlighted in the screenshot.
You will need to write the heading and change its Format to Heading 1. Then you will need to add a table with one row and two columns. Set the Border size property of the table to 0. You will insert the images into the table. Then you will select each of the images and add a hyperlink to the Logon page to it. Then you will have to select both of the images in the table and choose the center alignment. Finally, you will have to type the remaining text and set its Format to Normal.
9. Two web part zones are remaining. In the zoneCenterBottomLeft, we will place a repeater displaying extracts from the latest blog posts. The Blogs section from that the extracts will be displayed will be created later in this guide. Click the Add web part (![]() ) icon, choose the Listings and viewers -> Repeater web part and click OK. Set the following properties of the web part, leave the rest of them at their default values:
) icon, choose the Listings and viewers -> Repeater web part and click OK. Set the following properties of the web part, leave the rest of them at their default values:
•Disable view state: enabled
•Path: /Blogs/%
•Document types: CMS.BlogPost
•ORDER BY expression: BlogPostDate DESC
•Select top N documents: 6
•Transformation: Community.Transformations.HomeBlogPostsCenter
•Cache dependencies: nodes|{%CurrentSite.SiteName|(tolower)%}|cms.blogpost|all
•No record found text: There are currently no posts.
•Web part container: Community Site - Blue Box Light
•Web part container title: Latest blog posts
Click OK.
10. Last but not least, we will place a similar repeater to the zoneCenterBottomRight web part zone. This repeater will be displaying latest forum posts. The Forums section will be created later in this guide. Click the Add web part (![]() ) icon, choose the Forums -> Forum posts viewer web part and click OK. Set the following properties of the web part, leave the rest of them at their default values:
) icon, choose the Forums -> Forum posts viewer web part and click OK. Set the following properties of the web part, leave the rest of them at their default values:
•Disable view state: enabled
•Top N: 6
•Order by: PostTime DESC
•Web part container: Community Site - Blue Box Light
•Web part container title: Latest forum posts
Click OK.
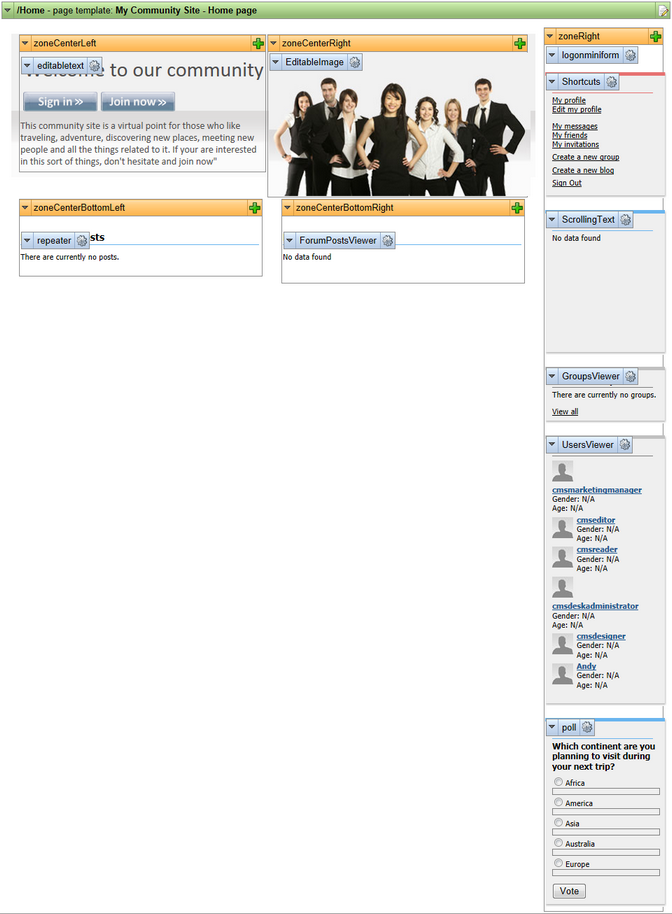
11. You have just finished creating the Home page. Most of the web parts are not displaying any content because the related sections of the web are not created yet. However, as you will be creating these sections further in this guide, you will see the related content appear on the home page. In the Design tab, the page should look as in the following screenshot.
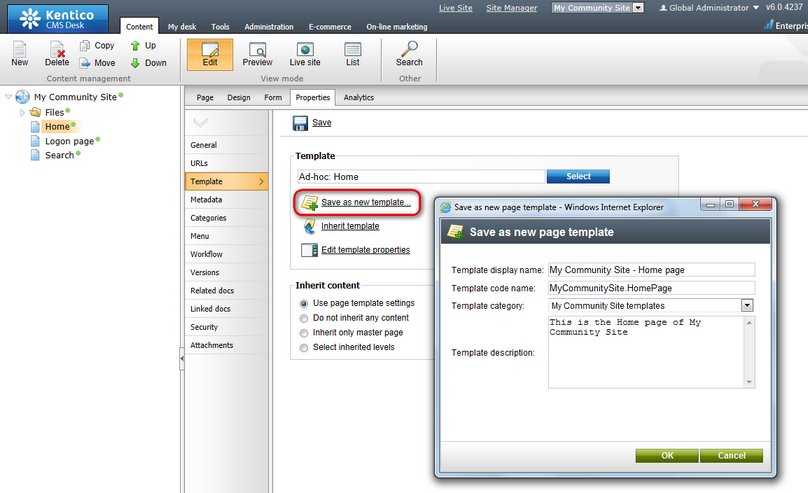
12. The last step is to save the page as a page template for further reusability. Switch to the Properties -> Template tab and click the Save as new template link. Enter the following details:
•Template display name: My Community Site - Home page
•Template code name: MyCommunitySite.HomePage
•Template category: My Community Site templates
•Template description: some text describing the page template
Click OK.