|
Workgroup management overview |

|

|

|

|
Members with the appropriate permissions (usually workgroup administrators) can manage workgroups, which means they are able to modify various types of properties and security settings, oversee workgroup membership, configure the available tools and more. The management interface can be accessed using the Manage the workgroup link in the Shortcuts menu on the right side of the Home section of a workgroup.
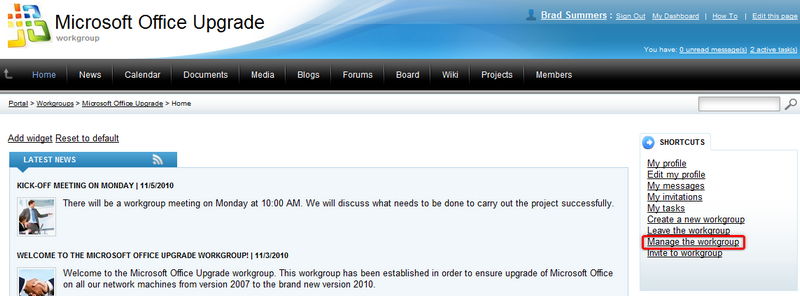
The following management tabs are available:
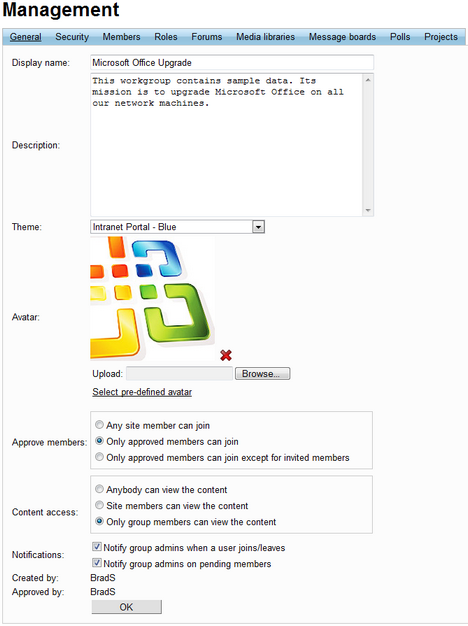
On this tab, the general properties of the workgroup can be set:
| • | Display name - contains the name of the workgroup displayed on the portal. |
| • | Description - contains text describing the workgroup. |
| • | Theme - allows the selection of a preset graphical theme that will be used to determine the appearance of the portal section dedicated to the workgroup. By default, the themes described in the Other features -> Available themes topic may be selected. |
| • | Avatar - allows the selection of the workgroup avatar image used for graphical representation. |
| • | Approve members - this selection determines if users can join the workgroup with or without a workgroup administrator's approval. The Only approved members can join option requires all new members to be approved, while Only approved members can join except for invited members allows users who accept an invitation from a workgroup member to join without approval. |
| • | Content access - this selection determines what type of users can view the content of the workgroup. Please keep in mind that if the Only group members can view the content option is selected, users cannot apply to join the workgroup and must be invited to become members. |
| • | Notify group admins when a user joins/leaves - if checked, workgroup administrators will receive a notification e-mail when a user joins/leaves the workgroup. |
| • | Notify group admins on pending members - if checked, workgroup administrators will receive a notification e-mail when a user requests to join the workgroup and approval is required. |
| • | Created by - displays the name of the user who created the workgroup. |
| • | Approved by - displays the name of the user (administrator) who approved the creation of the workgroup. |
|
Deleting workgroups
Workgroups cannot be removed from the portal via the front-end website. Please contact your system administrator if you need a workgroup to be deleted.
|
On this tab, the displayed matrix can be used to set permissions for the workgroup. These permissions affect things such as managing news, calendar events and wiki pages under the various sections of the workgroup. Blogs are not affected by these settings and can be created by any user with access to the workgroup. Each blog can only be managed by the user who created it. Security settings for the tools supported by workgroups can be configured individually in their appropriate interface.
The following permissions can be assigned:
| • | Create pages - users with this permission can create workgroup pages. |
| • | Delete pages - users with this permission can delete workgroup pages. |
| • | Edit pages - users with this permission can edit workgroup pages. |
These permissions can be assigned to the following types of users:
| • | Nobody - nobody can perform the action. |
| • | All users - all users can perform the action. |
| • | Authenticated users - only signed-in users can perform the action, i.e. anonymous public users cannot perform it. |
| • | Group members - only workgroup members can perform the action. |
| • | Authorized roles - only members of the workgroup that are assigned to the roles selected in the section below can perform the action. |

|
Workgroup administrator permissions
Workgroup members that are assigned to roles that have the Can manage the group property enabled (such members are usually referred to as workgroup administrators) can perform any of these actions, even if they don't have the appropriate permissions assigned.
|
On this tab, a list of all workgroup members is displayed. They can be Edited (![]() ) or Deleted (
) or Deleted (![]() ) from the list. This is also where new members can be Approved (
) from the list. This is also where new members can be Approved (![]() ) to join the workgroup if it is required. Members can also be Rejected (
) to join the workgroup if it is required. Members can also be Rejected (![]() ) from the workgroup. Once rejected, a user is no longer a member of the workgroup until approved again, and cannot rejoin or be invited.
) from the workgroup. Once rejected, a user is no longer a member of the workgroup until approved again, and cannot rejoin or be invited.

The ![]() Invite to group link located above the list conveniently allows new members to be invited to the workgroup. When clicked, a new window is opened.
Invite to group link located above the list conveniently allows new members to be invited to the workgroup. When clicked, a new window is opened.
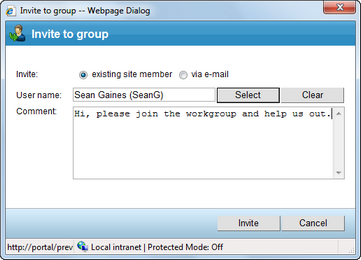
There are two ways to invite a new member:
| • | Invite existing site member - allows the selection of an existing portal user into the User name field. When the Invite button is clicked, a notification e‑mail is sent to the user's e‑mail address and any text entered into the Comment field is included in the e‑mail. The user can join the workgroup either by clicking a link in the e‑mail, or via the My invitations link in the Shortcuts menu found on their employee profile page. |
| • | Invite via e-mail - allows the sending of an invitation e‑mail to any address specified in the E‑mail field. In this case, the user will be required to register on the portal after clicking the join link in the e‑mail. Any text entered into the Comment field will be included in the e‑mail. |
When Editing (![]() ) a member, information about the given member is displayed and several actions may be performed. The Comment field can be used to enter a text description for the workgroup member. This comment is not shown to the member, it is only displayed in the workgroup management interface.
) a member, information about the given member is displayed and several actions may be performed. The Comment field can be used to enter a text description for the workgroup member. This comment is not shown to the member, it is only displayed in the workgroup management interface.
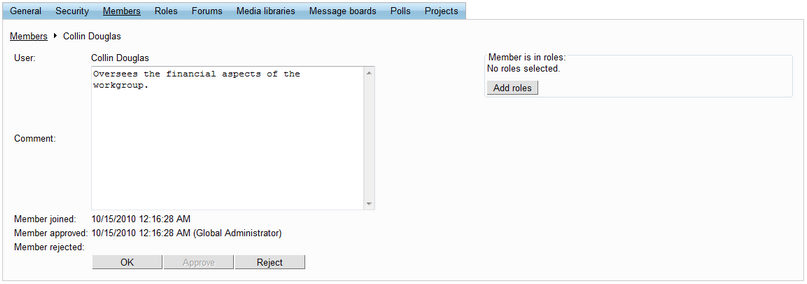
The Add roles button on the right opens a dialog where the edited member can be assigned to any of the workgroup's roles. The Approve and Reject buttons perform the respective action as described above.
On this tab, a list of roles defined for the workgroup is displayed. These roles are applicable only in the context of the workgroup and do not affect the remainder of the portal. The roles in the list can be Edited (![]() ) and Deleted (
) and Deleted (![]() ).
).

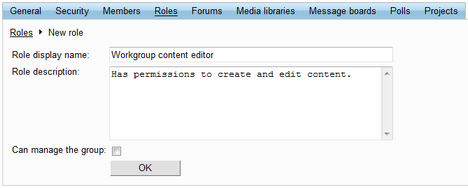
The ![]() New role link above the list allows new workgroup roles to be created. When clicked, a dialog where the following properties can be entered is displayed:
New role link above the list allows new workgroup roles to be created. When clicked, a dialog where the following properties can be entered is displayed:
| • | Role display name - contains the name of the role that will be used in the management interface. |
| • | Role description - contains text describing the role. |
| • | Can manage the group - if enabled, members of the role can manage the workgroup and are not affected by workgroup permissions. |
When Editing (![]() ) a role, two tabs are offered. The General tab allows the modification of the properties described above that were entered when the role was created. The Users tab contains a list of all members assigned to the role. These can be removed from the role by selecting the checkbox on the left of each member in the list and clicking the Remove selected button. New users can be added to the role using the Add users button.
) a role, two tabs are offered. The General tab allows the modification of the properties described above that were entered when the role was created. The Users tab contains a list of all members assigned to the role. These can be removed from the role by selecting the checkbox on the left of each member in the list and clicking the Remove selected button. New users can be added to the role using the Add users button.

Page url: http://devnet.kentico.com/docs/5_5r2/intranetusersguide/index.html?managing_workgroups.htm