|
Using workflow |

|

|

|

|
|
Using workflow |
|
|
|
|
This example explains how the workflow process works from the perspective of content editors. It requires the system to be configured as described in Defining a workflow.
Creating a new document
1. Sign in to CMS Desk as Alice and create a news item in the /News section:
| • | News title: My first news item |
| • | Release date: <click Now to get the current date> |
| • | News summary: Some summary |
| • | News text: Some text |
| • | Publish from-to: leave the fields blank |
Click Save. After the document is saved, you can see that there is the ![]() Submit to approval action displayed in the document menu:
Submit to approval action displayed in the document menu:
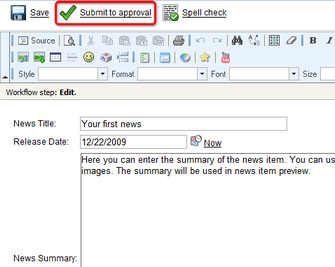
2. Before we submit the document to approval, we will preview it for a final check. Click Preview in the main toolbar and you will see exactly what the document will look like on the live site. After doing so, go back to the editing form and click the ![]() Submit to approval button.
Submit to approval button.
The document has been moved to the Approval step and it is now waiting for approval by some member of the PR Managers role and Alice can no longer edit it. Also, a notification e-mail is sent to all members of the PR Managers role.
Approving the document
With the document submitted to approval, we can switch to the PR Manager's perspective and approve it.
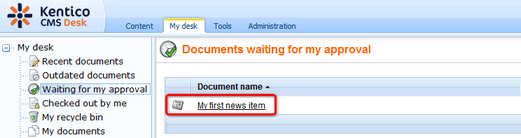
3. Sign out of CMS Desk and sign in again as Bob. Go to My desk -> Waiting for my approval. You should see the new document listed as in the screenshot below.
4. Click the document, which will open it for editing in CMS Desk -> Content -> Edit. You can now preview and optionally edit it.
If you were not satisfied with it and wanted Alice to re-work it, you could click ![]() Reject to return it back to the Edit step. For the purpose of this example, we will approve it by clicking the
Reject to return it back to the Edit step. For the purpose of this example, we will approve it by clicking the ![]() Publish button. Once you approve the document, it gets published on the live site. A notification e-mail is sent to Alice so that she knows the document has been published if configured as described in E-mail notification in workflow process.
Publish button. Once you approve the document, it gets published on the live site. A notification e-mail is sent to Alice so that she knows the document has been published if configured as described in E-mail notification in workflow process.
|
Tip 1: Approval/rejection comments
When you're approving or rejecting the document, you can go to Properties -> Workflow, add additional comments and click Approve. |
|
Tip 2: "Documents waiting for my approval" and "Recent documents"
Each user can find a list of documents waiting for their approval in My desk -> Documents waiting for my approval.
Similarly, the user who submitted the document can see the document status in My desk -> Recent documents. |
Archiving the document
If you want to archive the document so that it's no longer displayed on the live site, but it remains in the Kentico CMS database, you can go to Properties -> Workflow dialog of the published document and click the Archive button.
Workflow history and workflow comments
Beside the action buttons for approving/rejecting the document on the editing pages, you can also use the advanced interface in Properties -> Workflow dialog:
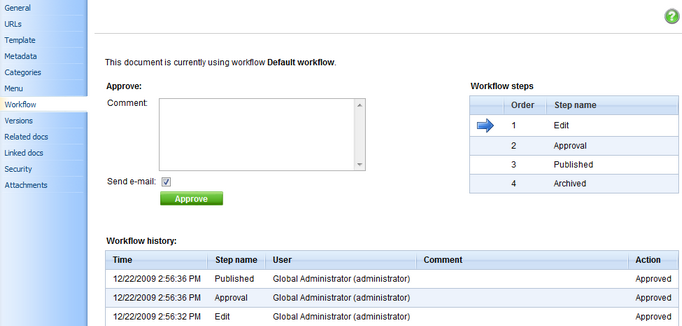
Here you can also track the workflow history of the document and see the current workflow step in the workflow.
|
Workflow and permissions
Once you enable workflow, the user needs to be authorized to both edit the document and must be authorized to manage the document in the give workflow step.
The users with permission "Manage workflow" can approve/reject any document in any workflow step, even if they are not authorized for the given workflow step. This permission can be set in the Site Manager -> Administration -> Permissions section, in the permission matrix called Module: CMS Content. |
Page url: http://devnet.kentico.com/docs/5_5r2/devguide/index.html?using_workflow.htm


