|
Using Data source web parts |

|

|

|

|
|
Using Data source web parts |
|
|
|
|
Data source web parts are designed for retrieving data from the database and sending it to other web parts that display it. This allows you to have separate web parts for retrieving data from the database, displaying data, filtering the displayed data and paging. These web parts can be placed anywhere on the page without any change in functionality and their design can be set separately, which results in higher design flexibility compared with using the original Repeater, Datalist, etc.
The following diagram shows how a Data source web part can be connected with other web parts to form a functional group of interconnected web parts. Captions of connecting lines show which properties of the web parts have to be set identically for the group to work properly.
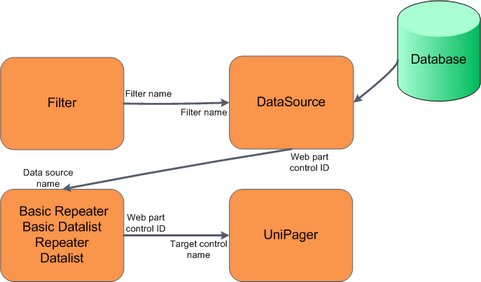
Please note: Repeater and Datalist web parts can only be used for documents (provided by the Documents data source web part), not for e.g. custom tables etc. You will need to use the Basic repeater or Basic datalist for this purpose.
In the following example, we will create a group of interconnected web parts just as in the diagram above in order to see how the Data source concept works in practice.
1. Sign in to CMS Desk as the administrator (login administrator with blank password).
2. Create a new page under the Products section. Name it DataSource example and choose to Create a blank page using the Simple layout. Click Save.
3. Add the Data Sources -> Products data source web part to the only web part zone on the page. Leave default values for all its properties and click OK.
4. Add the Listings & Viewers -> Basic Repeater web part to the same web part zone. Set the following properties:
| • | Data source name: ProductsDataSource |
| • | Transformation name: CMS.Product.Default |
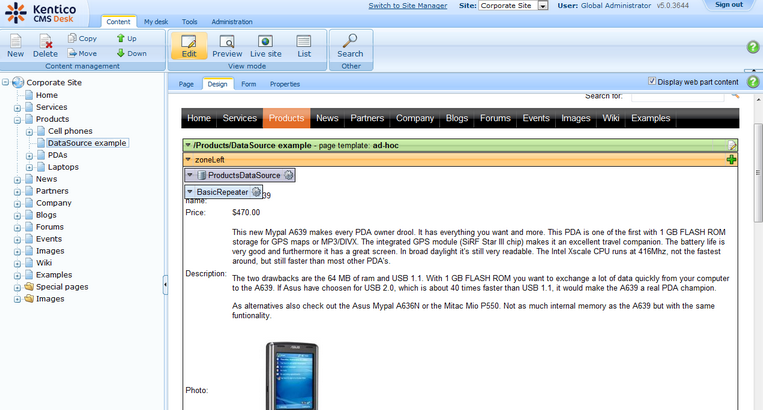
Click OK. You should see the repeater displaying products as in the following screenshot.
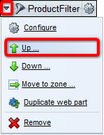
5. Now we will add the filter for the users to be able to filter displayed records. Add the E-commerce -> Product filter web part to the same web part zone. The web part will be added to the bottom of the page, so you may not be able to see it. You might want to scroll down and move the web part above the repeater. Open the web part's menu and choose to move the web part Up.
Set the following property of the filter web part:
| • | Filter name: ProductFilter |
Also open the properties of the Products data source web part and enter the same filter name into its Filter name property:
| • | Filter name: ProductFilter |
You have just connected the data source with the filter. Data sent from the DataSource to the repeater can now be filtered using the ProductFilter.
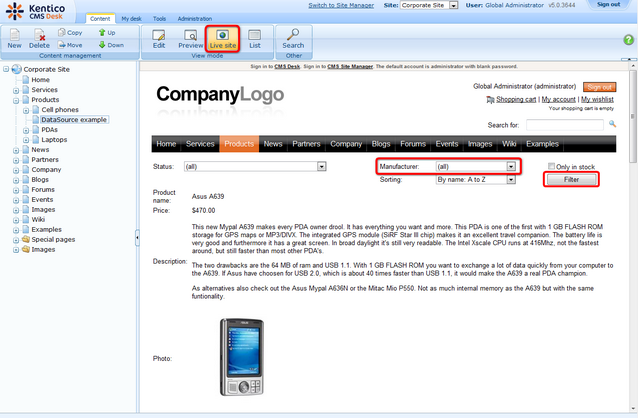
6. To verify the functionality, switch to Live site mode. You can for example choose to display only products manufactured by Asus using the Manufacturer drop-down list. After selecting, click Filter for the changes to take effect. After doing so, you should see only Asus products in the repeater, as you can see in the screenshot below.
7. As the amount of data displayed by the repeater might grow very large in some cases, the next logical step is to add a pager. Add the Listings & Viewers -> Universal pager web part to the web part zone and move it Up above the repeater the same way that you moved the filter in step 5.
Set the following properties:
| • | Target control name: BasicRepeater |
| • | Page size: 5 |
| • | Group size: 5 |
and make sure the following transformations are set:
| • | Pages: CMS.PagerTransformations.General-Pages |
| • | Current page: CMS.PagerTransformations.General-CurrentPage |
| • | Previous page: CMS.PagerTransformations.General-PreviousPage |
| • | Next page: CMS.PagerTransformations.General-NextPage |
| • | Layout: CMS.PagerTransformations.General-PagerLayout |
Click OK to save the changes.
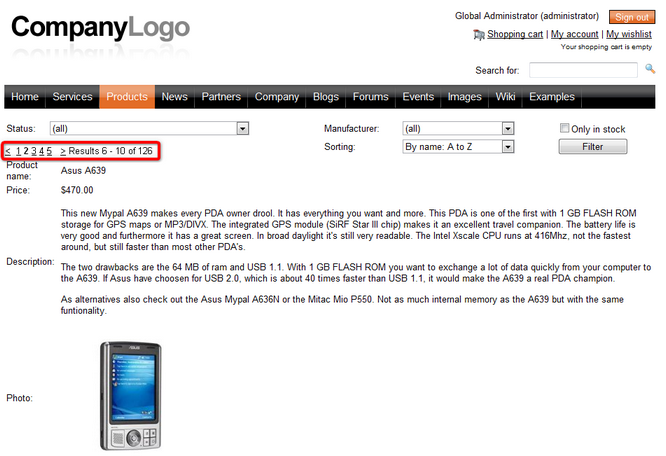
8. Now if you switch to Live site mode, the size of the page should be reduced to 5 products and you should be able to switch between pages using the pager.
Page url: http://devnet.kentico.com/docs/5_5r2/devguide/index.html?using_datasource_web_parts.htm

