|
Managing projects and tasks |

|

|

|

|
|
Managing projects and tasks |
|
|
|
|
There are several ways how projects and their tasks can be used and managed:
Using the main project management interface
All projects that do not belong to a group can be managed by users with sufficient permissions at CMS Desk -> Tools -> Project management -> Projects.
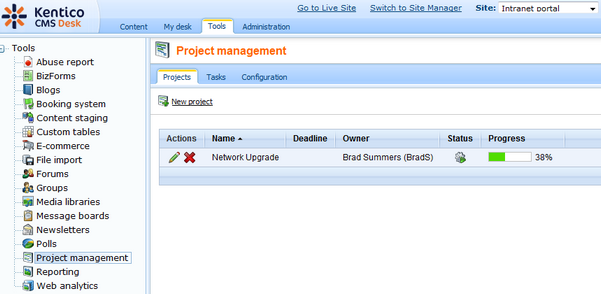
Here, existing projects are displayed in a list where they may be Edited (![]() ) or Deleted (
) or Deleted (![]() ).
).
Create a new project using the ![]() New project link and fill in the following properties:
New project link and fill in the following properties:
| • | Display name - Name of the project that is displayed on the live site and in the user interface. |
| • | Code name - Code name of the project. |
| • | Project goal - Text description of the purpose of the project. |
| • | Start date - Specifies the date and time when work on the project should start. |
| • | Deadline - Specifies the date and time before which the project should be complete. |
| • | Owner - Allows the selection of the user who will be set as the project owner. The owner is usually the user who ensures that the project is completed successfully. By default, the user who created the project is entered. |
| • | Status - Allows one of the predefined project statuses to be selected. Statuses are used to indicate which life cycle step the project is currently in and can be managed on the Configuration tab of this interface. |
| • | Project page - Allows the selection of a document from the current site to which the project will be bound. |
| • | Allow task ordering - If enabled, the order of tasks under the project can be changed using arrow buttons. |
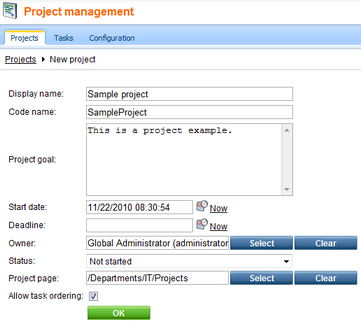
Click the OK button.
This will open the editing interface of the new project, where three tabs are available. The General tab allows the properties that were set when the project was created to be modified and the Security tab is where permissions for the project can be configured (learn more in the Security topic).
The Tasks tab contains a list of all tasks under the project, which will currently be empty.
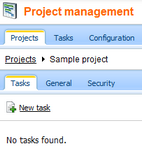
Click the ![]() New task link and enter the following properties:
New task link and enter the following properties:
| • | Title - Name of the task that is displayed on the live site and in the user interface. |
| • | Owner - Allows the selection of the user who will be set as the task owner. The owner is usually the user who checks that the task was completed correctly. By default, the user who created the task is entered. |
| • | Progress - A percentage representing the amount of progress that has been made on the task. |
| • | Estimate - Is used to set an approximate amount of hours that the completion of the task should take. |
| • | Deadline - Specifies the date and time before which the task should be complete. |
| • | Status - Allows one of the predefined task statuses to be selected. Statuses are used to indicate which life cycle step the task is currently in. |
| • | Priority - Allows one of the predefined task priorities to be selected. |
| • | Is private - If enabled, the task will only be displayed to its owner, the user to whom it is assigned and to users who have permissions to manage the project that the task belongs under (if applicable). |
| • | Assigned to - Allows the selection of the user who should complete this task. A notification e‑mail is automatically sent to the specified user when the task is created or modified. |
| • | Description - Text containing the goal of the task and any other relevant information. |
Click OK.
You can manage existing tasks using the appropriate action buttons on the left side: Edit (![]() ) or Delete (
) or Delete (![]() ). The Send reminder (
). The Send reminder (![]() ) button allows an e-mail to be sent to the user to whom the task is assigned, reminding them about the task. If the Allow task ordering property of the edited project is enabled, the Move up (
) button allows an e-mail to be sent to the user to whom the task is assigned, reminding them about the task. If the Allow task ordering property of the edited project is enabled, the Move up (![]() ) and Move down (
) and Move down (![]() ) buttons can be used to change the order of the tasks.
) buttons can be used to change the order of the tasks.
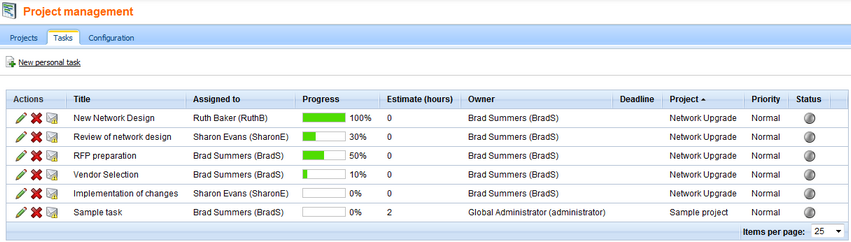
The Tasks tab on the top level of the project management interface is very similar to to the list of tasks shown when editing a project, except that all tasks are displayed regardless of the project they belong under, including personal tasks without any project.
The Configuration tab is where the statuses and priorities that can be set for projects or tasks may be defined. It may only be accessed by users belonging to roles with the Manage configuration permission for the project management module (more information can be found in the Security topic). All the usual actions such as Edit (![]() ) and Delete (
) and Delete (![]() ) are available.
) are available.
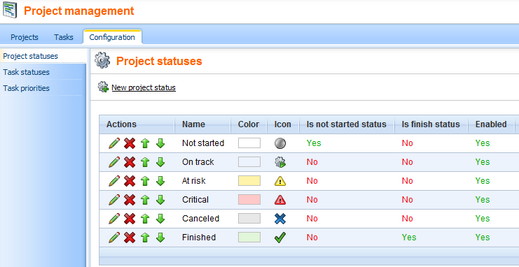
When creating or editing a status, the following properties can be set:
| • | Display name - Name of the status that is used in the status selection list. |
| • | Code name - Code name of the status. |
| • | Status color - Determines the color of projects/tasks that have this status selected. The color selector can be used here. |
| • | Status icon - Contains the path to an image used as the icon of the status. |
| • | Is not started status - If enabled, projects/tasks with this status are marked as not yet started. |
| • | Is finish status - If enabled, projects/tasks with this status are marked as finished. A status cannot be both not started and finished. |
| • | Enabled - If enabled, the status can be selected for projects. |
The not started or finished flag given to a project or task by its status can have an effect on whether it is displayed by certain project management web parts or widgets, depending on their configuration.
The Task priorities tab is where priorities, which can be selected to determine how urgent a task is, may be managed.
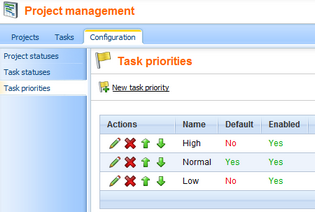
The following properties are available for task priorities:
| • | Display name - Name of the priority that is used in the task priority selection list. |
| • | Code name - Code name of the task priority. |
| • | Default - If enabled, the priority is selected by default when a new task is created. Only one priority can be set as default. |
| • | Enabled - If enabled, the priority can be selected for tasks. |
E‑mail notifications
As mentioned above, there are several types of notification e‑mails that are sent to users informing them about events related to tasks that they are involved in. These e‑mails are sent from the address specified in the value of the Site Manager -> Settings -> Project management -> Send project management e‑mails from setting and their format can be customized at Site Manager -> Development -> E‑mail templates. The following e‑mail templates are available:
| • | Project Management - New task - Sent when a new task is assigned to the user. |
| • | Project Management - Changed task - Sent when an assigned or owned task is in some way modified. |
| • | Project Management - Overdue task - Sent when an assigned task reaches its deadline before it is finished. |
| • | Project Management - Task reminder - Sent when the Send reminder ( |
Using the Group management interface
Group projects can be administered by users, who have permissions to manage a given group, by editing the group on its Projects tab either at CMS Desk -> Tools -> Groups or on‑site using the Group profile web part. Exactly the same options are available as when using the Projects tab of the main project management interface described above, except that the context of the current group is used e.g. for selecting users to whom a task should be assigned.
Using CMS Desk -> My Desk
Users with access to CMS Desk can use the My Desk -> My projects and tasks interface to manage projects and tasks that they are involved in.
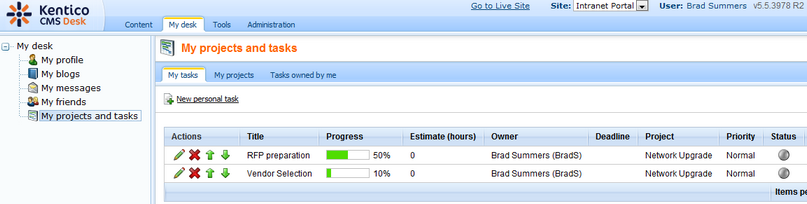
The current user can see a list of all tasks assigned to them on the My tasks tab, all the projects that they have permissions to access on the My projects tab and all tasks that they own on the Tasks owned by me tab. Projects and tasks can be managed using the actions described above.
Page url: http://devnet.kentico.com/docs/5_5r2/devguide/index.html?project_management_managing_projects.htm

