|
Developing custom filters |

|

|

|

|
|
Developing custom filters |
|
|
|
|
Even though Kentico CMS comes with a built-in set of filter web parts for various different types of data, it may still in many cases be necessary to create a custom filter according to your specific requirements.
This can be achieved by implementing the filter as a user control that inherits from one of the following base classes:
| • | CMSAbstractDataFilterControl - works with document data sources. |
| • | CMSAbstractMenuFilterControl - works with navigation web parts. |
| • | CMSAbstractQueryFilterControl - works with custom table and query data sources. |
These base classes can be found in the CMS.Controls namespace. The appropriate base class must be selected depending on the type of data to be filtered
When complete, the control can be placed onto your website through the General -> Filter web part. All that needs to be done is to specify the path to the .ascx file in the Filter control path property. The Filter web part can then be attached to data source web parts of the matching type.
Of course, a custom filter can also be used anywhere in your code as a standard user control, for example on ASPX templates or in other web parts. All necessary properties, like the FilterName used to connect with the data source are inherited from the used base class.
Example
The example below demonstrates how a custom filter can be developed. This sample filter will work with product documents. It will support filtering according to product departments and allow the selection of several options that determine the order in which products are displayed. Filters for all types of documents or other objects can be created using the same approach.
1. Open the web project in Visual Studio and start by creating a New folder under the root called CMSGlobalFiles (if it doesn't already exist). The content of this folder can be exported along with your site when it is deployed to the live server.
2. Next, add a new Web User Control called CustomProductFilter.ascx into the CMSGlobalFiles folder and modify it to contain the following code:
<%@ Control Language="C#" AutoEventWireup="true" CodeFile="CustomProductFilter.ascx.cs" Inherits="CMSGlobalFiles_CustomProductFilter" %> |
This creates the design of the filter's user interface. As you can see, it is composed of localized labels, drop-down lists and a button arranged in a simple table layout. Alternatively, it is possible to use a CSS‑based layout applied through HTML elements (e.g. <div>, <span>, etc.).
When developing a filter for actual live deployment, it may be preferable to enter the captions of the child controls using localization strings through the ResourceString property, rather than directly as Text.
3. Now switch to the code behind file of the user control, add the references shown below and set the control to inherit from the appropriate base class. This example uses the CMSAbstractDataFilterControl class, since the filter is intended for use with a document data source.
[C#]
using System; |
The methods described in the following steps of this example will be added as members of this class.
4. Add the following three methods:
[C#]
/// <summary> |
These ensure that the correct filtering options are loaded into the child drop-down lists.
5. The most important part of the filter is performed by the SetFilter() method. Define it as shown below:
[C#]
/// <summary> |
The custom filter control dynamically generates a WHERE condition and ORDER BY statement based on the current filter selection, which is then used to set the value of the WhereCondition and OrderBy members inherited from the base class. These members are read by the data source to which the filter is attached and inserted into the SQL query used to load data. Remember that the filter must inherit from the appropriate base class according to the type of the used data source.
6. Finally, add two methods that override the handlers of the Init and PreRender events as shown below:
[C#]
/// <summary> |
The handlers ensure that the appropriate private methods (defined previously in the example) are called during the correct stages of the page life cycle.
When the Apply Filter button is clicked, a postback occurs, which triggers the SetFilter() method during the PreRender event and the filter is applied to the displayed data. Notice the use of the CMS.GlobalHelper.RequestHelper.IsPostBack() method in the conditions. The SetFilter() method is only called when the current page request is a postback and the child controls are initialized only when this is not the case.
Save the changes to both files.
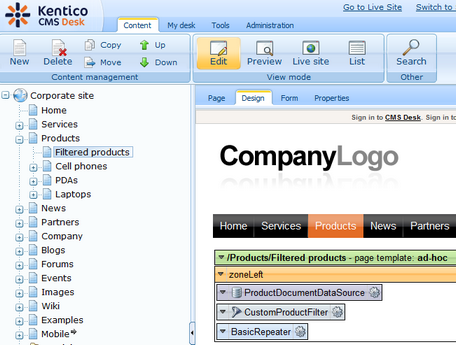
7. Now that the filter control is finished, you can try out its functionality. It is recommended to test the filter on the Corporate or E-commerce sample sites, since they already contain examples of product documents. Go to CMS Desk, create a new page and place the following web parts on it:
| • | Documents data source - configure it to load product documents and fill in its Filter name property (e.g. CustomProductFilter). |
| • | Filter - configure a matching Filter name (CustomProductFilter) and enter the path of the .ascx file implementing your custom filter into the Filter control path property (~/CMSGlobalFiles/CustomProductFilter.ascx). |
| • | Basic repeater - enter the ID of the Documents data source web part into the Data source name property and set an appropriate Transformation name, for example Ecommerce.Transformations.Product_SimplePreview. |
Detailed information about how this kind of web part combination works can be found in the Using Data source web parts topic.
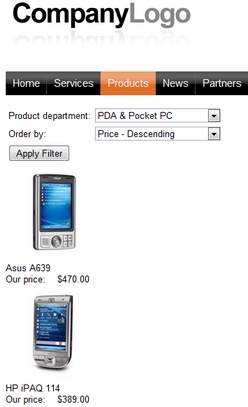
8. If you open the page on the live site, you will see a list of products with the custom filter displayed above. The products can be filtered by their department and the order in which they are displayed can be changed.
Page url: http://devnet.kentico.com/docs/5_5r2/devguide/index.html?developing_custom_filters.htm

