|
Custom categories |

|

|

|

|
|
Custom categories |
|
|
|
|
There are two ways to create custom categories. However, only users with administration privileges for the particular site can create custom categories both the ways.
Creating new custom categories
Each user can create their own categories and assign documents to them. This can be done in CMS Desk, after selecting a document from the content tree and switching to its Properties -> Categories tab.
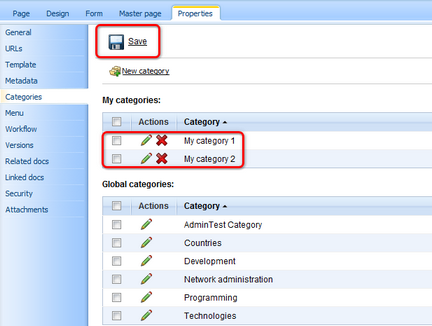
The current user's custom categories are listed in the My categories section. These categories can be Edited (![]() ) or Deleted (
) or Deleted (![]() ) in this section. Global categories are listed below and can also be edited here with certain limitations compared to editing in Site Manager.
) in this section. Global categories are listed below and can also be edited here with certain limitations compared to editing in Site Manager.
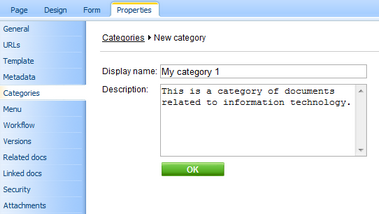
To create a new custom category, just follow these three easy steps:
1. Click the ![]() New category link.
New category link.

2. Enter the required details:
Display name |
Display name of the category. |
Description |
Text describing of the category. |
And click OK.
3. You should be redirected back (CMS Desk -> Properties -> Categories) to the list where your new custom category should be visible. Click ![]() Save to confirm the changes you have made.
Save to confirm the changes you have made.
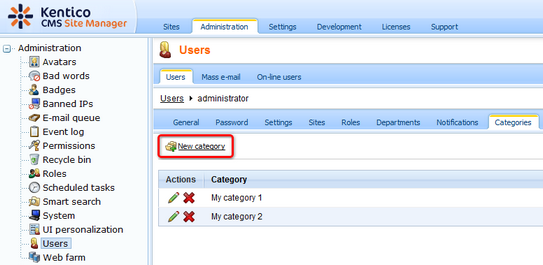
Administrating users' custom categories
Administrators can manage custom categories of other users in Site Manager -> Administration -> Users. Choose to Edit (![]() ) some of the users and switch to their Categories tab. You can edit and eventually create the selected user's custom categories here. Categories can be created in a similar way as mentioned in the previous examples, by clicking the
) some of the users and switch to their Categories tab. You can edit and eventually create the selected user's custom categories here. Categories can be created in a similar way as mentioned in the previous examples, by clicking the ![]() New category link and entering the required details.
New category link and entering the required details.
Page url: http://devnet.kentico.com/docs/5_5r2/devguide/index.html?custom_categories.htm

