|
Modifying the registration form |

|

|

|

|
|
Modifying the registration form |
|
|
|
|
In the following example, you will learn how to modify the registration form used on the logon page. For the purpose of this example, we will want the Middle name field to be specified by users on registration.
The registration form is displayed using the Custom registration form web part. This web part enables user registration based on an alternative form of the CMS_User system table. For more information about the Alternative forms concept, please refer to the Module Alternative forms chapter of Kentico CMS Developer's Guide.
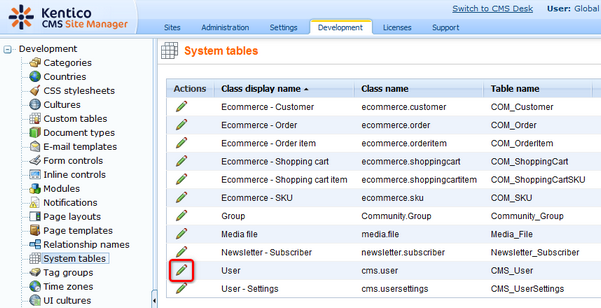
1. Sign in to Site Manager (login administrator with blank password by default). Go to Development -> System tables and choose to Edit (![]() ) the User (CMS_User) system table.
) the User (CMS_User) system table.
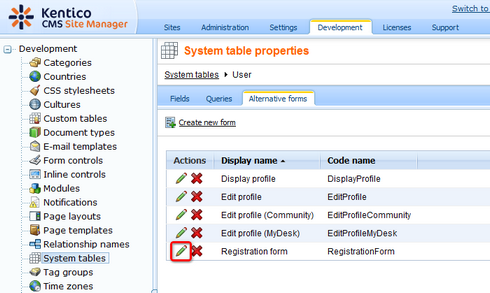
2. Switch to the Alternative forms tab. Choose to Edit (![]() ) the Registration form alternative form, which is the one currently used on the logon page. As you can see, the other alternative forms are used for user profile displaying and editing.
) the Registration form alternative form, which is the one currently used on the logon page. As you can see, the other alternative forms are used for user profile displaying and editing.
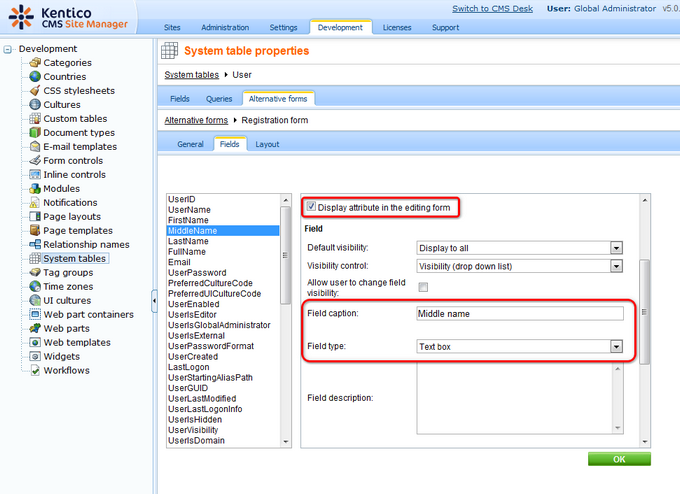
3. Switch to the Fields tab. This is where you can define which fields of the User system table will be displayed in the form. Select the MiddleName field from the list on the left and check the Display attribute in the editing form check-box. Enter the following details:
| • | Field caption: Middle name |
| • | Field type: Text box |
Click OK.
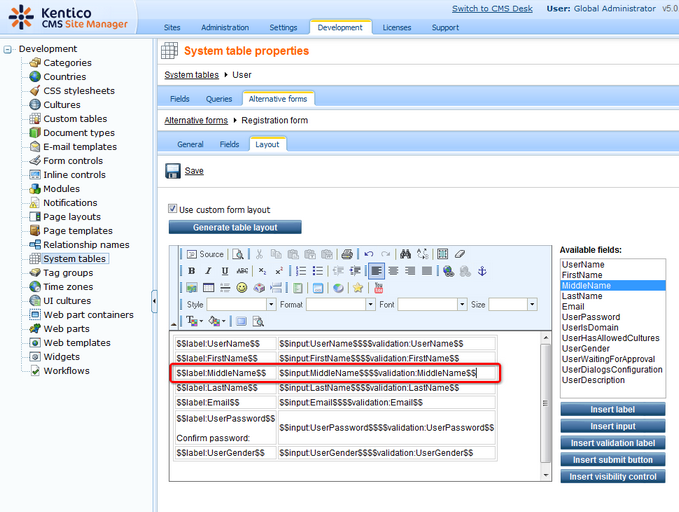
4. Switch to the Layout tab. This is where you can define the layout of the form. Right-click the line with the FirstName controls. From the context menu, choose Row -> Insert row after. Select MiddleName from the Available fields list and use the Insert label, Insert input and Insert validation label buttons below to insert the label, input and validation controls into the new table row. The result should look as in the following screenshot.
Click Save.
5. If you go to the live site now and open the Logon page, you should see the modified version of the alternative form, just as in the screenshot below.

Further steps: You have learned how to modify the registration alternative form. The same way, you can add other fields to the form according to your needs. You may also try creating a completely new alternative form and using it for registration. The new alternative form needs to be specified in the Alternative form property of the Custom registration form web part. You can find a step-by-step tutorial on how to do this in Kentico CMS Developer's Guide -> Membership and User registration -> Creating a custom registration form.

