|
Creating the Profile page |

|

|

|

|
|
Creating the Profile page |
|
|
|
|
On the Profile page, public profiles of users will be displayed based on the wildcard part of the URL. We will set the page's URL to /Members/{UserName}. This means that if you type <sitename>/Members/David.aspx into the browser, David will be recognized as the wildcard part of the URL and David's profile will be displayed by this page.
The profile is displayed using the User public profile web part and is based on the cms.user.EditProfileCommunity alternative form. You can find more information on how to modify the alternative form in this chapter.
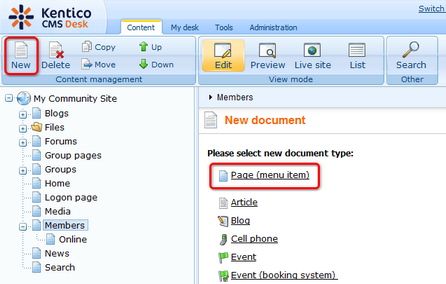
1. Select the Members page in the content tree and click New. Choose the Page (menu item) document type.
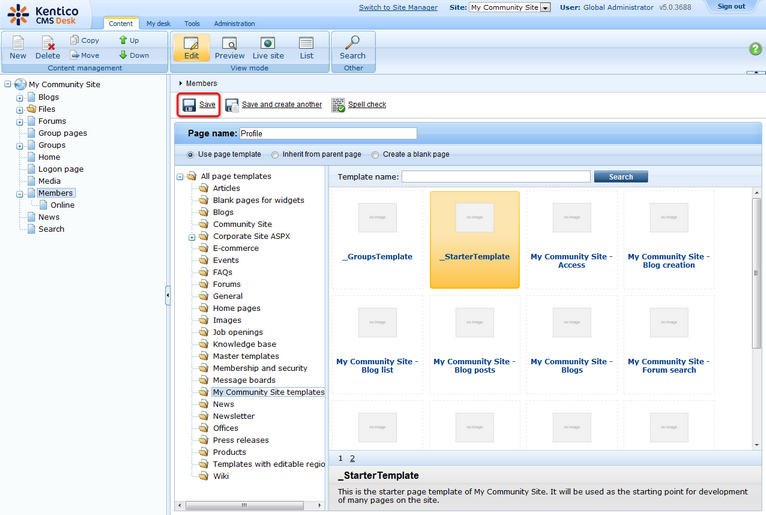
2. Select the My Community Site templates -> _StarterTemplate created in this chapter. Into the Page name field, enter Profile and click Save.
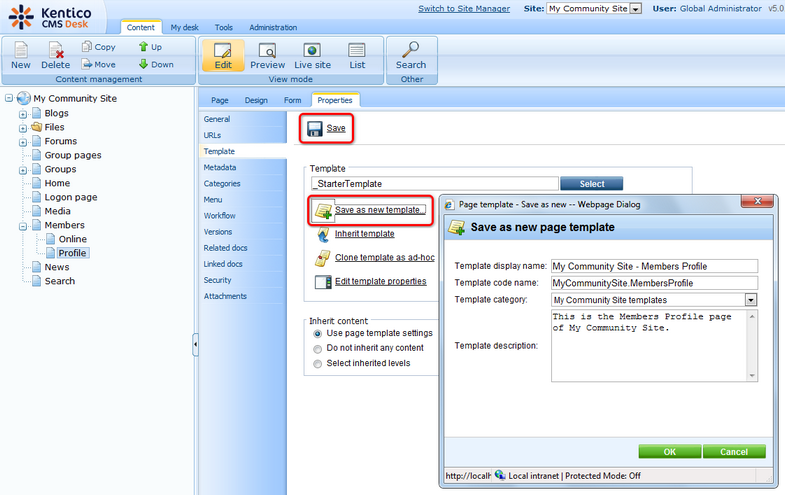
3. Switch to the Properties -> Template tab and click the Save as new template link. Enter the following details in the pop-up dialog:
| • | Template display name: My Community Site - Members Profile |
| • | Template code name: MyCommunitySite.MembersProfile |
| • | Template category: My Community Site templates |
| • | Template description: some text describing the page template |
Click OK. Click Save.
4. Switch to the Properties -> URLs tab and enter /Members/{UserName} into the Document URL path field. Click Save.

5. Switch to the Design tab. In the zoneRight web part zone, we will want three info boxes - for displaying the user's friends, blogs and groups. Let's start with the first one. Click the Add web part (![]() ) icon of the zoneRight web part zone and choose the Community -> Friends -> Friends viewer web part. Set the following properties of the web part, leave the default values for the rest of them:
) icon of the zoneRight web part zone and choose the Community -> Friends -> Friends viewer web part. Set the following properties of the web part, leave the default values for the rest of them:
| • | Transformation name: Community.Transformations.MembersPreviewList |
| • | No record found text: Currently doesn't have any friends. |
| • | Friend status: Approved |
| • | Selected columns: UserID,UserNickName,UserGender,UserDateOfBirth,UserAvatarID,UserCreated,UserName, AvatarGuid |
| • | Web part container: Community Site - Gray Box |
| • | Web part container title: My friends |
Click OK.
6. The second info box will be displaying links to the user's blogs. Click the Add web part (![]() ) icon of the zoneRight web part zone and choose the Listings and viewers -> Repeater web part. Set the following properties of the web part, leave the default values for the rest of them:
) icon of the zoneRight web part zone and choose the Listings and viewers -> Repeater web part. Set the following properties of the web part, leave the default values for the rest of them:
| • | Web part control ID: repeaterBlogs |
| • | Path: /Blogs/% |
| • | Document types: CMS.Blog |
| • | ORDER BY expression: DocumentCreatedWhen DESC |
| • | WHERE condition: NodeOwner = '{%SiteContext.CurrentUser.UserID%}' |
| • | Transformation: Community.Transformations.BlogsListRight |
| • | Hide if no record found: disabled |
| • | No record found text: Currently doesn't have any blogs. |
| • | Web part container: Community Site - Orange Box |
| • | Web part container title: My Blogs |
Click OK.
7. The third info box will be displaying the groups where the user is a member. Click the Add web part (![]() ) icon of the zoneRight web part zone and choose the Community -> Groups viewer web part. Set the following properties of the web part, leave the default values for the rest of them:
) icon of the zoneRight web part zone and choose the Community -> Groups viewer web part. Set the following properties of the web part, leave the default values for the rest of them:
| • | Transformation name: Community.Transformations.GroupsPreviewList |
| • | Show filter: disabled |
| • | ORDER BY condition: GroupDisplayName ASC |
| • | WHERE condition: GroupID IN (Select MemberGroupID FROM Community_GroupMember WHERE MemberUserID = '{%SiteContext.CurrentUser.UserID%}' AND MemberStatus = 0) |
| • | Hide if no record found: disabled |
| • | No record found text: Currently is not member of any group. |
| • | Use default cache dependencies: enabled |
| • | Web part container: Communty Site - Gray Box |
| • | Web part container title: My groups |
Click OK.
8. In the zoneCenter web part zone, the main web part is the User public profile. Click the Add web part (![]() ) icon of the zoneCenter web part zone and choose the Membership -> User public profile web part. Set the following properties of the web part, leave the default values for the rest of them:
) icon of the zoneCenter web part zone and choose the Membership -> User public profile web part. Set the following properties of the web part, leave the default values for the rest of them:
| • | Apply visibility settings: enabled |
| • | Use visibility settings from: cms.user.EditProfileCommunity |
Click OK.
9. Below the user's profile, there will be two message boards. The first one will be used only by the owner of the profile. This will be where the user can post announcements for the other users. Click the Add web part (![]() ) icon of the zoneCenter web part zone and choose the Message boards -> Message board web part. Set the following properties of the web part, leave the default values for the rest of them:
) icon of the zoneCenter web part zone and choose the Message boards -> Message board web part. Set the following properties of the web part, leave the default values for the rest of them:
| • | Web part control ID: MessageBoardAnnouncements |
| • | No messages text: There are currently no announcements. |
| • | Display name: Anouncements of {%SiteContext.CurrentUser.FullName|(encode)true%} |
| • | Message board owner: User message board |
| • | Access: Only Owner |
| • | Enable subscriptions: enabled |
| • | Board base URL: ~/Members/Profile.aspx |
| • | Web part container: Community Site - Blue Box Light |
| • | Web part container title: My announcements |
Click OK.
10. Below the first message board, there will be another one. This one will be a public board, which means that anybody can post messages on it. This is where users can leave comments on the user. Click the Add web part (![]() ) icon of the zoneCenter web part zone and choose the Message boards -> Message board web part. Set the following properties of the web part, leave the default values for the rest of them:
) icon of the zoneCenter web part zone and choose the Message boards -> Message board web part. Set the following properties of the web part, leave the default values for the rest of them:
| • | Web part control ID: MessageBoardComments |
| • | No messages text: There are currently no comments. |
| • | Display name: Comments on {%SiteContext.CurrentUser.FullName|(encode)true%} |
| • | Message board owner: User message board |
| • | Access: Only authenticated users |
| • | Enable subscriptions: enabled |
| • | Board base URL: ~/Members/Profile.aspx |
| • | Web part container: Community Site - Red Box Light |
| • | Web part container title: Comments on me |
Click OK.
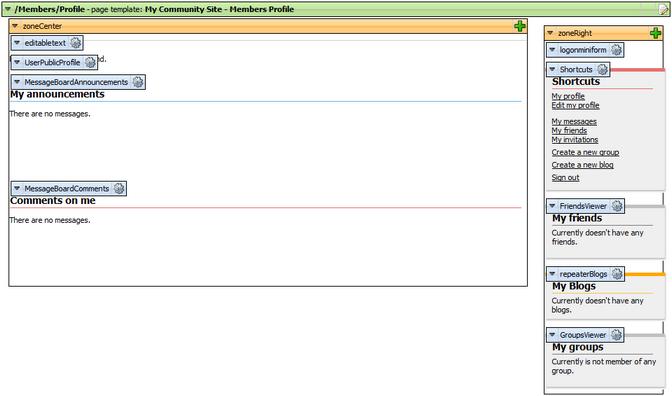
11. The page is now ready. In Design tab, it should look as in the following screenshot.
Page url: http://devnet.kentico.com/docs/5_5r2/communitysiteguide/index.html?creating_the_profile_page.htm

