|
Creating the Create page |

|

|

|

|
|
Creating the Create page |
|
|
|
|
On this page, users will be provided with the possibility to create new groups. This is achieved using the Group registration web part. There will also be the Groups viewer web part in zoneRight, which will be displaying the latest 5 groups. The page is accessible from the Shortcuts menu, by clicking the Create a new group link.
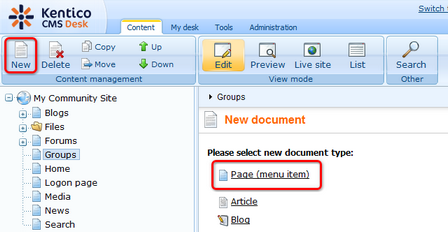
1. Select the Groups page in the content tree and click New. Choose the Page (menu item) document type.
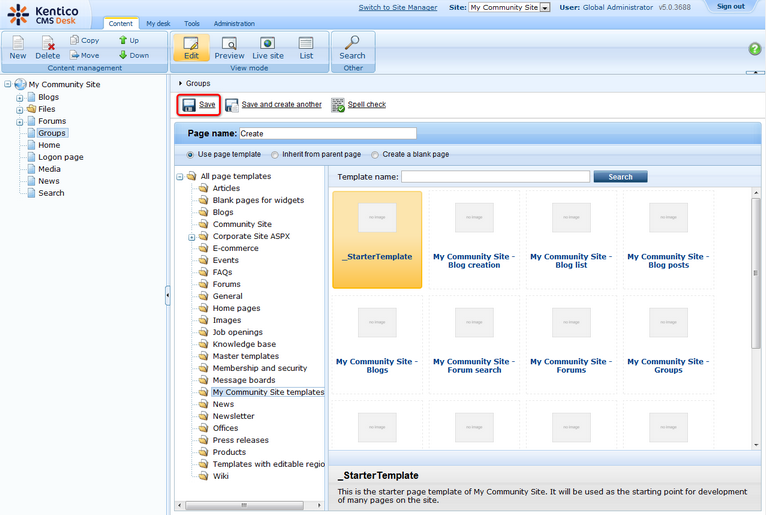
2. Select the My Community Site templates -> _StarterTemplate created in this chapter. Into the Page name field, enter Create and click Save.
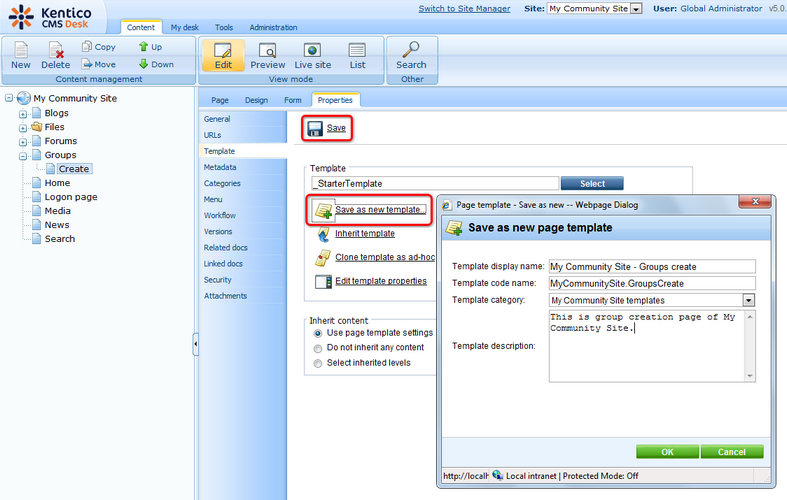
3. Switch to the Properties -> Template tab and click the Save as new template link. Enter the following details in the pop-up dialog:
| • | Template display name: My Community Site - Groups create |
| • | Template code name: MyCommunitySite.GroupsCreate |
| • | Template category: My Community Site templates |
| • | Template description: some text describing the page template |
Click OK. Click Save.
4. Switch to the Design tab. Firstly, delete the Logon mini form in zoneRight. We will not need it on this page as the page is accessible only to authenticated users (the Shortcuts menu doesn't display the link to unauthenticated users).
5. Now that the Logon mini form is deleted, we will add the Groups viewer below the Shortcuts menu. Click the Add web part (![]() ) icon of the zoneRight web part zone and choose the Community -> Groups viewer web part. Set the following properties of the web part, the rest of them can be left at the default values:
) icon of the zoneRight web part zone and choose the Community -> Groups viewer web part. Set the following properties of the web part, the rest of them can be left at the default values:
| • | Transformation name: Community.Transformations.GroupsPreviewList |
| • | Show filter: disabled |
| • | ORDER BY condition: GroupCreatedWhen DESC |
| • | Select Top N groups: 5 |
| • | Hide if no record found: disabled |
| • | No record found text: There are currently no groups. |
| • | Web part container: Community Site - Blue Box |
| • | Web part container title: Recent groups |
Click OK.
6. Let's move on to zoneCenter. First, we will add another Editable text web part for displaying additional info text. Click the Add web part (![]() ) icon of the zoneCenter web part zone and choose the Text -> Editable text web part. You do not need to set any properties of the web part, just leave all of them at the default values.
) icon of the zoneCenter web part zone and choose the Text -> Editable text web part. You do not need to set any properties of the web part, just leave all of them at the default values.
7. Below the second Editable text web part, we will add the main web part of this page - the Group registration web part. Click the Add web part (![]() ) icon of the zoneCenter web part zone and choose the Community -> Group registration web part. Set the following properties of the web part, leave the rest of them at the default values.
) icon of the zoneCenter web part zone and choose the Community -> Group registration web part. Set the following properties of the web part, leave the rest of them at the default values.
| • | Template source alias path: /Groups/Template |
| • | Template target alias path: /Group-pages |
| • | Text after successful registration: Group has been succesfully registered. <a href="{0}">Click here to view group profile</a> |
Click OK.
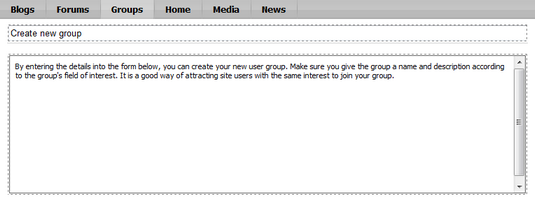
8. Switch to the Page tab. Enter Create new group into the first Editable text web part's text field. Into the second Editable text web part's HTML area, enter the following text:
By entering the details into the form below, you can create your new user group. Make sure you give the group a name and description according to the group's field of interest. It is a good way of attracting site users with the same interest to join your group.
Click Save.
9. The page is now finished. In Design tab, it should look as in the following screenshot.


