|
Available web parts |

|

|

|

|
After registering your web at https://msm.live.com/app and making the necessary settings, you can use the following two web parts on your website to allow authentication via Windows LiveID. The web parts are located under the Membership category in the web part catalog.
Windows LiveID
This webpart can be used to let site visitors sign in to your website using their Live ID. It can be placed on any page of your website. The web part is hidden to authorized users and will be displayed only to unauthorized public site visitors. With default settings, the web part appears as in the following screenshot.
![]()
Although the web part works fine without setting any of its properties, the following can be set:
| • | Sign in text - if entered, link with the entered text will be used instead of the default sign in image |
| • | Sign out text - if entered, link with the entered text will be used instead of the default sign out image |
| • | Show sign out - if checked, sign out link will be displayed after the user logs in |
| • | Show as button - if checked, buttons will be used instead of links |
| • | Sign in image - if set, the image will be used as sign in link |
| • | Sign out image - if set, the image will be used as sign out link |
Live ID required data
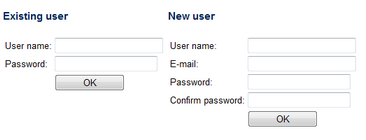
In some cases, you may want the new users to provide some extra details before creating the new account. This can be achieved using the Live ID user data web part. The web part must be placed on a page specified by the Required user data page in Site Manager -> Settings -> Windows LiveID.
The following properties of the web part are the most important:
| • | Allow forms authentication - if checked, new users will be able to enter a password for their new account so that they can log in the usual way as well as via LiveID |
| • | Allow existing user - if enabled, users are allowed to join their existing account with their LiveID |
| • | Default target URL - if no return URL is passed, users will be redirected to URL entered here after merging or creating the account |
| • | Hide for no LiveID - if checked, the web part will be hidden if the page with it is displayed not after LiveID logon (e.g. when accessed by entering its URL into the browser) |
Other specific web part properties are explained in Kentico CMS Web Parts Reference or after clicking the Documentation (![]() ) link in the top right corner of the web part properties window.
) link in the top right corner of the web part properties window.

The screenshot above shows how the web part looks with both the Allow forms authentication and Allow existing user options enabled. In the left part, an existing site users can merge their current user account with the LiveID by just entering thier user name and password. In this case, the LiveID Token will be added to the LiveID field of the existing user account. New users can enter the required details in the right part of the web part.
Page url: http://devnet.kentico.com/docs/devguide/index.html?live_id_available_web_parts.htm