|
Cache access debug |

|

|

|

|
|
Cache access debug |
|
|
|
|
Cache access debugging can be turned on by adding one or more of the following keys into the AppSettings section of your web.config file:
| • | <add key="CMSDebugCache" value="true"/> - enables the Cache access tab in Administration -> System -> Debug |
| • | <add key="CMSDebugCacheLive" value="true"/> - enables cache access debugging on the live site |
| • | <add key="CMSDebugAllCaches" value="true"/> - enables cache access debugging for all operations (including the UI) |
| • | <add key="CMSDebugCacheLogLength" value="10"/> - maximal length of the cache access debug log (number of preserved records) |
| • | <add key="CMSLogCache" value="true" /> - if applied, cache access debug log will be stored into ~/App_Data/logcache.log |
It can also be enabled using the bulk keys.
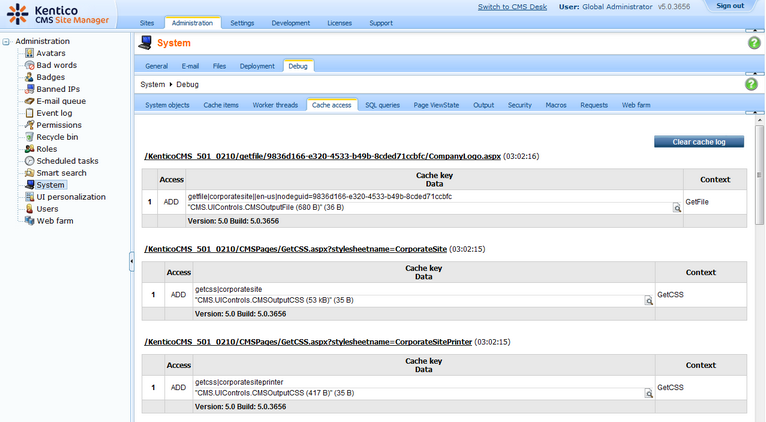
On the Debug -> Cache access tab, you can see a log of accesses to the system cache.
For each access, you can see the URL of the page on whose loading the cache was accessed. The table below the URL always shows the type of Access, the accessed Cache key, the object type and size of cached Data and the Context from which the cache was accessed. For more information about caching in Kentico CMS, please refer to this topic.
All dummy keys can be cleared from the cache using the Clear cache button.
By clicking the View object (![]() ) icon, you can display details of the cached object in a new window. Clicking the Clear cache log button clears all records in this debug log.
) icon, you can display details of the cached object in a new window. Clicking the Clear cache log button clears all records in this debug log.
Page url: http://devnet.kentico.com/docs/devguide/index.html?cache_debugging.htm

