|
Creating a new form |

|

|

|

|
In the following chapters, we will create a new form, publish it and read the entered data.
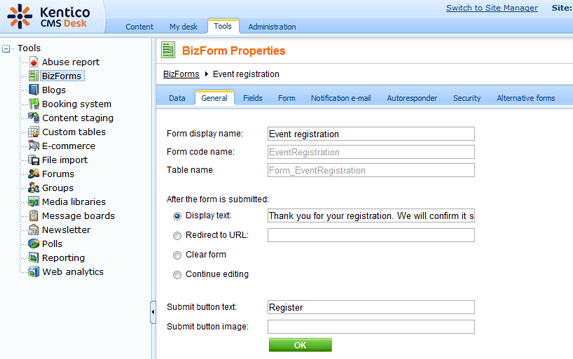
Go to CMS Desk -> Tools -> BizForms and click New BizForm. Enter the following details:
| • | Form display name: Event registration |
| • | Form code name: EventRegistration |
| • | Table name: Form_EventRegistration |
Click OK. On the General tab, in the After the form is submitted section, choose the Display text option and enter the following value:
| • | Display text: Thank you for your registration. We will confirm it shortly by e-mail. |
Enter the caption of the submit button:
| • | Submit button text: Register |
Click OK.

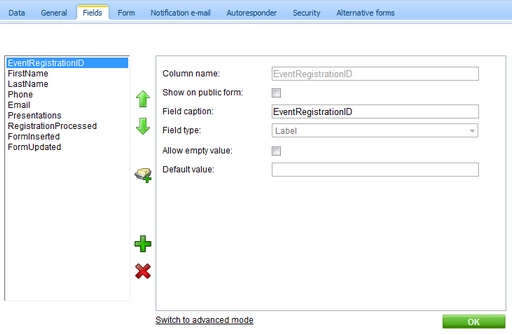
Now we will define the form fields. Go to the Fields tab. Add the following fields using the Simplified mode:
| • | Column name: FirstName |
| • | Show on public form: yes |
| • | Field caption: First name |
| • | Field type: TextBox |
| • | Maximum length: 100 |
| • | Allow empty value: no |
| • | Column name: LastName |
| • | Show on public form: yes |
| • | Field caption: Last name |
| • | Field type: TextBox |
| • | Maximum length: 100 |
| • | Allow empty value: no |
| • | Column name: Phone |
| • | Show on public form: yes |
| • | Field caption: Phone |
| • | Field type: U.S. phone number |
| • | Maximum length: 14 |
| • | Allow empty value: yes |
| • | Column name: Email |
| • | Show on public form: yes |
| • | Field caption: E-mail |
| • | Field type: E-mail |
| • | Maximum length: 100 |
| • | Allow empty value: no |
| • | Column name: Presentations |
| • | Show on public form: yes |
| • | Field caption: Presentations you want to visit |
| • | Field type: Multiple choice |
| • | Options: ASP.NET;ASP.NET ATLAS;ATLAS WPF;Windows Presentation Foundation |
| • | Allow empty value: yes |
| • | Column name: RegistrationProcessed |
| • | Show on public form: no |
| • | Field caption: Registration processed |
| • | Field type: Check box |
| • | Allow empty value: yes |
The last item will be used only by site owners to mark the processed registration forms.
Please note: if you switch to the Advanced mode, you can set up additional options, such as validation rules or design.

|
Form text localization
If you need to display the form on a multi-lingual web site, you can localize the field captions and other text strings using an expression like this:
You can find more details in chapter Localization Expressions. |
Page url: http://devnet.kentico.com/docs/devguide/index.html?creating_a_new_bizform.htm