This chapter will guide you through the process of creating a very simple "Hello world" web part that displays a label and a button. When the button is clicked, it updates the current time displayed in the label.
| 1. | Open the web project in Visual Studio 2005 (or Visual Web Developer) using the WebProject.sln file or using File -> Open -> Web site in Visual Studio. |
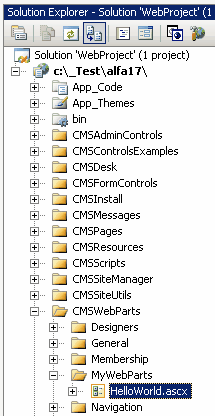
| 2. | Right-click the CMSWebParts folder in the Solution Explorer window and choose New Folder. Rename the folder to MyWebParts. |
| 3. | Right-click the MyWebParts folder and choose Add New Item. Choose to create a new Web User Control and call it HelloWorld.ascx. |

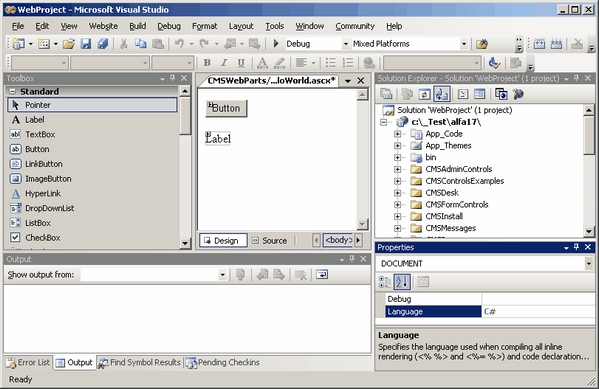
| 4. | Display the HelloWorld control in Design mode. Drag and drop a new Button control and a new Label control on the form: |
| 5. | Double-click the Button control and add the following code to the Button1_Click method: |
[C#]
Label1.Text = DateTime.Now.ToString(); |
[VB.NET]
Label1.Text = DateTime.Now.ToString() |
| 6. | Add the following line to the beginning of the code: |
[C#]
using CMS.PortalControls; |
[VB.NET]
Imports CMS.PortalControls |
| 7. | Change the following line: |
[C#]
public partial class CMSWebParts_MyWebParts_HelloWorld : System.Web.UI.UserControl |
[VB.NET]
Partial class CMSWebParts_MyWebParts_HelloWorld Inherits System.Web.UI.UserControl
to
Partial class CMSWebParts_MyWebParts_HelloWorld Inherits CMSAbstractWebPart |
It ensures that the user control behaves as a web part.
Please make sure that inheritance is set to Inherits="CMSWebParts_MyWebParts_HelloWorld" in the HelloWorld.ascx file, as Visual Studio does not always change it automatically.
| 8. | Add the following code to the Page_Load method: |
[C#]
Button1.Text = (string) PartInstance.GetValue("ButtonText"); |
[VB.NET]
(Visual Basic.NET doesn't create the Page_Load method automatically, so you need to add the whole method:)
protected Sub Page_Load(ByVal sender As Object, ByVal e As System.EventArgs) _ Handles Me.Load Button1.Text = CType(PartInstance.GetValue("ButtonText"), String) End Sub |
It sets the button text to the value configured in Kentico CMS Desk.
| 9. | Save all changes. |
| 10. | Open Site Manager -> Development -> Web parts, click the root and click New category. Enter My web parts into the Category display name field, MyWebParts into the Category name field and click OK. |
| 11. | Click the new category and click New web part. Click the Create a new web part radio button and enter the following values: - Web part display name: Hello world - Web part code name: HelloWorld - Web part file name: MyWebParts/HelloWorld.ascx Click OK. |
| 12. | Switch to CMS Desk. |
| 13. | Click the Services page in the content tree and switch to the Design mode. |
| 14. | Add the new Hello world web part to the left zone and set the value of the Button text field to Hello world! |
| 15. | Now switch to the Live site mode. You will see the button with text Hello world! When you click it, the label displays current date and time: |
You have learned how to create a simple web part.
|
Tip: Displaying content on the web part
You can also use Kentico CMS Controls on the web part to display content from Kentico CMS.
|
