Adding a filter to the BizForm data listing page
Kentico doesn’t include a filter when displaying the data of a BizForm in CMSDesk / Tools / Forms / / Data. However it’s easy to add a simple one yourself.
We will create a DropDownList containing all the available fields in the BizForm, a TextBox for the input and an update button. To achieve this, you will have to modify two files:
~\CMSModules\Bizforms\Tools\BizForm_Edit_Data.aspx
and
~\CMSModules\Bizforms\Tools\BizForm_Edit_Data.aspx.cs
Please modify the first file (BizForm_Edit_Data.aspx) to include the following code in the
<asp:Content … > tags:
<asp:TextBox ID="TextBox1" runat="server"></asp:TextBox>
<asp:DropDownList  ID="DropDownList1" runat="server"></asp:DropDownList>
<asp:Button ID="Button1"  runat="server" Text="Update" onclick="Button1_Click" />
The code of this file will look something like this:
<%@ Page Language="C#" AutoEventWireup="true"
    Inherits="CMSModules_BizForms_Tools_BizForm_Edit_Data" EnableEventValidation="false"
    MasterPageFile="~/CMSMasterPages/UI/SimplePage.master" Title="BizForm Data" Theme="Default" CodeFile="BizForm_Edit_Data.aspx.cs" %>
<%@ Register Src="~/CMSAdminControls/UI/UniGrid/UniGrid.ascx" TagName="UniGrid" TagPrefix="cms" %>

<asp:Content ID="cntBody" runat="server" ContentPlaceHolderID="plcContent">

<asp:TextBox ID="TextBox1" runat="server"></asp:TextBox>
<asp:DropDownList  ID="DropDownList1" runat="server"></asp:DropDownList>  <asp:Button ID="Button1"
    runat="server" Text="Update" onclick="Button1_Click" />

    <cms:UniGrid runat="server" ID="gridData" EnableViewState="true" GridName="~/CMSModules/BizForms/Tools/BizForm_Edit_Data.xml" IsLiveSite="false" />
    <asp:Button Text="Delete" id="btnDelete" runat="server" OnClick="Delete_Click" />

</asp:Content>
Then, we need to modify the second (BizForm_Edit_Data.aspx.cs) file. Please add the following method at the end of the file, for example:
protected void Button1_Click(object sender, EventArgs e)
    {
    }
This method will only cause a postback and refresh the content of the grid.
Now we need to add the logic in the Page_Load method. Please customize the method, so the part within the last if-condition looks like this:
if (bfi != null)
        {
            dci = DataClassInfoProvider.GetDataClass(bfi.FormClassID);
            if (dci != null)
            {
                className = dci.ClassName;

                //initialize filter
                if (DropDownList1.Items.Count < 1)
                {
                    foreach (FormItem columnName in bfi.Form.ItemsList)
                    {
                        ListItem li = new ListItem
                        {
                            Text = columnName.ToString()
                        };
                        DropDownList1.Items.Add(li);
                    }
                }

                // Set alternative form and data container
                gridData.ObjectType = BizFormItemProvider.GetObjectType(className);
                gridData.FilterFormName = className   "."   "filter";
                gridData.FilterFormData = bfi;

                // Get primary column name
                gridData.OrderBy = primaryColumn = GetPrimaryColumn(FormInfo, bfi.FormName);

                if(DropDownList1.SelectedIndex != null && !string.IsNullOrEmpty(TextBox1.Text))
                {
                    gridData.WhereClause = DropDownList1.SelectedItem.Value   " LIKE '%"   TextBox1.Text   "%'";
                }
            }
        }
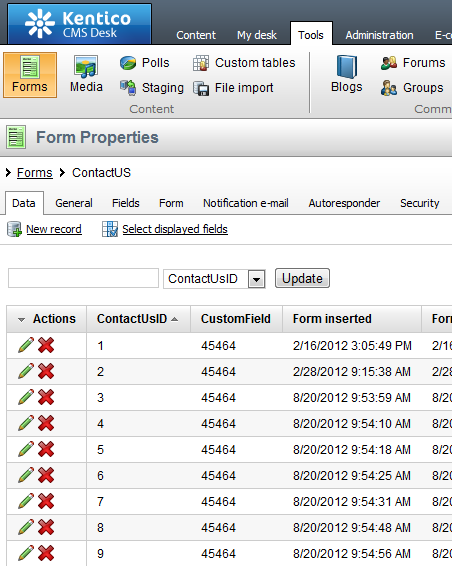
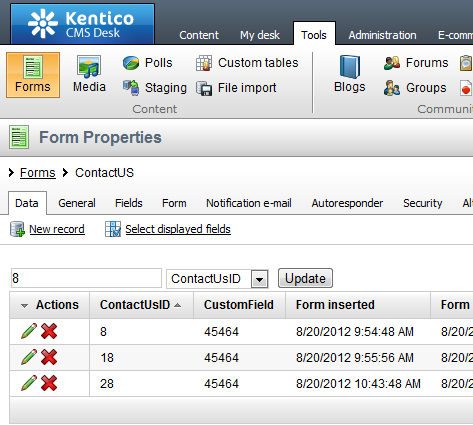
Now you should be able to filter the data as in the below screenshots:
Please note, that this is only a simple example, which can be extended according to your needs.
Note: If you don’t need to execute custom logic during filtering, here is a faster approach. Just create an alternative form with the name and code name
filter. It will be used to filter out the displayed results. See here:
Creating filter forms for more details.
-bp-
See also: UniGrid overview
Advanced UniGrid exampleApplies to: Kentico CMS 6.x, 7.x