|
|

Managing avatars |

|

|

|

|
|
Managing avatars |
|
|

|
|
|
|
Managing avatars |
|
|
|
|
|
Managing avatars |
|
|
|
|
|
|
||
The administration interface for managing locally stored avatars can be found in Site Manager -> Administration -> Avatars.
You can limit which avatars should be displayed using the filter above the list. Possible filtering parameters are Avatar name, Avatar type (user or group avatar, avatars of type all can be used for both) and Avatar kind (shared avatars are the predefined ones, while custom avatars are those that users uploaded from a file). Click Search to display only avatars matching the selected criteria.
You can Edit (![]() ) or Delete (
) or Delete (![]() ) the listed avatars.
) the listed avatars.

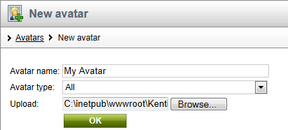
1. New predefined avatars can be created using the ![]() New avatar at the top part of the page. Click it.
New avatar at the top part of the page. Click it.
2. You will be asked to enter the following details:
•Avatar name - the name of the avatar.
•Avatar type - choose if the avatar can be used for users, groups or both.
•Upload - click the Browse button to select an image file on your local machine.
When entered, click OK to proceed.
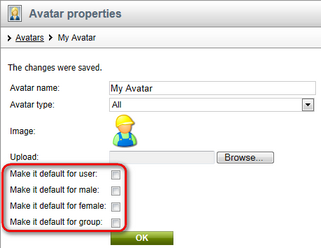
3. The avatar is now created and if you go back to the list of avatars, you should see the avatar present in the list. However, you can set the following extra properties of the avatar now or any time later when editing the avatar:
•Make it default for user - if checked, this avatar will be the default avatar for users with an unspecified gender (including public visitors).
•Make it default for male - if checked, this avatar will be the default avatar for male users.
•Make it default for female - if checked, this avatar will be the default avatar for female users.
•Make it default for group - if checked, this avatar will be the default avatar for groups.
Default avatars will be assigned to new users or groups automatically when the user or group is created.
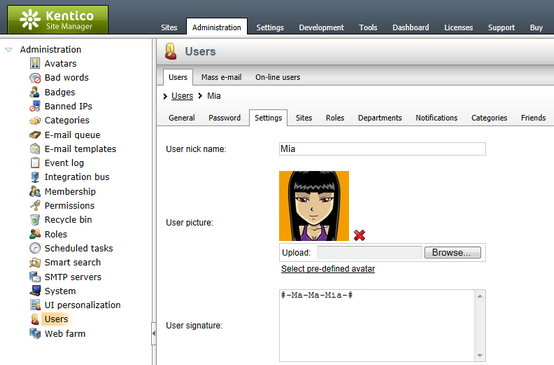
Site administrators can change the avatar of any user. If you go to Administration -> Users in CMS Desk or Site Manager, choose to Edit (![]() ) a user in the list and switch to the Settings tab, you should see the given user's avatar in the User picture field as shown in the screenshot below. You can Delete (
) a user in the list and switch to the Settings tab, you should see the given user's avatar in the User picture field as shown in the screenshot below. You can Delete (![]() ) the avatar or Upload your own avatar from a file.
) the avatar or Upload your own avatar from a file.
If default avatars are enabled in site settings, you can also click the Select pre-defined avatar link, which displays a gallery of pre-defined avatars from which you can easily pick one by clicking it and clicking OK.
Changing group avatars in CMS Desk
Site administrators can change the avatar of any group. If you go to CMS Desk -> Tools -> Groups and choose to Edit (![]() ) some of the groups, you should see the group's avatar in the Avatar section, as depicted in the screenshot below. A Group avatar can be Deleted (
) some of the groups, you should see the group's avatar in the Avatar section, as depicted in the screenshot below. A Group avatar can be Deleted (![]() ), a new one can be Uploaded from a file or selected from a gallery of predefined avatars (if this is enabled in site settings).
), a new one can be Uploaded from a file or selected from a gallery of predefined avatars (if this is enabled in site settings).
