|
|

Transformations |

|

|

|

|
|
Transformations |
|
|

|
|
|
|
Transformations |
|
|
|
|
|
Transformations |
|
|
|
|
|
|
||
The functionality of transformations is very similar to that of templates used by standard ASP.NET list controls such as the Repeater. The main difference is that our transformations are stored separately in the database and can easily be used repeatedly. They can be assigned to listing web parts or controls through the appropriate Transformation properties. The use of transformations is supported by all web parts that can display document data, as well as by those listing controls that are designed to work directly with Kentico CMS documents.
There are several different approaches that you can use when writing transformations. You can select one of the following transformation types, which determines how the system renders the transformation's code:
•ASCX - with this option, the code of the transformation supports ASCX markup, i.e. the same syntax that you would use to edit a standard web form or user control, including inline code, embedded controls, standard ASP.NET data binding expressions and special methods designed for use in transformations. You can access the fields of the transformed document through standard data binding expressions in format: <%# Eval("ColumnName") %>
•Text/XML - the system processes the code only as basic HTML. This means that any ASCX markup, such as controls or inline code, are not functional when the transformation is rendered. You may use Kentico CMS Macro expressions and methods to insert dynamic values into the content. Expressions in the following format allow you to easily get the values of the given document's fields: {%ColumnName%}
•HTML - works the same way as the Text/XML option, but editing is done through the WYSIWYG editor. The rendered output of HTML code will be shown inside the editor.
•XSLT - this option can be selected for transformations that use XSL elements to render the data. The code must be in valid XML format.
•jQuery - these transformations provide a way to define the jQuery templates used by the Chat module.
For security reasons, the code of ASCX type transformations may only be edited by users who have the Edit ASCX code permission for the Design module. This permission can only be assigned by global administrators.
Since text‑based transformations (Text/XML or HTML types) are only processed as basic HTML, they cannot be used to compromise the security of the website. Another advantage of these transformation types is that they do not need to be compiled, which means they may be used and modified even if the Virtual path provider is not available, such as in a precompiled or medium trust environment.
Transformations are categorized under the document types that they are supposed to display. They can be managed in the Kentico CMS administration interface at Site Manager -> Development -> Document types -> ... Edit document type ... -> Transformations. Some document types do not represent an object but serve only as a container for transformations and queries.
The full name used to identify transformations uses the following format: <document type code name>.<transformation name>
The sample sites include many transformations for all document types and you can modify them or write new transformations to suit any of your requirements.
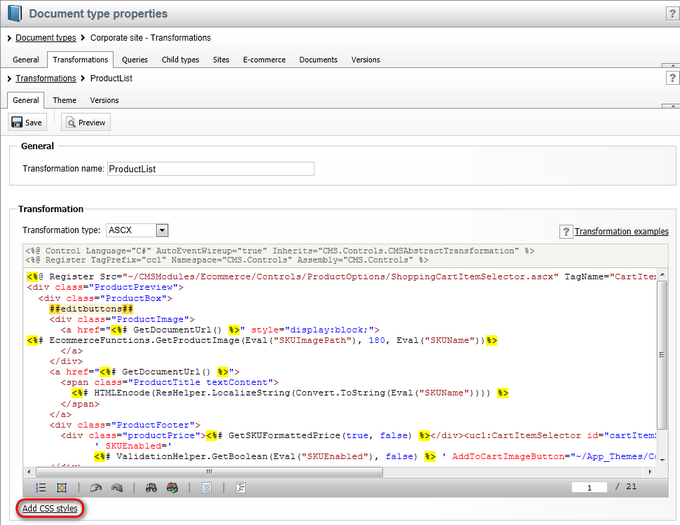
The code of the CorporateSite.Transformations.ProductList ASCX transformation, which is used to display lists of products on the sample Corporate Site, looks like this:
<%@ Register Src="~/CMSModules/Ecommerce/Controls/ProductOptions/ShoppingCartItemSelector.ascx" TagName="CartItemSelector" TagPrefix="uc1" %> |
When this transformation is assigned to a listing web part or control that has products (SKUs) in its data source, the output HTML code of individual products contains the values returned by the methods and data binding expressions, like in the following example (please note that a part of the code is omitted to save space):
<div class="ProductPreview"> <div class="ProductBox"> <div class="ProductImage"> <a href="/KenticoCMS/Products/Laptops-and-Tablets/Apple-iPad-2.aspx" style="display:block;"> <img alt="Apple iPad 2" src="/KenticoCMS/getmetafile/f1e09daf-f8c5-4252-ba7b-222d33e01ff8/ipad2_product.aspx?maxsidesize=180" border="0" /> </a> </div> <a href="/KenticoCMS/Products/Laptops-and-Tablets/Apple-iPad-2.aspx"> <span class="ProductTitle textContent"> Apple iPad 2 </span> </a> <div class="ProductFooter"> <div class="productPrice">$510.99</div>
...
</div> </div> |
The final output of this product on the website then looks like this:

The CSS classes used in the transformation code can either be defined in the stylesheets used by the website and individual pages, or added directly to the transformation object. To do this:
1. Edit the transformation on its General tab.
2. Click Add CSS styles below the code editor.
3. The CSS styles field appears, where you can add any required CSS classes.
4. Click ![]() Save.
Save.
If the styles require any additional files (such as images), you can add them on the Theme tab.
For more information about page component CSS styles, see the Development -> CSS stylesheets and design -> CSS for page components topic.