|
|

Services page |

|

|

|

|
|
Services page |
|
|

|
|
|
|
Services page |
|
|
|
|
|
Services page |
|
|
|
|
|
|
||
Now we will create a new site section for services. This site section will contain a left tree menu and a single editable region.
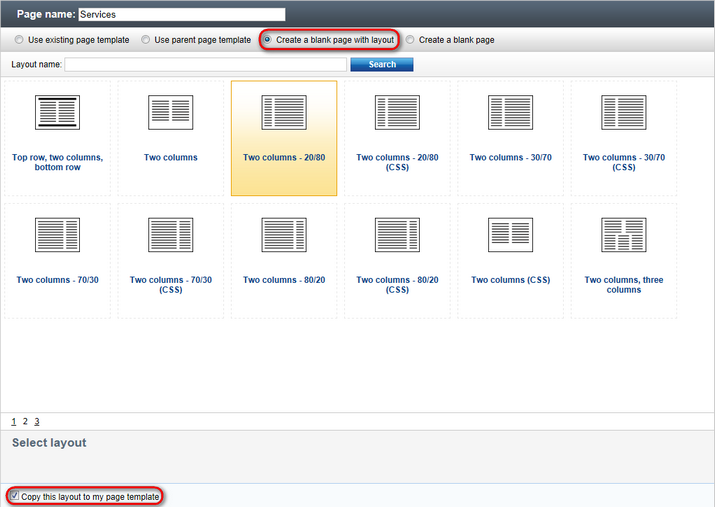
Click the root of the content tree and click New. Choose to create a new Page (menu item). Enter Services as the Page name and choose to Create a blank page with layout using the Two columns - 20/80 layout. Leave the Copy this layout to my page template box checked.
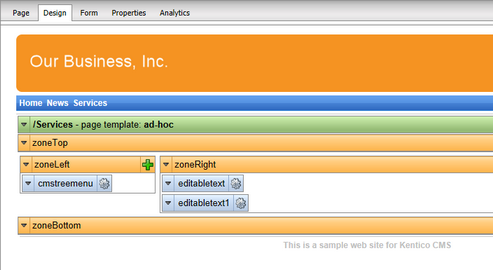
Click ![]() Save. Click Design and add the Navigation -> Tree menu web part into the zoneLeft zone. Set the following menu properties:
Save. Click Design and add the Navigation -> Tree menu web part into the zoneLeft zone. Set the following menu properties:
•Content -> Path: /{0}/% (this means that the menu starts from the second level)
•Design -> Item image URL: ~/app_themes/mysite/images/bullet.gif
•Design -> Open item image URL: ~/app_themes/mysite/images/bullet.gif
The ~ character represents the root of the website and it ensures that the image will be displayed correctly whether you run the websites in the root or in a virtual directory.
Click OK.
Add the Text/Editable text web part into the zoneRight zone and set the following values:
•Editable region title: Header
•Editable region type: Text box
•Editable region width: 600
•Content before: <h1>
•Content after: </h1>
Click OK. Add another web part of type Text/Editable text below the first one and set the following web part properties:
•Editable region title: Main text
•Editable region type: HTML editor
•Editable region height: 300
Click OK. The design tab of the page now looks like this:
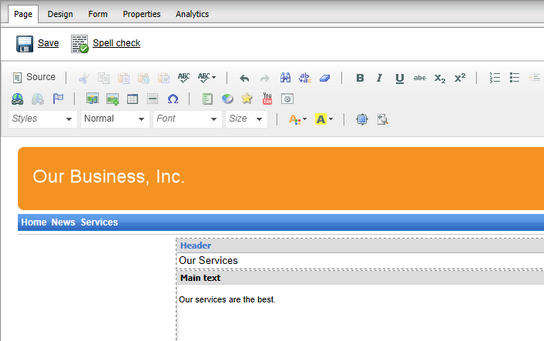
Click the Page tab and enter some text into the editable regions. Click ![]() Save.
Save.
Now we will save this page as a re-usable template so that we can use it for sub-pages. Go to Properties -> Template and click Save as new page template. Enter the following values:
•Template display name: Services page template
•Template code name: ServicesPageTemplate
•Template category: General
Click OK and click ![]() Save in the template dialog.
Save in the template dialog.
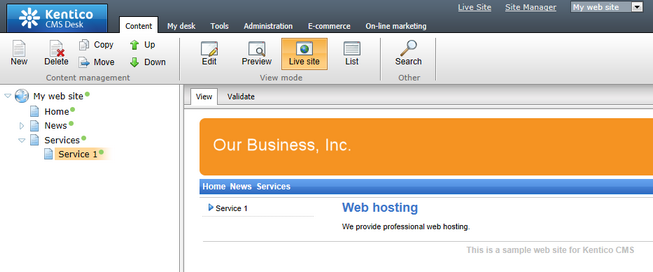
Click New in the main toolbar and choose to create a new Page (menu item) under the /Services page. Call the page Service 1 and choose the General/Services page template template. Click ![]() Save. Enter the following text:
Save. Enter the following text:
•Header: Web hosting
•Main text: We provide professional web hosting.
Click ![]() Save.
Save.
Click Live site. You will see a page like this:
In this topic, you have learned how to create a new page template with editable regions from scratch and how to re-use it for multiple pages.