|
|

Available web parts |

|

|

|

|
|
Available web parts |
|
|

|
|
|
|
Available web parts |
|
|
|
|
|
Available web parts |
|
|
|
|
|
|
||
After configuring the settings, you can use the following two web parts on your website to allow OpenID authentication. The web parts are located under the Membership category in the web part catalog.
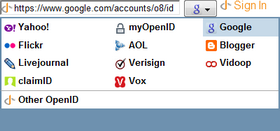
This web part can be used to let site visitors sign in to your website using their OpenID. It can be placed on any page of your website. With default settings, the web part appears as in the screenshot below.
It lets you choose from a number of websites which support OpenID and where you might already have an account. If you choose one and click Sign In, you will be redirected to the logon page on that site. After successful logon, you will be redirected back to the Kentico CMS site where you came from, but you will be authenticated and a new account will be created in case this is your first logon.
Even though the web part works fine with default settings, it has the following specific properties to fine-tune its behavior:
•Providers - Providers used for OpenID login. Each provider must be specified on a single line. Total number of 3 parameters should be included for each provider:
1 - provider display name
2 - provider login URL
3 - provider icon name placed in ~/CMSWebParts/Membership/OpenID/OpenID_files/.
Each parameter must be separated by '|'. The third parameter is optional and if not supplied then the default OpenID icon will be displayed. Provided URL must be the login URL of the OpenID provider. If the username (or blog name, user id, etc.) is part of the URL, then use the ##username## macro to replace the username part of the URL.
Example: myOpenID|http://##username##.myopenid.com/|myopenid.ico
•Display textbox - indicates if the OpenID provider textbox should be visible; if disabled then only the sign in button will be visible
•Sign in text - if entered, a link with the entered text will be used instead of the default sign in image
•Sign out text - if entered, a link with the entered text will be used instead of the default sign out image
•Show sign out - if checked, the sign out link will be displayed after the user logs in
•Show as button - if checked, buttons will be used instead of links
•Sign in image - if set, the image will be used as the sign in link
•Sign out image - if set, the image will be used as the sign out link
•Required data for new users - using these settings, you can request additional data from the OpenID provider, which will be added to the newly created user account. In case that you are using the OpenID required data web part, the requested data will be pre-filled in the web part.
In some cases, you may want new users to provide some extra details before their account is created. For example, if your site is configured to require registration approval or double opt-in, all users need a valid e-mail address to help activate their account.
This can be achieved using the Open ID required data web part. The web part must be placed on the page specified by the Required user data page value in Site Manager -> Settings -> Security & Membership -> Authentication -> OpenID.
The following properties of the web part are the most important:
•Allow forms authentication - if checked, new users will be able to enter a password for their new account so that they can log in the usual way as well as via OpenID
•Allow existing user - if enabled, users are allowed to join their existing account with OpenID
•Default target URL - if no return URL is passed, users will be redirected to the URL entered here after merging or creating the account
•Hide for no OpenID - if checked, the web part will be hidden if the page with it is displayed without OpenID logon (e.g. when accessed by entering its URL into the browser)
Other specific web part properties are explained in Kentico CMS Web Parts Reference or after clicking the Documentation (![]() ) link in the top right corner of the web part properties window.
) link in the top right corner of the web part properties window.
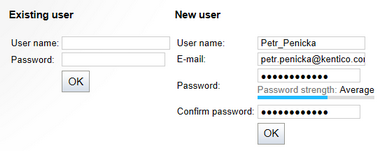
The screenshot above shows how the web part looks with both the Allow forms authentication and Allow existing user options enabled. In the left part, an existing site users can merge their current user account with the OpenID by just entering their user name and password. In this case, the OpenID will be added to the OpenID field of the existing user account. New users can enter the required details in the right part of the web part.