|
|

Editing a group |

|

|

|

|
|
Editing a group |
|
|

|
|
|
|
Editing a group |
|
|
|
|
|
Editing a group |
|
|
|
|
|
|
||
There are two ways how group properties can be edited:
•On-site management using the Group profile web part; this is typically used by group administrators
•Administration interface in CMS Desk -> Tools -> Groups, after choosing to Edit (![]() ) a group; this is typically used by site administrators
) a group; this is typically used by site administrators
Both of the two approaches provide the same tabs layout, with the difference that there are some extra settings in the administration interface compared to on-site management. These will be marked as AI only in the descriptions below.
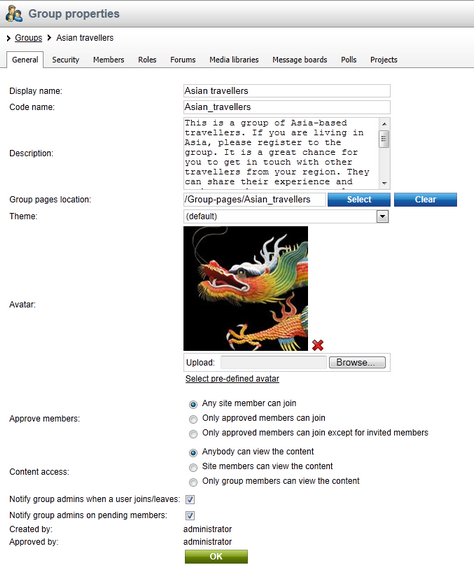
General tab
On this tab, you can set the general properties of the group:
•Display name - name of the group displayed on the site and in the administration interface; AI only
•Code name - name of the group used in site code; AI only
•Description - text describing the group
•Group pages location - node alias path of the location where group pages of the group are stored
•Theme - allows the selection of one of the website CSS stylesheets that will be used by the pages of the group
•Avatar - group avatar image
•Approve members - determines if users can join the group with or without a group admin's approval; the last option allows invited members to join without approval
•Content access - determines who can view content of the group pages
•Notify group admins when a user joins/leaves - if checked, group administrators will receive a notification e-mail when a user joins/leaves the group
•Notify group admins on pending members - if checked, group administrators will receive a notification e-mail when a user requests to join the group and admin's approval is needed
•Created by - displays who created the group
•Approved by - displays who approved the group to be created on the site
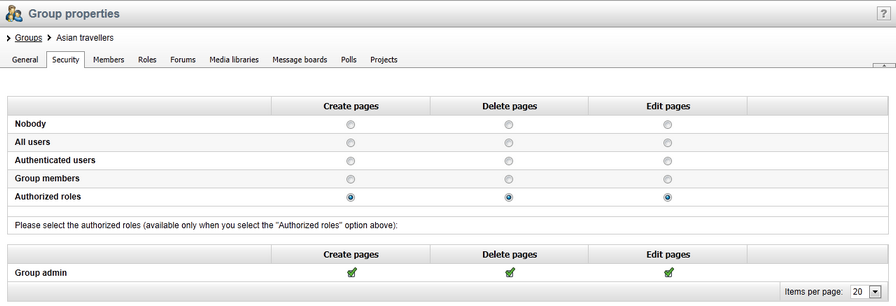
On this tab, you can use the matrix to set permissions for group pages. The following permissions can be assigned:
•Create pages - users can create group pages
•Delete pages - users can delete group pages
•Edit pages - users can edit group pages
These permissions can be assigned to:
•Nobody - nobody can perform the action
•All users - all users can perform the action
•Authenticated users - only signed-in users can perform the action, i.e. anonymous public users cannot perform it
•Group members - only group members can perform the action, i.e. authenticated non-group members and anonymous users cannot perform it
•Authorized roles - only members of the group roles selected below can perform the action
|
Group admin's permissions
Group administrators can perform any of these actions, even if they don't have the permissions assigned.
|
On this tab, you can see a list of all members of the group. You can Edit (![]() ) or Delete (
) or Delete (![]() ) users in the list. You can also Approve (
) users in the list. You can also Approve (![]() ) members' requests for joining the group or Reject (
) members' requests for joining the group or Reject (![]() ) them from the group. Once rejected, the user cannot request to join the group until they are approved again.
) them from the group. Once rejected, the user cannot request to join the group until they are approved again.
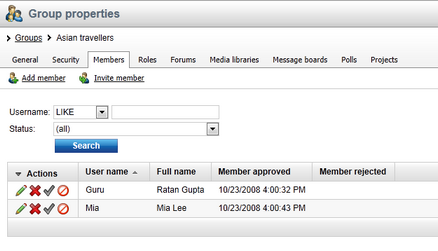
Clicking the ![]() Add member link, you can add users to the group directly, without sending an invitation to them. This is possible only in the administration interface. On the live site, only the
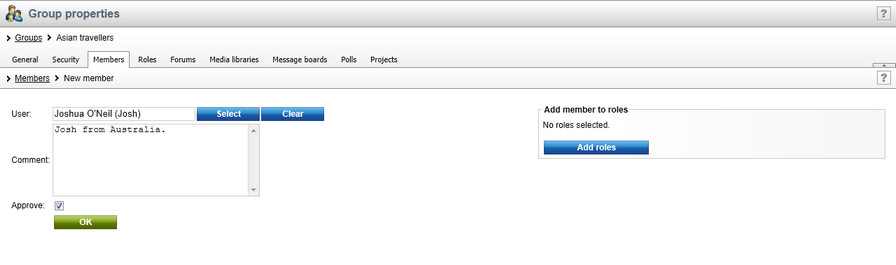
Add member link, you can add users to the group directly, without sending an invitation to them. This is possible only in the administration interface. On the live site, only the ![]() Invite member link is displayed. When adding a user to a group, you have the following options:
Invite member link is displayed. When adding a user to a group, you have the following options:
•User - select an existing site user who you want to add to the group
•Comment - text comment that you can add to the user; this comment is not sent to the user, it is only displayed in the administration interface
•Approve - if checked, the user will be automatically approved; if not, a user will need a group admin's approval before they become members of the group
•Add roles - you can use this button to assign the user to group roles; a dialog where you can select from a list of available group roles is opened
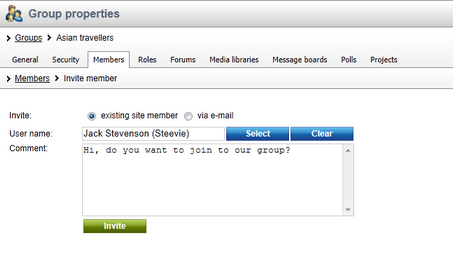
After clicking the ![]() Invite member link, the dialog displayed in the screenshot below will be displayed. There are two ways of invitation:
Invite member link, the dialog displayed in the screenshot below will be displayed. There are two ways of invitation:
•Invite existing site member - after selecting an existing site user in the User name field, an invitation e-mail will be sent to the user's e-mail address. The text entered into the Comment field will be included in the e-mail. Users can then join the group either by clicking a link in the e-mail, or via the My sent invitations web part.
•Invite via e-mail - this way, you can send the invitation to any e-mail address that you enter into the E-mail field. In this case, user will be required to register to the site after clicking the join link in the e-mail. Text entered to the Comment field will be included in the e-mail.
On this tab, you can see a list of roles defined for the group. These roles are applicable only in the context of the group. Don't confuse them with website roles, which can be set in Site Manager -> Administration -> Roles.
Roles in the list can be Edited (![]() ) and Deleted (
) and Deleted (![]() ).
).
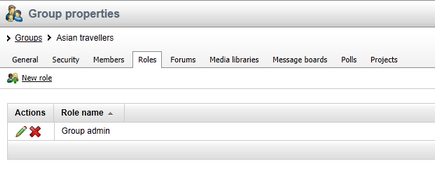
If you click the ![]() New role link above the list, you can define a new role for the group. The following properties can be entered:
New role link above the list, you can define a new role for the group. The following properties can be entered:
•Role display name - name of the role that will be used on the live site and in the administration interface
•Role code name - name of the role used in your code; AI only
•Role description - text description of the role
•Can manage the group - indicates if members of the role can manage the group by means of the Group profile web part

When Editing (![]() ) a role, two tabs are offered. On the General tab, you can change the details entered when creating the role, as described above. On the Users tab, you can see a list of all members assigned to the role. These can be removed from the role by selecting the checkbox to the left of users in the list and clicking the Remove selected button. New users can be added to the role using the Add users button.
) a role, two tabs are offered. On the General tab, you can change the details entered when creating the role, as described above. On the Users tab, you can see a list of all members assigned to the role. These can be removed from the role by selecting the checkbox to the left of users in the list and clicking the Remove selected button. New users can be added to the role using the Add users button.

On this tab, you can create and manage the group's forums. As these forums are standard Kentico CMS forums set into the context of the group, please refer to the Modules -> Forums chapter of this guide for more information on their management.
On this tab, you can create and manage the group's media libraries. As these are standard Kentico CMS media libraries set into the context of the group, please refer to the Modules -> Media libraries chapter of this guide for more information on their management.
On this tab, you can manage the group's message boards. As these are standard Kentico CMS message boards set into the context of the group, please refer to the Modules -> Message boards chapter of this guide for more information on their management.
On this tab, you can manage the group's polls. As these are standard Kentico CMS polls set into the context of the group, please refer to the Modules -> Polls chapter of this guide for more information on their management.
On this tab, you can manage the group's projects. As these are standard Kentico CMS projects set into the context of the group, please refer to the Modules -> Project management chapter of this guide for more information on their management.
