|
|

Configuring custom file types |

|

|

|

|
|
Configuring custom file types |
|
|

|
|
|
|
Configuring custom file types |
|
|
|
|
|
Configuring custom file types |
|
|
|
|
|
|
||
You can allow custom media types by a simple modification to the site's web.config and MediaControl.ascx inline controls. Any media types can be enabled to be recognized by the system in case that you have the right player for the file type.
The following example shows how to enable .flv videos in the system.
1. Add the following keys into the appSettings section of your web.config file. Add your custom extensions for the particular document types here for the files to be recognized as image/audio/video by the system, as you did with the highlighted flv extension.
<add key="CMSImageExtensions" value="bmp;gif;ico;png;wmf;jpg;jpeg;tiff;tif" /> <add key="CMSAudioExtensions" value="wav;wma;mp2;mp3;mid;midi;mpga" /> <add key="CMSVideoExtensions" value="avi;mp4;mpg;mpeg;wmv;qt;mov;rm;flv" /> |
2. Add the flv extension to the enumeration in Site Manager -> Settings -> Content -> Media -> Media file allowed extensions, which will allow upload of these files into media libraries, and click the Save button.
You may also want to add the extension to the Site Manager -> Settings -> System -> Files -> Upload extensions enumeration, which will allow upload of these files as CMS.File documents and document attachments, and click the Save button.
3. Download a player for your media type. In this example, you will use the JW FLV Player available here: http://www.longtailvideo.com/players/jw-flv-player/.
4. Extract the swfobject.js and player.swf files and put them in a folder under your website folder, e.g. ~/FlvPlayer. This path will be used in the CreateFlvObject(), which you will create in step 6.
5. Open the ~/CMSInlineControls/MediaControl.ascx.cs inline control in Visual Studio and replace the Page_PreRender method with the following code. It is the original code of the method with the first condition added. The added code ensures that when the file extension is .flv, the CreateFlvObject() method is called.
[C#]
protected void Page_PreRender(object sender, EventArgs e) { if ((this.Type != null) && (this.Type.TrimStart('.').ToLower() == "flv")) { CreateFlvObject(); } else if (MediaHelper.IsFlash(this.Type)) { CreateFlash(); } else if (ImageHelper.IsImage(this.Type)) { CreateImage(); } else { CreateMedia(); } } |
6. Now you need to add the CreateFlvObject() private method to the control. In this example, it looks like the code sample below.
The method creates a new DIV tag for the FLV player, with ID generated in the divID variable. It also handles the player URL in a special way - the URL must be absolute and must end with flv. Support for the Autoplay and Loop properties of the player is also ensured.
[C#]
private void CreateFlvObject() { string playerID = Guid.NewGuid().ToString("N"); string flvUrl = URLHelper.GetAbsoluteUrl(this.Url) .Replace("?", "%3F") .Replace("=", "%3D") .Replace("&", "%26");
string flashVars = "file=" + flvUrl + "&provider=video&"; flashVars += "controlbar=" + (AVControls ? "bottom" : "none") + "&"; flashVars += "autostart=" + (AutoPlay ? "true" : "false") + "&"; flashVars += "repeat=" + (Loop ? "always" : "none");
string player = ""; player += "<object id=\"" + playerID + "\""; player += "classid=\"clsid:D27CDB6E-AE6D-11cf-96B8-444553540000\""; player += "codebase=\"http://download.macromedia.com/pub/"; player += "shockwave/cabs/flash/swflash.cab#version=9.0.115\""; player += "width=\"" + Width + "\" height=\"" + Height + "\">"; player += "<param name=bgcolor value=\"#FFFFFF\">"; player += "<param name=movie value=\"" + ResolveUrl("~/FlvPlayer/player.swf") + "\">"; player += "<param name=allowfullscreen value=\"true\">"; player += "<param name=allowscriptaccess value=\"always\">"; player += "<param name=\"flashvars\" value=\"" + flashVars + "\">"; player += "<embed name=\"" + playerID + "\" "; player += "type=\"application/x-shockwave-flash\" "; player += "pluginspage=\"http://www.macromedia.com/go/getflashplayer\" "; player += "width=\"" + Width + "\" height=\"" + Height + "\" "; player += "bgcolor=\"#FFFFFF\" "; player += "src=\"" + ResolveUrl("~/FlvPlayer/player.swf") + "\" "; player += "allowfullscreen=\"true\" "; player += "allowscriptaccess=\"always\" "; player += "flashvars=\"" + flashVars + "\">"; player += "</embed>"; player += "</object>";
this.ltlMedia.Text = player; } |
7. To make this work also on the live site using media libraries transformations, you now need to open the ~/CMSModules/MediaLibrary/Controls/LiveControls/MediaFilePreview.ascx.cs file and replace the following line of code:
else if (CMS.GlobalHelper.MediaHelper.IsVideo(mfi.FileExtension)) |
with this piece of code:
else if (mfi.FileExtension.TrimStart('.').ToLower() == "flv") { |
8. Similarly, you will need to add the CreateFlvObject(string url) private method to the control. In this example, it looks like the code sample below.
The method creates a new DIV tag for the FLV player, with ID generated in the divID variable. It also handles the player URL in a special way - the URL must be absolute and must end with flv. Please note that the Autoplay and Loop properties of the player are defined firmly in the code.
private string CreateFlvObject(string url) { string playerID = Guid.NewGuid().ToString("N"); string flvUrl = URLHelper.GetAbsoluteUrl(url) .Replace("?", "%3F") .Replace("=", "%3D") .Replace("&", "%26");
bool avControls = true; bool autoPlay = false; bool loop = false;
string flashVars = "file=" + flvUrl + "&provider=video&"; flashVars += "controlbar=" + (avControls ? "bottom" : "none") + "&"; flashVars += "autostart=" + (autoPlay ? "true" : "false") + "&"; flashVars += "repeat=" + (loop ? "always" : "none");
string player = ""; player += "<object id=\"" + playerID + "\""; player += "classid=\"clsid:D27CDB6E-AE6D-11cf-96B8-444553540000\""; player += "codebase=\"http://download.macromedia.com/pub/"; player += "shockwave/cabs/flash/swflash.cab#version=9.0.115\""; player += "width=\"" + Width + "\" height=\"" + Height + "\">"; player += "<param name=bgcolor value=\"#FFFFFF\">"; player += "<param name=movie value=\"" + ResolveUrl("~/FlvPlayer/player.swf") + "\">"; player += "<param name=allowfullscreen value=\"true\">"; player += "<param name=allowscriptaccess value=\"always\">"; player += "<param name=\"flashvars\" value=\"" + flashVars + "\">"; player += "<embed name=\"" + playerID + "\" "; player += "type=\"application/x-shockwave-flash\" "; player += "pluginspage=\"http://www.macromedia.com/go/getflashplayer\" "; player += "width=\"" + Width + "\" height=\"" + Height + "\" "; player += "bgcolor=\"#FFFFFF\" "; player += "src=\"" + ResolveUrl("~/FlvPlayer/player.swf") + "\" "; player += "allowfullscreen=\"true\" "; player += "allowscriptaccess=\"always\" "; player += "flashvars=\"" + flashVars + "\">"; player += "</embed>"; player += "</object>";
return player; } |
If you need to change the behavior of the player, please modify these lines of code of the added method.
bool avControls = true; bool autoPlay = false; bool loop = false; |
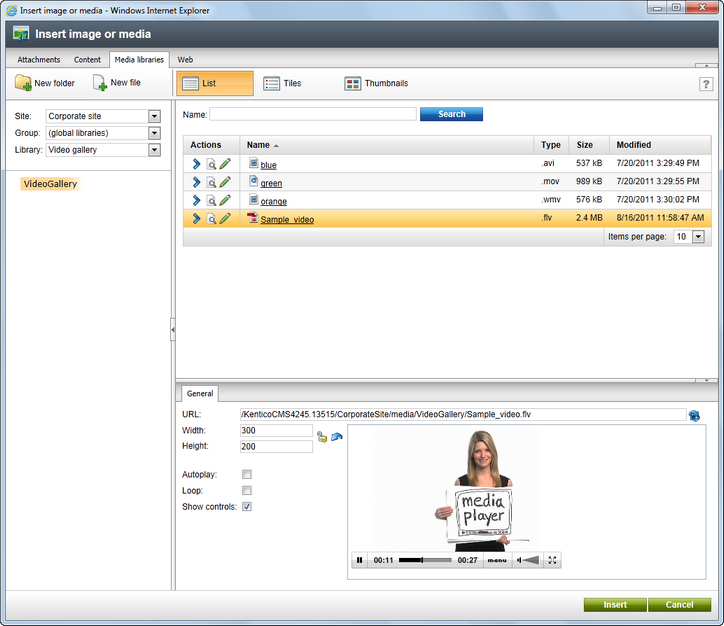
9. Now .flv files are recognized as videos by the system. The custom player is used for the files on the live site and also in the Insert image or media dialog, as you can see in the screenshot below.