|
|

Configuration for WebDAV |

|

|

|

|
|
Configuration for WebDAV |
|
|

|
|
|
|
Configuration for WebDAV |
|
|
|
|
|
Configuration for WebDAV |
|
|
|
|
|
|
||
The following steps need to be taken in order to install a Kentico CMS website with WebDAV support enabled. The beginning of the procedure is different for IIS 7.0 or higher and the previous versions of IIS.
Before you start, it is necessary to have a website created in the IIS root (i.e. not in a virtual directory). The website should have Windows authentication enabled in IIS.
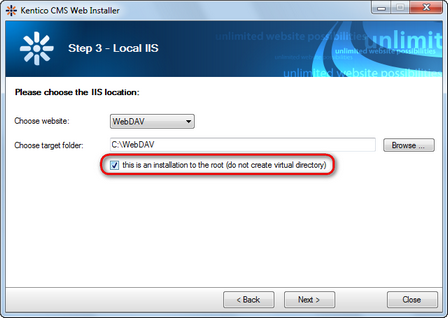
1. Launch Kentico Web Installer. In step 2, choose I want to use local IIS server. In step 3, use the following configuration:
•Choose web site: choose the website that you have prepared in the IIS root
•Choose target folder: enter the path to the website's physical folder
•This is an installation to the root (do not create virtual directory): enabled
Click Next and proceed through the rest of the wizard.
When using IIS versions older than 7.0, it is also necessary to correctly map the aspnet_isapi.dll file in IIS. The process of performing this configuration is described below.
Open the IIS Management console, right‑click on your Kentico application in the tree and select Properties. On the Home Directory tab, click Configuration and then Add to create a new application extension mapping. Enter the following details into the dialog:
•Executable: <Windows install directory>\Microsoft.NET\Framework\<.Net framework version>\aspnet_isapi.dll
•Extension: .*
•Verbs: All Verbs
•Check that file exists: disabled
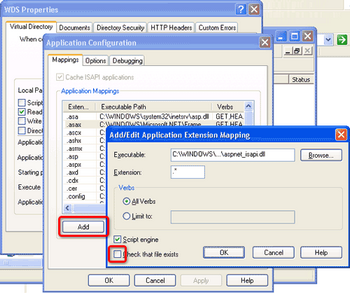
Click OK and return to the main management console. Now right‑click the website under which your application is stored and select Properties. Switch to the Home directory tab, ensure that the Read box is checked and set the Execute permissions field to Scripts only.
Open the IIS 6 Management console, right‑click on your Kentico application in the tree and select Properties. On the Home Directory tab, click Configuration and then Insert to add a new wildcard application map. Enter the following details into the dialog:
•Executable: <Windows install directory>\Microsoft.NET\Framework\<.Net framework version>\aspnet_isapi.dll
•Verify that file exists: disabled

Click OK and return to the main management console. Now right‑click the website under which your application is stored and select Properties. Switch to the Home directory tab, ensure that the Read box is checked and set the Execute permissions field to Scripts only.
On IIS 7.0 or higher, you do not need to have the website created in the IIS root - it can also be installed in a virtual directory.
1. Launch Kentico Web Installer and proceed through the steps with configuration according to your needs.
If you wish to run the website using an application pool set for Classic managed pipeline mode, please ensure that your web.config file contains the two Isapi extension handlers highlighted below once the Web installer finishes.
The handlers should be defined as follows on .NET 3.5:
... <location path="cms/files"> <system.web>
<add name="CMSWebDAVHandler" path="*" verb="*" type="CMS.WebDAV.WebDAVHandler, CMS.WebDAV" /> ... |
On .NET 4.0, the handlers should be defined the following way:
... <location path="cms/files"> <system.web>
<add name="CMSWebDAVHandler" path="*" verb="*" type="CMS.WebDAV.WebDAVHandler, CMS.WebDAV" /> ... |
If necessary, adjust the path in the scriptProcessor attributes of the handlers according to your current .NET framework version.
2. When the web installation is complete and the appropriate configurations have been made according to your IIS version and application pool mode, open the website using the link in the last step of the Web installer. When you access the URL, Kentico CMS Database Setup will be displayed. Follow the wizard as described in Installation and deployment -> Installation procedure -> Database setup.
3. After finishing the Database Setup, go to Site Manager -> Settings -> Integration -> WebDAV and configure the settings as described in the Settings topic.
4. The last step is to enable Windows authentication for your website. Please follow the instructions in Development -> Membership -> Authentication -> Windows authentication -> Configuring Windows authentication.
With all these steps performed, WebDAV editing should be possible. Please refer to the Editing files using WebDAV topic to learn more about the editing possibilities.