|
|

Creating the Blog list page |

|

|

|

|
|
Creating the Blog list page |
|
|

|
|
|
|
Creating the Blog list page |
|
|
|
|
|
Creating the Blog list page |
|
|
|
|
|
|
||
The Blog list page displays a list of all blogs on the site. This functionality will be achieved using the Repeater web part. The page is accessible from the Recent blogs repeater on the Blogs title page, by clicking the View all blogs link.
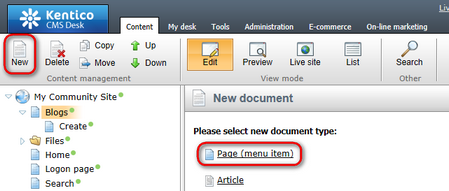
1. Go to CMS Desk -> Edit mode, select the Blogs page from the content tree and click New.
2. We will use the page template from the previous chapter so that we can save time by eliminating adding some identically configured web parts. Choose the My Community Site templates -> My Community Site - Blog creation page template. For Page name, enter Blog list and click Save.

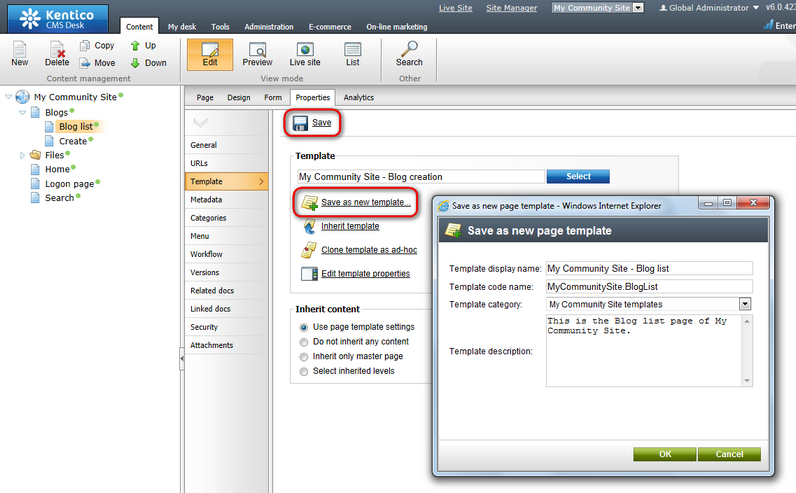
3. Switch to the Properties -> Template tab. We will save the page as a new page template so that the modifications made to this page will not be reflected on the Blog creation page. Click the Save as new template link and enter the following details in the pop-up dialog:
•Template display name: My Community Site - Blog list
•Template code name: MyCommunitySite.BlogList
•Template category: My Community Site templates
•Template description: some text describing the page template
Click OK. Click Save.
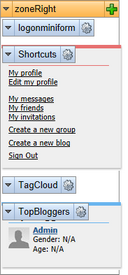
4. Switch to the Design tab. Let's start with zoneRight web part zone. Remove the repeaterYourBlogPosts and LatestBlogs web parts. These web parts wouldn't make sense in this context, so you can leave them out.
Click the Add web part (![]() ) icon and choose the Membership -> Logon mini form web part. Set the following properties of the web part, leave the rest of them as they are:
) icon and choose the Membership -> Logon mini form web part. Set the following properties of the web part, leave the rest of them as they are:
•Display to roles: _notauthenticated_
•Logon failure text: Error logging in.
•Web part container: Community Site - Red box
•Web part container title: Sign in
Click OK.
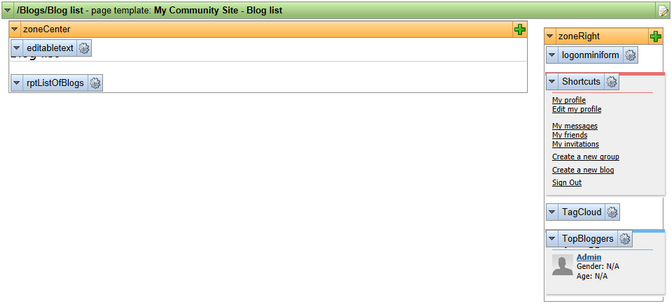
Drag and drop the web part to the top of the web part zone, above the Shortcuts box. The web part zone is ready now and should look as in the screenshot below.
5. Modifying the zoneCenter web part zone will also be a task of a few clicks. Firstly, remove the DescriptionText and NewBlog web parts so that the only web part remaining is the Editable text for the heading.
Now we will add the main part of the page - the repeater for displaying blogs. Click the Add web part (![]() ) icon and choose the Listings and viewers -> Repeater web part. Set the following properties of the web part, leave the rest of them at the default values:
) icon and choose the Listings and viewers -> Repeater web part. Set the following properties of the web part, leave the rest of them at the default values:
•Web part control ID: rptListOfBlogs
•Show for document types: CMS.MenuItem
•Path: /Blogs/%
•Document types: CMS.Blog
•Transformation: Community.Transformations.BlogPostDetail
•Selected item transformation: Community.Transformations.BlogPostDetail
•Paging: enabled
•Page size: 5
•Cache dependencies: nodes|{%CurrentSite.SiteName|(tolower)%}|cms.blog|all
Click OK.
6. Finally, switch to the Page tab and enter Blogs list into the text field of the heading Editable text web part. Click Save.

In the screenshot below, you can see the desired appearance of the page in Design tab. The page is not displaying anything yet, because there are no blogs on the site. If you create one, it will be displayed here.