|
Getting started |

|

|

|

|
|
Getting started |
|
|
|
|
The following is a step-by-step tutorial that will show you how to display a list of all cell phones (CMS.Cellphone documents) from the sample Corporate Site using the QueryDataList control:
1. Create a new Web form somewhere in your website installation directory.
2. Switch to its Design tab, drag and drop a QueryDataList control from the toolbox onto the form and set its following properties:
| • | QueryName: cms.cellphone.selectdocuments |
| • | RepeatColumns: 2 |
| • | TransformationName: ecommerce.transformations.Product_SimplePreview |
| • | SelectedItemTransformationName: ecommerce.transformations.Product_Default |
This assigns the query that should be used to retrieve cellphone documents, determines the amount of displayed columns and assigns the transformations that should be used.
3. Switch to the Source tab. The code of the QueryDataList control should look like this:
<cms:QueryDataList ID="QueryDataList1" runat="server" QueryName="cms.cellphone.selectdocuments" RepeatColumns="2" TransformationName="ecommerce.transformations.Product_SimplePreview" SelectedItemTransformationName="ecommerce.transformations.Product_Default" > </cms:QueryDataList> |
It's not necessary to define the standard ItemTemplate elements of the DataList control since the transformation names have already been specified.
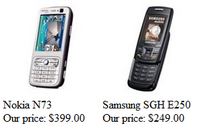
4. Save the changes to the web form. Now right-click it in the Solution explorer and select View in Browser. The resulting page should display a list like this:
Page url: http://devnet.kentico.com/docs/5_5r2/controls/index.html?querydatalist_getting_started.htm

