|
Getting started |

|

|

|

|
|
Getting started |
|
|
|
|
The following is a step-by-step tutorial that will show you how to display a table that contains all products (CMS.Cellphone, CMS.Laptop and CMS.PDA documents) from the products section of the sample Corporate Site using the CMSDataGrid control:
1. Create a new Web form somewhere in your website installation directory.
2. Switch to its Design tab, drag and drop a CMSDataGrid control from the toolbox onto the form and set its following properties:
| • | ClassNames: cms.cellphone;cms.laptop;cms.pda |
| • | Path: /products/% |
This tells the control which document types to read and specifies the Path to the products section (the default setting of /% would also display all products, but it is more effective to read only a section of the site).
3. Right-click the CMSDataGrid on the form, select Show Smart Tag and then Property Builder...; the CMSDataGrid1 Properties dialog will be displayed.
On the General tab, check the Allow sorting box.
Now switch to the Columns tab, where you can specify the columns that will be displayed, and uncheck the Create columns automatically at run time box.
Add a new Bound Column from the Available columns list to the Selected columns list. Enter the following values into the appropriate fields:
| • | Header text: Name |
| • | Data Field: SKUName |
| • | Sort expression: SKUName |
Add another Bound column from the Available columns list to the Selected columns list. Enter the following values in the appropriate fields:
| • | Header text: Price |
| • | Data Field: SKUPrice |
| • | Sort expression: SKUPrice |
Click OK.
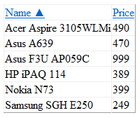
4. Save the changes to the web form. Now right-click it in the Solution explorer and select View in Browser. The resulting page should display a table like this:
Page url: http://devnet.kentico.com/docs/5_5r2/controls/index.html?cmsdatagrid_getting_started.htm

