|
Creating the Management page |

|

|

|

|
|
Creating the Management page |
|
|
|
|
On the Management page, group administrators will be able to manage the profile and settings of their groups. This functionality is provided by the Group profile web part. The page is accessible by clicking the Manage the group link in the Shortcuts menu. This link is displayed only to group administrators when viewing the group's profile.
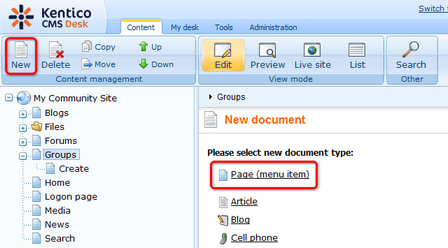
1. Select the Groups page in the content tree and click New. Choose the Page (menu item) document type.
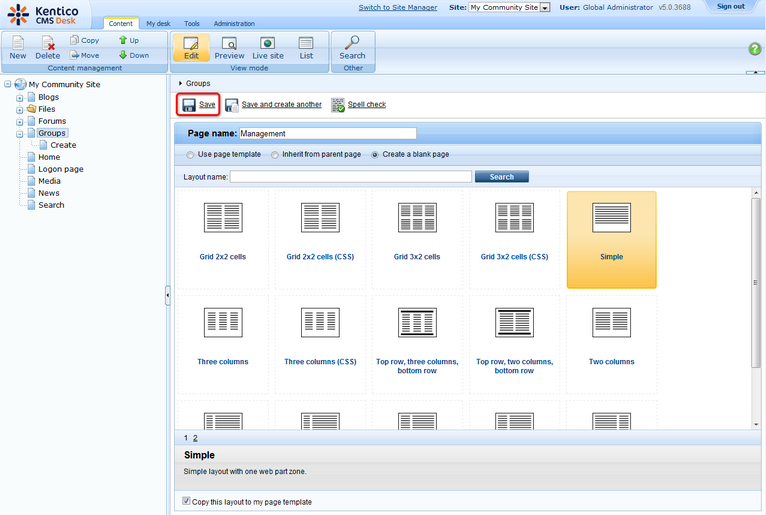
2. Choose to Create a blank page using the Simple layout. Into the Page name field, enter Management and click Save.
3. Switch to the Properties -> Template tab and click the Save as new template link. Enter the following details in the pop-up dialog:
| • | Template display name: My Community Site - Groups management |
| • | Template code name: MyCommunitySite.GroupsManagement |
| • | Template category: My Community Site templates |
| • | Template description: some text describing the page template |
Click OK. Click Save.

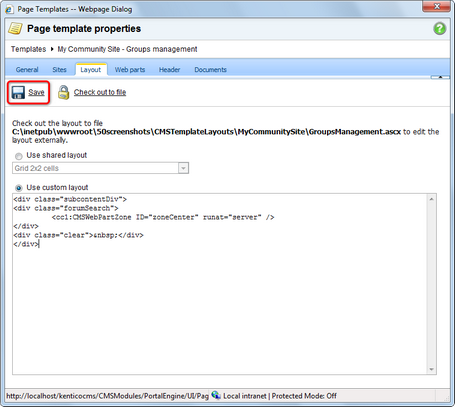
4. On the same tab, click the Edit template properties link. In the pop-up window, switch to the Layout tab and replace the original layout with the following code:
<div class="subcontentDiv"> <div class="forumSearch"> <cc1:CMSWebPartZone ID="zoneCenter" runat="server" /> </div> <div class="clear"> </div> </div> |
Click Save.
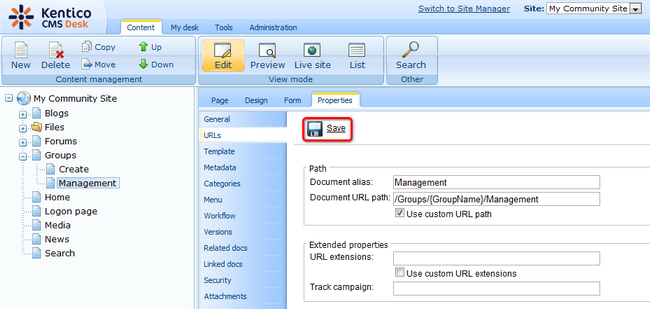
5. Switch to the Properties -> URLs tab and enter /Groups/{GroupName}/Management into the Document URL path field.
6. Switch to the Design tab. First, we will add the Group security access web part. This web part checks if the user has the appropriate permissions for this group and redirects them to the Access page, which we will create later in this chapter, in case that the permissions are insufficient. Click the Add web part (![]() ) icon of the zoneCenter web part zone and choose the Community -> Group security access web part. You do not need to set any properties of the web part, just leave all of them at the default values. Click OK.
) icon of the zoneCenter web part zone and choose the Community -> Group security access web part. You do not need to set any properties of the web part, just leave all of them at the default values. Click OK.
7. Below the Group securtity access, we will add the Static text web part, which will show the path to the currently managed group in a form of breadcrumbs. Click the Add web part (![]() ) icon of the zoneCenter web part zone and choose the Text -> Static text web part. Set the following properties of the web part, leave the rest of them at the default values.
) icon of the zoneCenter web part zone and choose the Text -> Static text web part. Set the following properties of the web part, leave the rest of them at the default values.
| • | Web part control ID: Breadcrumbs |
| • | Text: |
<div class="GroupBreadcrumbs"> <a href="~/Groups.aspx" class="CMSBreadCrumbsLink">Groups</a> <span class="TitleBreadCrumbSeparator"> </span> <a href="~/Groups/{%CommunityContext.CurrentGroup.GroupName%}.aspx" class="CMSBreadCrumbsLink">{%CommunityContext.CurrentGroup.GroupDisplayName|(encode)true%}</a> <span class="TitleBreadCrumbSeparator"> </span> <span class="CMSBreadCrumbsCurrentItem"> {%CMSContext.CurrentDocument.DocumentName|(encode)true%} </span> </div> |
Click OK.
8. Finally, we will add the Group profile web part. Click the Add web part (![]() ) icon of the zoneCenter web part zone and choose the Community -> Group profile web part. Set the following properties of the web part, leave the rest of them at the default values.
) icon of the zoneCenter web part zone and choose the Community -> Group profile web part. Set the following properties of the web part, leave the rest of them at the default values.
| • | Group name: (current group) |
Click OK.
9. The page is now finished. In Design tab, it should look as in the following screenshot.


