Inserting images via this dialog enables setting a number of properties of the image. If you want to insert an image from your disk in a quick way, without specifying any properties, you can use the Quickly insert image (![]() ) action as described here.
) action as described here.
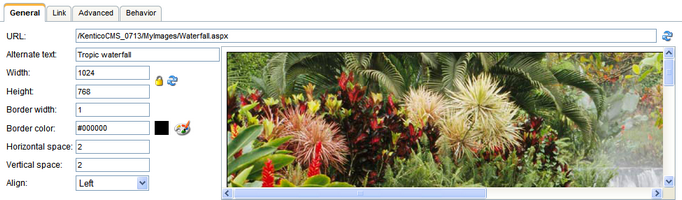
When inserting an image, its properties can be set on the following four tabs:
General
| • | Alternate text: text displayed when the image is not loaded correctly |
| • | Width, Height: width and height of the displayed image |
| • | aspect ratio can be locked ( |
| • | if it is unlocked ( |
| • | you can also reload the default dimensions using the Reset size ( |
| • | Border width: width of the border around the displayed image |
| • | Border color: color of the border around the image; has no effect when border width is not set |
| • | Horizontal space: horizontal space between the image and the surrounding text |
| • | Vertical space: vertical space between the image and the surrounding text |
| • | Align: image alignment |
Link tab
| • | URL: if set, the image will become a link to the resource defined by the entered URL. If set, settings on the Behavior tab are overridden! |
| • | Target: destination where the linked resource should be displayed when the image is clicked |
Advanced tab
| • | ID: identifier of the image HTML element |
| • | Tooltip: text displayed when mouse cursor is placed over the image |
| • | Class: image element CSS class |
| • | Style: image element additional styles |
Behavior tab
| • | None: image is inserted as standard image; when the image is clicked, no action is performed |
| • | Open full size in the same window: image will become a link; when the image is clicked, its full size is displayed in the same window |
| • | Open full size in a new window: image will become a link; when the image is clicked, its full size is displayed in a new window |
| • | Show larger size on mouse-over: when the mouse cursor is placed over the image, the image is displayed in a "floating window" in the defined size; the image will be inserted as the Image inline control |
6 ways how images can be inserted
1. Standard image
| • | Behavior tab: None |
| • | Link tab -> URL: empty |
The image is inserted as a standard image with no special behavior. No action is performed when the image is clicked or mouse-overed.
The output code looks like the following code sample:
<img style="width: 320px; height: 240px" alt="" src="/KenticoCMS41/MyImages/Waterfall.aspx" /> |
2. Image with link
| • | Behavior tab: None |
| • | Link tab -> URL: some URL is specified |
The image functions as a link to the specified URL. When the image is clicked, user is redirected to the URL in the same browser window.
The output code looks like the following code sample:
<a href="www.kentico.com"><img style="width: 320px; height: 240px" alt="" src="/KenticoCMS41/MyImages/Waterfall.aspx" /></a> |
3. Image with special behavior - full size in the same window
| • | Behavior tab: Open full size in the same window |
| • | Link tab -> URL: empty |
When the image is clicked, it is displayed in full size in the same browser window.
The output code looks like the following code sample:
<a target="_self" href="/KenticoCMS41/MyImages/Waterfall.aspx"><img style="width: 320px; height: 240px" alt="" src="/KenticoCMS41/MyImages/Waterfall.aspx" /></a> |
4. Image with special behavior - full size in a new window
| • | Behavior tab: Open full size in a new window |
| • | Link tab -> URL: empty |
When the image is clicked, it is displayed in full size in a new browser window.
The output code looks like the following code sample:
<a target="_blank" href="/KenticoCMS41/MyImages/Waterfall.aspx"><img style="width: 320px; height: 240px" alt="" src="/KenticoCMS41/MyImages/Waterfall.aspx" /></a> |
5. Image with special behavior - larger size on mouse-over
| • | Behavior tab: Show larger size on mouse-over; Height = xx; Width = yy |
| • | Link tab -> URL: empty |
When the image is mouse-overed, it is displayed in a new layer in a size defined on the Behavior tab as shown in the screenshot below.
In this case, the image is inserted as the Image inline control. The output code looks like the following code sample:
{^Image|(behavior)hover|(url)~/MyImages/Waterfall.aspx?width=200&height=150|(width)200|(height)150|(mouseoverwidth)400|(mouseoverheight)300^} |

6. Image with special behavior - larger size on mouse-over with link
| • | Behavior tab: Show larger size on mouse-over; Height = xx; Width = yy |
| • | Link tab -> URL: some URL is specified |
When the image is mouse-overed, it is displayed in a new layer in a size defined on the Behavior tab as shown in the screenshot above. Furthermore, the image is clickable and when clicked, the user gets redirected to the specified URL in the same browser window.
In this case, the image is inserted as the Image inline control. The output code looks like the following code sample:
<a href="www.kentico.com">{^Image|(behavior)hover|(url)~/MyImages/Waterfall.aspx?width=200&height=150|(width)200|(height)150|(mouseoverwidth)400|(mouseoverheight)300^}</a> |