You can use Kentico CMS API and Kentico CMS Controls also outside the standard CMS web site project. This chapter explains how you can configure your ASP.NET application so that it can use Kentico CMS API and Kentico CMS Controls.
Start Visual Studio 2005 and create a new ASP.NET application or open your existing ASP.NET web project.
Kentico CMS Initialization
Please note: you may need to initialize the apllication to be able to use all the features of Kentico CMS API. To do that, call the method CMSContext.Init() before any other calls to the API. You can do that at the time your project starts or anytime later, the method handles all necessary initializations of the environment.
Configuring the web.config file
Add the connection string for the Kentico CMS database with name CMSConnectionString into the configuration/connectionStrings section of the web.config. The section will look like this:
<configuration> <connectionStrings> <add name="CMSConnectionString" connectionString="Persist Security Info=False;database=KenticoCMS;server=myserver;user id=sa;password=mypassword;Current Language=English;Connection Timeout=120;" /> |
It's recommended that you copy the exact connection string line from the web.config file of the CMS web project.
Adding a reference to Kentico CMS API libraries
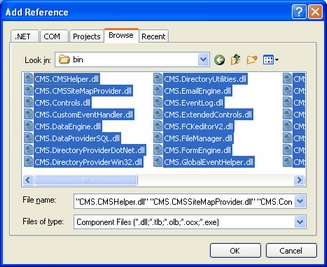
Now we will add a reference to Kentico CMS libraries. Right-click your web project in the Solution Explorer and and choose Add reference... Choose the Browse tab and locate the CMS web project's bin folder. Choose all libraries and click OK:
Adding Kentico CMS Controls to your toolbox
Now we will add Kentico CMS Controls to your toolbox so that you can easily drag-and-drop the controls on the web forms. Right-click the toolbox and choose Add tab. Use the name CMS and press Enter.
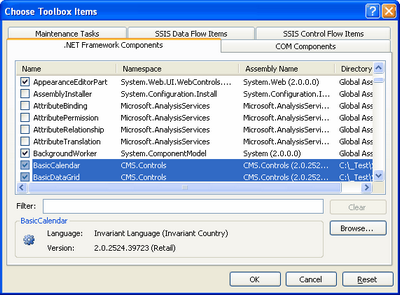
Right-click the new tab and click Choose Items... Click Browse... and locate the CMS.Controls.dll library in the bin folder of your application. Click Open and click OK on the Choose Toolbox Items dialog.
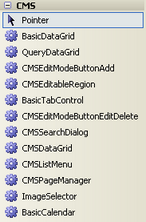
The controls are added to your tab:
Configuring your project for transformations (virtual path provider)
The transformations used by Kentico CMS Controls are retrieved using a virtual path provider. You need to add the following line to the Application_Start method in the app_code\global.asax.cs/vb file:
[C#]
CMS.VirtualPathHelper.VirtualPathHelper.RegisterVirtualPathProvider(); |
[VB.NET]
CMS.VirtualPathHelper.VirtualPathHelper.RegisterVirtualPathProvider() |
If you cannot use the virtual path provider (e.g. in the medium trust environment), you may need to save the virtual objects to disk using the Site Manager -> Administration -> System -> Deployment -> Save all virtual objects to disk button and copy the folder ~/CMSTransformations to the root of your own web project.
Using Kentico CMS Controls to display content from Kentico CMS database
Now that we have configured the web project for Kentico CMS, we will create a testing page that will display news items from Kentico CMS.
Create a new web form (ASPX page) in your custom project using Visual Studio 2005. Drag and drop the CMSRepeater control on your page and set the following properties:
| • | ClassNames: cms.news |
| • | CultureCode: en-us (or other language version) |
| • | SiteName: CorporateSite (or other site code name) |
| • | TransformationName: cms.news.preview |
| • | SelectedItemTransformationName: cms.news.default |
Run the project and navigate to the newly created page. You should see a page like this:
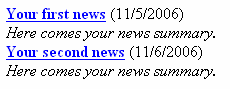
However, the links may not work at this moment since they are using the Kentico CMS web friendly URLs by default. So we need to modify the transformation cms.news.preview so that it points the user to same page, but with URL parameter aliasPath that will contain the page aliasPath. You can alternatively use your own URL parameters and set the Path property appropriately.
Go to Kentico CMS Site Manager -> Development -> Document types -> edit News -> Transformations -> edit preview. Change the following line of the transformation code:
<b><a href="<%# GetDocumentUrl() %>"> |
Like this:
<b><a href="?aliasPath=<%# Eval("NodeAliasPath") %>"> |
Save the changes. Since the transformations are cached, you need to restart (rebuild) your custom web application now so that the change is applied to your web site.
Now you need to add a short code to the page code behind:
[C#]
protected void Page_PreInit(object sender, EventArgs e) { if (Request.QueryString["aliaspath"] != null) { CMSRepeater1.Path = Request.QueryString["aliaspath"]; } else { CMSRepeater1.Path = "/%"; } } |
[VB.NET]
Protected Sub Page_PreInit(ByVal sender As Object, ByVal e As System.EventArgs) Handles Me.PreInit If Not Request.QueryString("aliaspath") Is Nothing Then CMSRepeater1.Path = Request.QueryString("aliaspath") Else CMSRepeater1.Path = "/%" End If End Sub |
|
Setting CMS control properties
Kentico CMS Controls load the content at early stage of the page life cycle. It means that if you want to set the properties programmatically, you need to set them in the Page_PreInit event.
If you need to set them for some reason later in the page life cycle, you need to call the CMSRepeater1.ReloadData(true) method so that the data is reloaded and the changes are applied. |

Using Kentico CMS API to retrieve content from Kentico CMS database
Kentico CMS API can be used to script any action in Kentico CMS, including content retrieval and modification. The following example explains how you can retrieve documents from Kentico CMS database as a DataSet and display them using standard ASP.NET repeater control (instead of using the CMSRepeater control).
Add a new web form (ASPX page) to your web project. Drag and drop the Repeater control on the web form. Switch to the Source mode of the page and add the Following item template code inside the <asp:Repeater> control element:
[C#]
<ItemTemplate> <b><a href="?aliasPath=<%# Eval("NodeAliasPath") %>"> <%# Eval("NewsTitle") %></a></b> (<%# ( (DateTime) Eval("NewsReleaseDate")).ToString("d") %>)<br /> <i><%# Eval("NewsSummary") %></i> <br /> </ItemTemplate> |
[VB.NET]
<ItemTemplate> <b><a href="?aliasPath=<%# Eval("NodeAliasPath") %>"> <%# Eval("NewsTitle") %></a></b> (<%# ( (DateTime) Eval("NewsReleaseDate")).ToString("d") %>)<br /> <i><%# Eval("NewsSummary") %></i> <br /> </ItemTemplate> |
Switch to the code behind and add the following code to the beginning of the page:
[C#]
using CMS.TreeEngine; using System.Data; |
[VB.NET]
Imports CMS.TreeEngine Imports System.Data |
Add the following code inside the Page_Load method of the page:
[C#]
TreeProvider tp = new TreeProvider(); DataSet ds = tp.SelectNodes("CorporateSite", "/news/%", "en-us", true, "cms.news", " NewsReleaseDate <= GetDate() ", " NewsReleaseDate DESC ", -1, true); Repeater1.DataSource = ds; Repeater1.DataBind(); |
[VB.NET]
Dim tp As New TreeProvider Dim ds As DataSet = tp.SelectNodes("CorporateSite", "/news/%", "en-us", True, "cms.news", " NewsReleaseDate <= GetDate() ", " NewsReleaseDate DESC ", -1, True) Repeater1.DataSource = ds Repeater1.DataBind() |
|
Please note
The code above works fine for just retrieving documents; if you want to perform some other operations with the documents (edit, delete, ...), you should initialize the tree provider with UserInfo, as shown below:
[C#]
|

Run the web site and navigate to your new page. You should see a page like this:
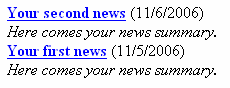
As you can see, you can use Kentico CMS API to retrieve content as a DataSet and display it with your custom .NET code.