The CMSDataGrid displays a table based on Kentico CMS data. It inherits the BasicDataGrid control. It automatically ensures databinding, paging and sorting.
It allows you to display Kentico CMS documents specified by path, depth, document type and WHERE condition. The CMSDataGrid control displays content without writing any additional code.
You can use the common DataGrid designer to set up CMSDataGrid style and behavior.
Please note: If you want to display data using custom query, please use the QueryDataGrid control.
Data Source
Data retrieved using the SelectDocuments query of the specified document type.
Inherits: CMSDataProperties - common properties, BasicDataGrid
Design
The design can be modified in the same way as the standard ASP.NET DataGrid control.
Example
This example will show you how to display a list of all mobile phones in the grid using the CMSDataGrid control.
| 1. | Create a new Web form. |
| 2. | Drag and drop the CMSDataGrid control on the form. |
| 3. | In the Properties window, click Auto Format... and choose some color schema. |
| 4. | In the Properties window, click Property Builder..., the CMSDataGrid1 Properties dialog appears. |
- On the General tab check the "Allow sorting" box.
- Now we will specify the columns that will be displayed. On the Columns tab:
- Uncheck the Create columns automatically at run time box.
- Add a new Bound Column from the Available columns list to the Selected columns list. Enter the following values in the appropriate fields:
- Header text: Product Name
- Data field: ProductName
- Sort expression: ProductName
- Add a new Bound Column from the Available columns list to the Selected columns list. Enter the following values in the appropriate fields:
- Header text: Price
- Data field: ProductPrice
- Sort expression: ProductPrice
- On the Paging tab check the box Allow Paging. Click OK.
| 5. | In the Properties window set the following property values: |
- ClassNames: cms.product
- MaxRelativeLevel: -1
- Path: /products/%
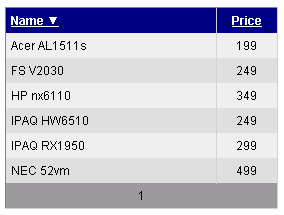
| 6. | Compile and run the project. You should see a page like this: |