Adding Real-Time FedEx Shipping Rates to Kentico 11
If you have an e-commerce store, chances are you ship things to your customers. This means a lot of orders and a lot of calculations. One of the biggest ways to get more sales and happy customers is to integrate real-time shipping rates into your site. In this article, I’ll show you how to add real-time FedEx rates to your Kentico 11 site.
When it comes to shopping online, people want information quickly. They want to know that the item’s in stock, that they’re getting it for a great price, and when they’ll receive it (of course they want it NOW). Another important cost is the shipping. Luckily, there’s a lot of options for developers to display this data real-time in their Kentico sites. Whether you’re using FedEx, UPS, or some other carrier, chances are they have an API you can integrate with to get up-to-date costs for shipping your packages. Let me show you how to pull in FedEx rates into your application.
Note
Most of concepts in this article are covered in our documentation for creating custom shipping carrier providers.
Implementing custom shipping carrier providers
Creating a custom module
Before you can add any custom code, you need somewhere to put it. The first step will be to create a custom module in your Kentico site. This involves registering a new module within your UI, creating a new class, and adding some super cool functionality.
Creating custom modules
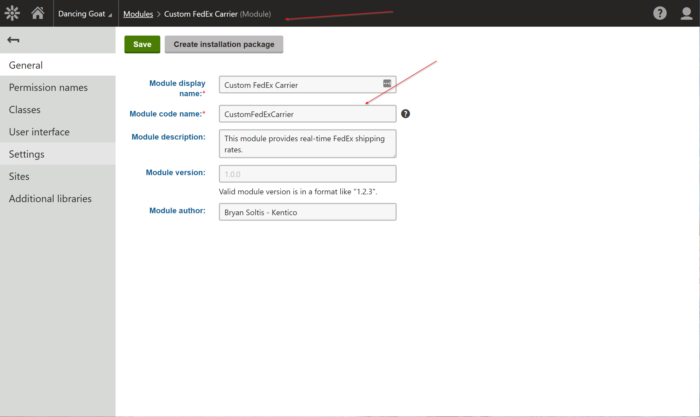
First, in your Modules application, create a new module and set your configuration. On the General tab, set your module name and description. Be sure you note the codename, as that will be important in the custom code.
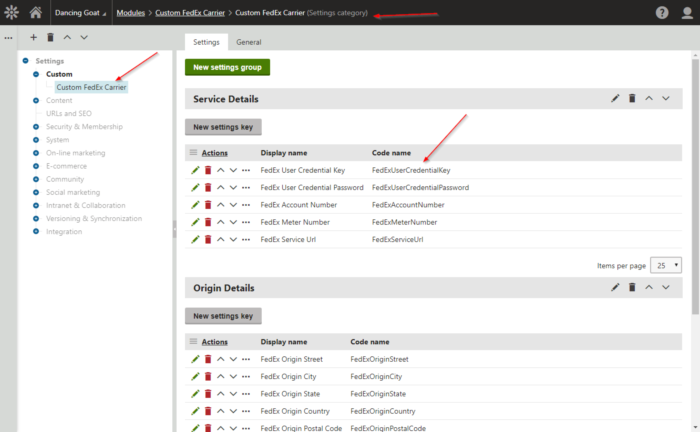
Next, you will want to create some settings to use within your module. This will allow admins to update service logins and addresses without redeploying the site.
On the Settings tab, create a new category and group(s) for your carrier settings.
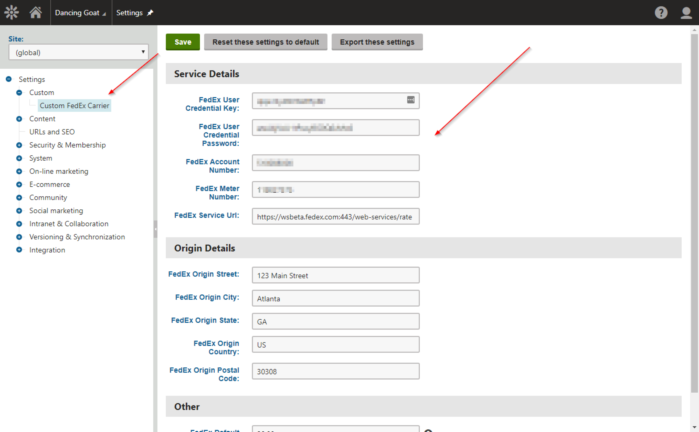
Now, you can open the Settings app and see your new fields. A little later in the article, I’ll show you to create a configuration page right in the Ecommerce app to make things even easier.
Lastly, you will want to create your new module in the Visual Studio Solution. If you use a sperate project, you’ll be able to isolate your code for easy updates and duplication into other Kentico sites.
Create your new class to match your module code name.
using CMS;
using CMS.DataEngine;
using CMS.Ecommerce;
using CMS.EventLog;
using CMS.Globalization;
using CMS.Helpers;
using CMS.Membership;
using CMS.Modules;
using CustomFedEx.FedExRateService;
using System;
using System.Collections.Generic;
using System.Linq;

[assembly: RegisterModule(typeof(CustomFedEx.CustomFedExCarrier))]

namespace CustomFedEx
{
    public class CustomFedExCarrier : ICarrierProvider
    {
        private const string NAME = "Custom FedEx provider";
        private List<KeyValuePair<string, string>> services;

        /// <summary>
        /// Gets the name of the carrier provider.
        /// </summary>
        public string CarrierProviderName
        {
            get
            {
                return NAME;
            }
        }
    }
}
Adding the FedEx API
Alright, at this point you should be ready to add your custom code. Depending on your carrier, this may involve an SDK, DLL, or web service. For this article, I’m focusing on FedEx, which means importing a WSDL (welcome to 2005) to get the functionality.
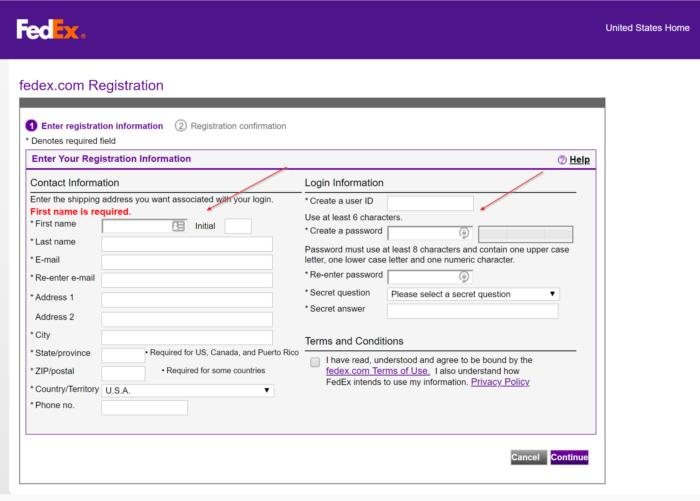
Your first step will be to create a FedEx developer account. Just fill out the form and you will get your keys and email with your passwords.
Once logged in, you can download the WSDL (and documentation) for your custom code. I recommend checking out the sample project to see a basic implementation of the service.
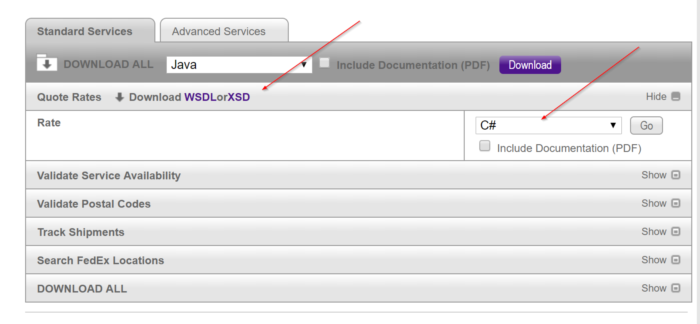
After you download the WSDL, you can add a web service reference (seriously, what year is it?!?) to the file and pull in all the super fantastic FedEx logic.
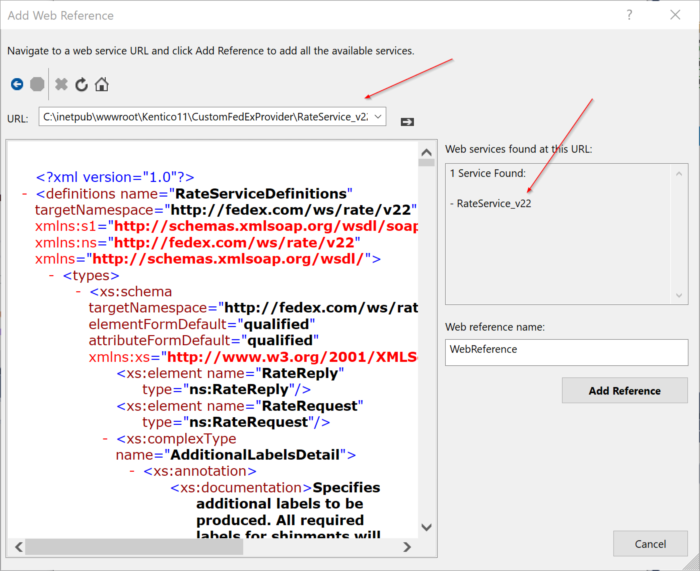
At this point, you are ready to add your custom shipping code. With the FedEx service reference, you will be able to leverage their API to create your shipments, set your details, and get real-time rates.
Creating a custom shipping provider
In your custom class, you will now add in some functions to handle the shipping carrier calls. These include GetServices, GetPrice, and some supplementary calls for various settings. These will be key to ensuring you offer the correct services, and retrieve the rates needed.
Get Services
The GetServices function returns a list of KeyValuePairs representing each shipping option. This is what will display in the Shipping option UI, as well as to the user. Add the shipping options you want to support.
        /// <summary>
        /// Returns a list of service code names and display names.US
        /// </summary>
        public List<KeyValuePair<string, string>> GetServices()
        {
            return services ?? (services = new List<KeyValuePair<string, string>>
            {
                new KeyValuePair<string, string>("PRIORITY_OVERNIGHT","FedEx Priority Overnight"),
                new KeyValuePair<string, string>("STANDARD_OVERNIGHT", "FedEx Standard Overnight"),
                new KeyValuePair<string, string>("2_DAY","FedEx 2 Day")
            });
        }
GetPrice
The GetPrice function is where the actual shipping costs are returned. This is where most of your custom code will go, so be sure to handle every option you want to support. For each shipping option you offer, the GetPrice function will get called.
Because we are integrating FedEx, we will want to handle each option we defined in our GetServices function. We will set the ServiceType to match the requested option.
                ServiceType stType = new ServiceType();
                switch (delivery.ShippingOption.ShippingOptionName)
                {
                    case "FedExPriorityOvernight":
                        stType = ServiceType.PRIORITY_OVERNIGHT;
                        break;
                    case "FedExStandardOvernight":
                        stType = ServiceType.STANDARD_OVERNIGHT;
                        break;
                    case "FedEx2Day":
                        stType = ServiceType.FEDEX_2_DAY;
                        break;
                }
Get FedEx Rates
Once we know the ServiceType, we are ready to use the FedEx API to get the rate. There are several options you will want to configure prior to requesting your rates. These include:
- Creating the request
- Setting the shipment details
- Setting the origin details
- Setting the destination details
- Defining the package items and their values (if needed)
If you download the FedEx sample code, it provides a nice example of each of these components. You can also view my full demo code in the link at the bottom of the article.
One important change I added was to cache the rate information for orders of the same customer/destination/weight. Because the GetPrices function gets called for every option, you can quickly rack up a lot of API calls for an order. By leveraging the Caching API, you can save yourself some processing for your orders.
                RateReply reply = new RateReply();
                // Cache the data for 60 minutes with a key
                using (CachedSection<RateReply> cs = new CachedSection<RateReply>(ref reply, 60, true, null, "FedExRatesAPI-" + stType.ToString().Replace(" ", "-") + "-" + uinfo.UserID + "-" + delivery.DeliveryAddress.AddressZip + "-" + ValidationHelper.GetString(delivery.Weight, "")))
                {
                    if (cs.LoadData)
                    {
                        //Create the request
                        RateRequest request = CreateRateRequest(delivery, stType, uinfo);
                        //Create the service
                        RateService service = new RateService();
                        // Set the service url
                        service.Url = SettingsKeyInfoProvider.GetValue("FedExServiceUrl");
                        // Call the web service passing in a RateRequest and returning a RateReply
                        reply = service.getRates(request);
                        // Cache the reply
                        cs.Data = reply;
                    }
                    reply = cs.Data;
                }
Creating a configuration page
With the custom code in place, you’re ready to configure your carrier. Remember that custom configuration page I mentioned earlier? Here’s where it will come into play. You can create a new page within your CMS project to display the module settings you created. This will allow your users to update the carrier configuration from within the Ecommerce app.
In your project, create a new page and add a SettingsGroupViewer control.
<%@ Register TagPrefix="cms" TagName="SettingsGroupViewer" Src="~/CMSModules/Settings/Controls/SettingsGroupViewer.ascx" %>

<asp:Content ID="Content1" ContentPlaceHolderID="plcContent" runat="Server">
    <cms:SettingsGroupViewer ID="SettingsGroupViewer" runat="server" AllowGlobalInfoMessage="false" />
</asp:Content>
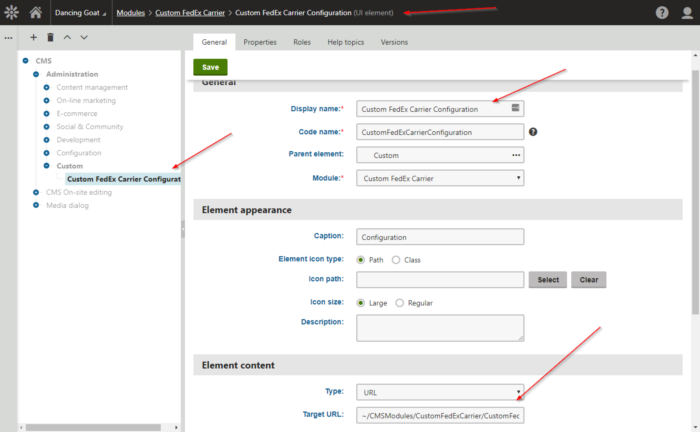
Open the Modules application and select your new module. On the UI Elements tab, create a new element, with your custom module selected and the URL for your new configuration page. Note the codename for the element.
Next, in your custom module code, update the GetConfigurationUIElmentGUID function to get the new element by the code name.
        /// <summary>
        /// Returns the Guid for the configuration page. This allows the Store Settings UI to display the configuration page on the carrier details.
        /// </summary>
        public Guid GetConfigurationUIElementGUID()
        {
            UIElementInfo ui = UIElementInfoProvider.GetUIElementInfo("CustomFedExCarrier", "CustomFedExCarrierConfiguration");
            return ui.ElementGUID;
        }
Updating this function will tell Kentico to load your new UI element as the Configuration page for your shipping carrier in the Ecommerce module.
Store configuration
After a rebuild, you should be ready to configure your store. This will involve creating a carrier, and defining your shipping options.
Creating a carrier
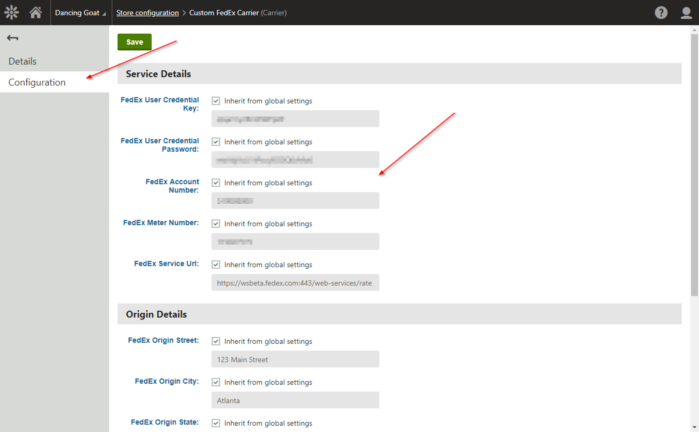
In your Store configuration module, select Shipping / Carriers and create your new carrier. For the provider, select your custom assembly name and class Once you add it, you’ll see a swanky new Configuration tab, which will allow you to update your carrier settings.
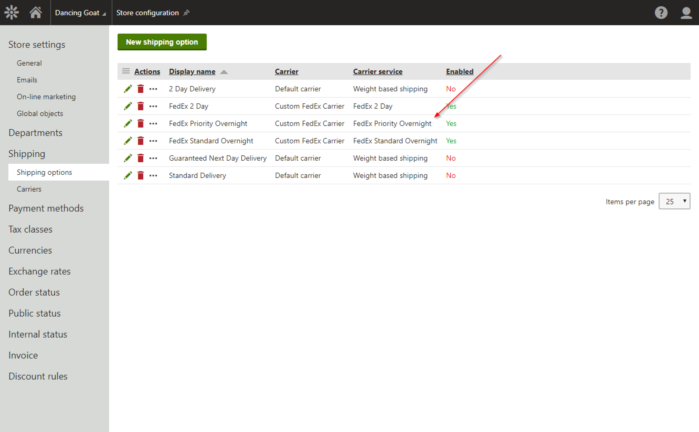
Creating shipping options
On the Shipping options tab, create a new option for each of your defined shipping methods. In the Carrier service dropdown, select the appropriate option.
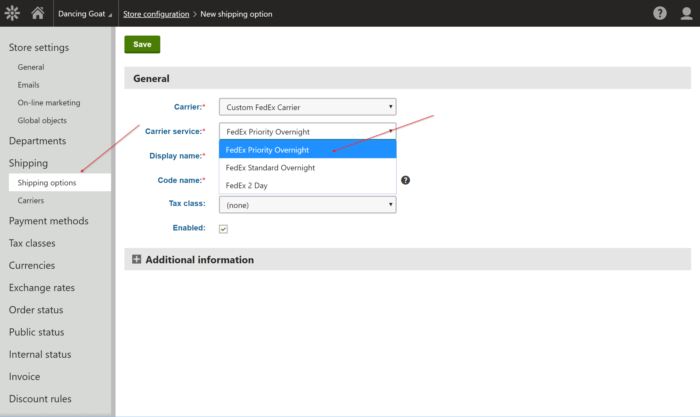
Add each of the options you want to offer.
NOTE
The Carrier service options are populated from the GetServices function of the custom module.
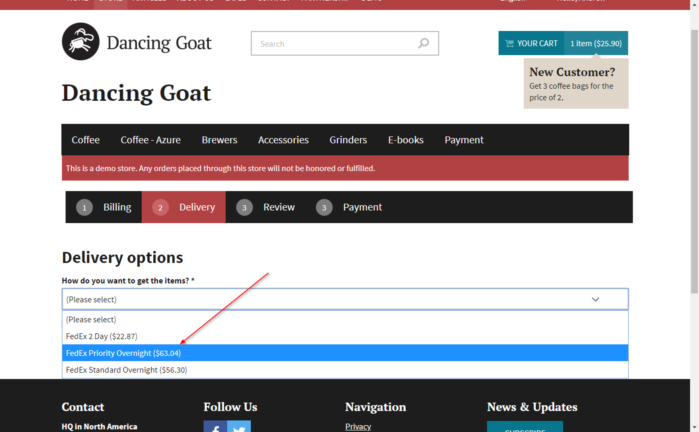
Testing
At this point, you should be ready to test your functionality. On your site, add items to your cart and proceed to the checkout process. On the Delivery options page, confirm the new shipping options are listed, along with the real-time rates.
In your Debug console, you can check to make sure the rates are being cached correctly for each option.
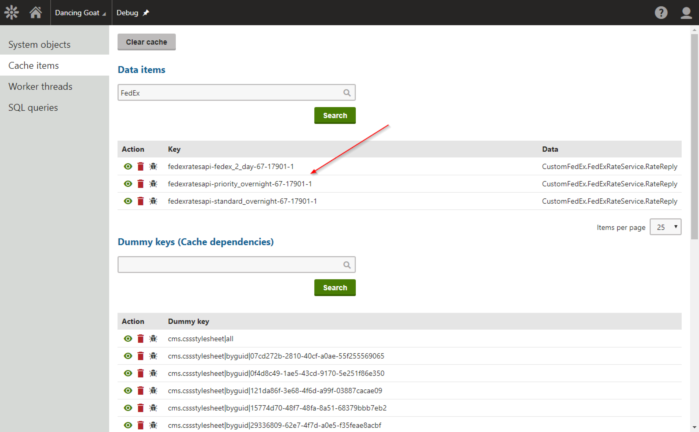
If the cart does not change, the custom module will pull the cache data for the rates, saving you processing time and resources.
Moving forward
Congratulations, you now have real-time FedEx rates flowing to your app! With this code, you can give users accurate pricing for their shipping options and help them complete purchases faster. You no doubt will want to add additional error handling and fallbacks in your code, in the event FedEx (or your service) is not available. I hope this code helps you create some awesome ecommerce applications and sell tons of merchandise. Good luck!
Get the full source code
This blog is intended for informational purposes only and provides an example of one of the many ways to accomplish the described task. Always consult Kentico Documentation for the best practices and additional examples that may be more effective in your specific situation.