Virtual Widget for Kentico MVC
As developers convert websites from Portal Engine to MVC, Many have said there should be a way to allow front end developers to create virtual widgets in MVC, similar to Portal. That way, front end developers can work more independently, instead of relying on backend developers to build MVC widgets and push code changes. With that thought in mind, here is the working concept for allowing front end developers to build virtual widgets without backend code changes.
Virtual Widget for Portal Engine
First of all, in case you are not familiar with virtual widgets in Portal Engine, here is a quick note on that. You don’t need to write any code for a virtual widget. You simply create a widget with field definitions to manage & store data. Then you use widget container, which has the HTML markup and macro script, to pull data from widget data fields and generate the final HTML output. It’s an easy way to create structured, reusable components for front end developers and content editors to use on pages.
Although the widget is virtually built in the admin UI and stored in the database, it needs to be rendered by a default web part. You can typically use the Static Text web part or create a simple custom blank web part as the base.
Virtual Widget for Kentico MVC
My thinking for the virtual widget concept for Kentico MVC consists of the following:
- First, think the output that you are trying to display as a component. For example, a banner, a tile block contains image and text, or a block of text.
- You will need a generic MVC widget as the base, to render the component output.
- Because the based widget has to be generic, the model, controller, and view should not contain any specific definition tie to any component.
- The data structure (model) can be handled as a Page Type. The data of the component should be stored in the content tree as a node. This way, components will also be reusable.
- You can utilize a Text/XML transformation to bind the page type data with HTML markup using a Macro resolver. (p.s. I did check with product team and got confirmation that both Text/XML transformation and Macro resolver are staying beyond Xperience 13)
- The simple idea is to create a dedicated transformation for each of these component page types, with the same naming convention. Certainly, this can be extended to allow multiple transformations with a drop down list for content editor to select.
- When using this widget, an editor can place the widget into the page, and select the component node from the content tree. The controller of this widget will identify the node class in order to get the matching transformation. Then, using macro resolver API to resolve the node data with the transformation, it can generate the HTML output for the widget viewer to display.
Here is how I did it.
First, for the code part, I chose the name FlexWidget, as it’s flexible.
FlexWidgetViewModel.cs
namespace DancingGoat.Models.Widgets
{
    public class FlexWidgetViewModel
    {
        public string outputHTML { get; set;}
    }
}
FlexWidgetController.cs
[assembly: RegisterWidget("DancingGoat.Widgets.FlexWidget", typeof(FlexWidgetController), "Flex Widget", Description = "Select the page item", IconClass = "icon-cup")]

namespace DancingGoat.Controllers.Widgets
{
    public class FlexWidgetController : WidgetController<FlexWidgetProperties>
    {
        public ActionResult Index()
        {
            FlexWidgetProperties properties = GetProperties();
            var viewModel = new FlexWidgetViewModel { };

            if (properties.SelectedItems != null)
            {
                var node = new MultiDocumentQuery().WhereEquals("NodeGuid", properties.SelectedItems.FirstOrDefault().NodeGuid).WithCoupledColumns().FirstOrDefault();
                var transformation = TransformationInfoProvider.GetTransformation(node.ClassName + ".WidgetDisplay").TransformationCode.ToString(); // using the ClassName.WidgetDisplay as the naming convention for transformation
                var macroResolver = MacroResolver.GetInstance();
                macroResolver.SetNamedSourceData("widget", node); // all the macro field value in transformation need to be prefixed with “widget.”

                var output = macroResolver.ResolveMacros(transformation);

                viewModel.outputHTML = output;
            }
            else
            {
                viewModel.outputHTML = "";
            }
            return PartialView("Widgets/_FlexWidget", viewModel);
        }
    }
}
FlexWidget.cshtml – stored under /Views/Shared/Widgets folder
@model DancingGoat.Models.Widgets.FlexWidgetViewModel

@Html.Raw(HttpUtility.HtmlDecode(Model.outputHTML))
Next, let’s look at the CMS Admin. I’m using the Dancing Goat sample site and Café (MVC) page type for this example. One thing to notice is that macro methods won’t be able to resolve here, so you can only use {% fieldname %} to get field values. Also, as we mentioned earlier in the FlexWidgetController, the field names need to be prefixed with “widget.” in order for the API to resolve them. (e.g. {% widget.fieldname %}. (Note: I changed the Café image from the sample site’s File data type to Media Library selection, since I won’t be able to use macro method to convert File data type in this transformation. Media Library selection will return the file path directly.)
<div>
  <span style="background-color: #b24143;margin-top: 3rem;color: #fff;padding: .4rem 1rem;position: absolute;">{ % widget.CafeStreet % }<br />{ % widget.CafeCity % }</span>
  <img style="width: 100%;" src=" { % widget.CafeImage % }" />
</div>
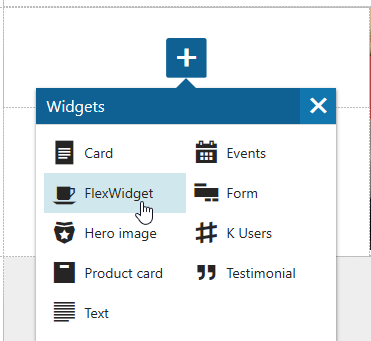
Now we can use it inside page builder. First, in the widget zone add the FlexWidget.
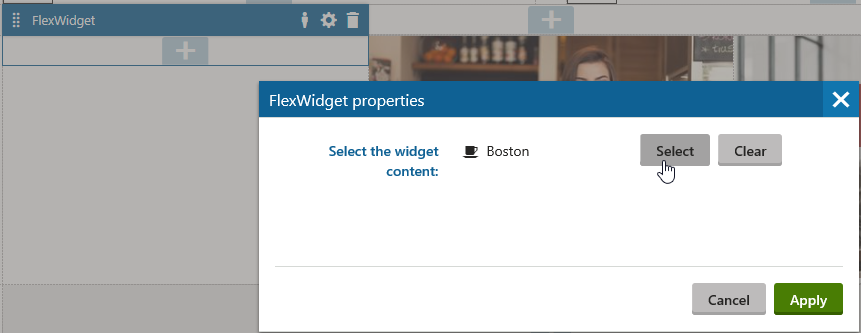
Click the gear icon to configure it by selecting one of the Café pages under the Cafes section.
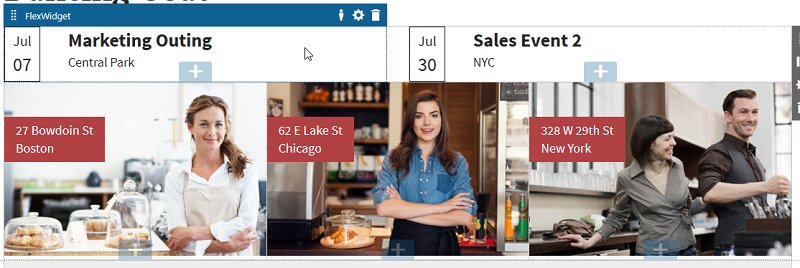
Here is the result after adding 3 café blocks using FlexWidget. I had also added 2 more events blocks into the same page as well, by creating an Event page type, writing the transformation, and adding the event contents to the content tree— all things front end developers can do without backend code changes.
As you can see, although with some limitations, this allows front end developers and content editors to build structured block displays using MVC widgets without the need for backend code changes. You can certainly take this concept further by giving front end editors with more options. Feel free to share your ideas with us as well. You can also send you feedback to product@xperience.io.