|
|

Managing campaigns (Example) |

|

|

|

|
|
Managing campaigns (Example) |
|
|

|
|
|
|
Managing campaigns (Example) |
|
|
|
|
|
Managing campaigns (Example) |
|
|
|
|
|
|
||
Each marketing campaign is represented in the system by a corresponding object. To configure these objects, go to CMS Desk -> On‑line marketing and select Campaigns from the menu. Then, switch to the Campaigns tab, where you can view a list of all campaigns defined for the current website and manage them as needed.
By default, the Corporate Site contains a single campaign called Sample campaign.

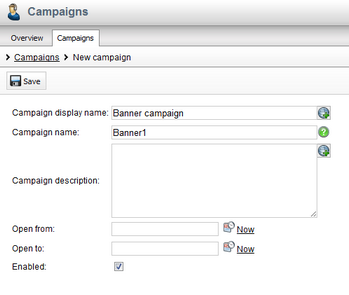
To better demonstrate the functionality of campaigns, we will need two additional ones. Click ![]() New campaign and fill in the following properties:
New campaign and fill in the following properties:
•Campaign display name: Banner campaign; the name of the campaign displayed in the administration interface (in campaign lists and reports).
•Campaign name: Banner1; sets a code name that serves as a unique identifier for the campaign. It is also stored as the value of the Campaign browser cookie used to identify visitors who came to the website through the given campaign.
•Campaign description - can be used to enter a text description for the campaign in order to give information about its purpose, goals etc. You may leave this empty.
•Open from/to - sets the time interval during which the campaign should be active. The Calendar button (![]() ) can be used to select an exact date and time. Leave these empty for this example.
) can be used to select an exact date and time. Leave these empty for this example.
•Enabled - this property may be used to manually start or stop the campaign. Visitor statistics and actions will not be logged for disabled campaigns. Leave the box checked.
Click ![]() Save to add the campaign. The General tab of the campaign's editing interface will now be displayed, where you can modify the fields listed above at any time. Several additional properties are also available, but these are described later in this chapter.
Save to add the campaign. The General tab of the campaign's editing interface will now be displayed, where you can modify the fields listed above at any time. Several additional properties are also available, but these are described later in this chapter.
Return to the campaign list and add a third campaign with the following names:
•Campaign display name: E‑mail marketing
•Campaign name: Emails
Now that some campaign tracking objects are prepared, it is necessary to ensure that visitors who access the website through marketing campaigns are correctly identified and assigned to the appropriate object. There are three different ways how this can be done.
This method utilizes a URL query string parameter to indicate that the traffic source is a campaign. All you need to do is enter the name of the parameter that you wish to use into the Site Manager -> Settings -> On‑line marketing -> Web analytics -> Campaign tracking URL parameter setting.
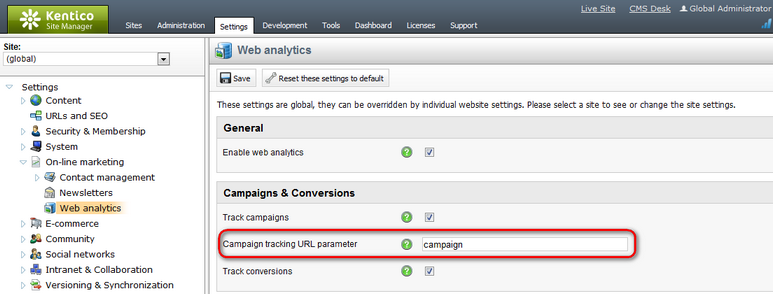
For now, leave the setting with its default value (campaign).
Open a new tab in your browser and enter the URL of your site's Home page into the address bar. Include the campaign tracking parameter and set its value to samplecampaign (the name of the default campaign):
http://localhost/KenticoCMS/Home.aspx?campaign=samplecampaign
You will have to adjust the URL according to the domain of your website. You may also need to Close the preview mode of the page to get to the actual live site. The Home page will be opened as usual, but the system will recognize that you have arrived via a campaign. Scroll down to the bottom of the page and click the Examples link under the Where to learn more? section. On this page, use the menu on the left to reach On‑line marketing -> Optimization -> Conversion page, which will cause a sample conversion to be logged.
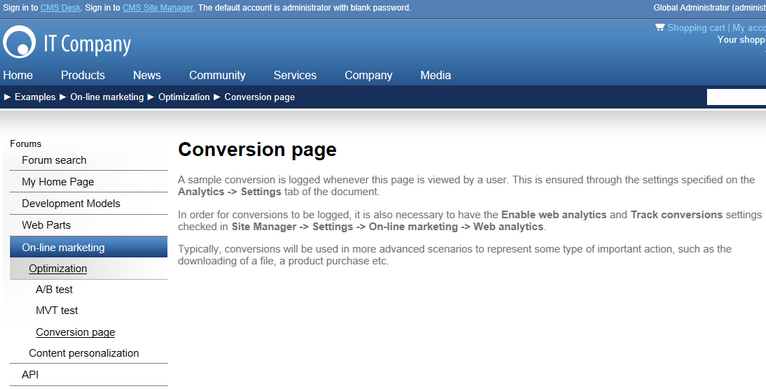
Because the Sample campaign is currently active in your browser, the conversion will also be recorded in the campaign statistics. You can try reloading the page several times to log multiple conversions.
In a real‑world scenario, you would need to ensure that all links to your website placed in the given campaign's marketing materials contain the tracking parameter with the name of the appropriate campaign object as the value. This type of campaign tracking is not limited to a specific document and may be used when linking to any page on the website.
Alternatively, you can configure a document to behave as a campaign landing page. When this type of page is viewed by a user, a specified campaign will automatically be assigned.
To ensure accurate campaign tracking, it is recommended to create a special page that will not be available in the website's standard navigation, since the campaign will be assigned to all users who view this page (and repeated views by the same user will also be logged as campaign visits). When using this approach, all of the campaign's links need to be directed at this special landing page.
Log back in to CMS Desk, select the Special Pages folder in the content tree and create a New page under it named Landing page. You can choose the Create a blank page option in the template selection dialog, since the content of the page is not important for the purposes of this example.
Select the new document and switch to its Analytics -> Settings tab. Here, click the Select button next to the Track campaign field and choose Banner campaign in the displayed dialog. Then click the Save button.
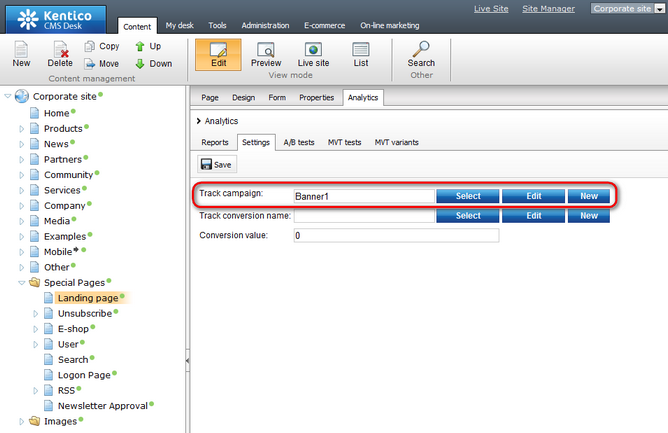
Now open this new page on the live site (you can access it through its URL: <domain>/SpecialPages/Landing-Page.aspx). The Banner campaign will become active, replacing the previously assigned campaign. Navigate to Examples -> On‑line marketing -> Optimization -> Conversion page again, so that a conversion is logged for this campaign as well.
You can also define campaign tracking for a page's specific Document alias. This approach is useful if you wish for the campaign to link visitors to an easily accessible page, but want to avoid using a query string parameter. The campaign will only be assigned to users who access the document through this alias.
Select the Home page from the content tree in CMS Desk and go to Properties -> URLs. Here, click on ![]() Add new alias and configure the alias's settings as shown below:
Add new alias and configure the alias's settings as shown below:
•Path type: Standard URL or wildcard
•Path or pattern: /EmailCampaign/Home
•Track campaign: select the E‑mail marketing campaign
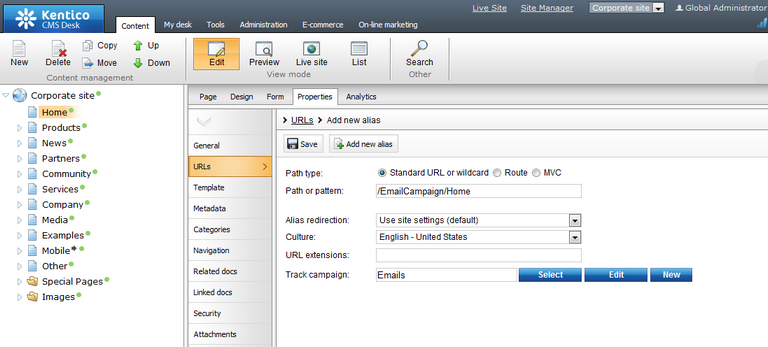
Click ![]() Save and the alias will be created.
Save and the alias will be created.
To activate the campaign, open the Home page of the site through the URL of this alias (<domain>/EmailCampaign/Home.aspx). This will override the previous campaign and you can visit the sample Conversion page again.
The campaign tracking methods are listed in the order of their priority. So if a campaign is specified for a document via Settings -> Analytics, but the page is also accessed via a URL containing a tracking parameter, the campaign specified via the parameter will be assigned to the given visitor.
Continue in the Evaluating campaigns topic to see how you can view the results of these steps. Keep in mind that this sample scenario only serves to quickly demonstrate the functionality of campaigns. In the case of a real campaign, visitors would not need to enter URLs manually, but would simply follow the appropriate links and the system would keep track of more practically defined conversions.
As you may have noticed, there are some additional configuration options that may be specified when editing campaigns in the CMS Desk -> On‑line marketing interface.
On the General tab, the Campaign impressions and Total cost values may be used to help evaluate the campaign and calculate its goals. An important property is the Campaign condition, which allows you to set a macro condition that must be fulfilled in order for the campaign to be assigned to visitors.
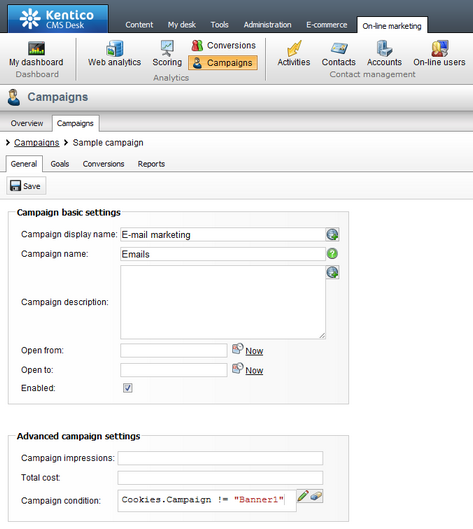
For example: Cookies.Campaign != "Banner1"
This sample condition checks the value of the Campaign cookie and prevents the edited campaign (E‑mail marketing) from being assigned to visitors who are already being tracked by the Banner1 campaign. In practice, this would mean that if a visitor was brought to the site through a banner and then later clicked on a link in a marketing e‑mail, the banner campaign would remain active instead of being overwritten.
You can write any other type of condition according to your specific requirements. Through the edit icon (![]() ), you can open the Macro condition editor, which allows you to build conditions through a graphical interface. For more information about the available macro options, please refer to Internals and API -> On-line marketing macros.
), you can open the Macro condition editor, which allows you to build conditions through a graphical interface. For more information about the available macro options, please refer to Internals and API -> On-line marketing macros.
If you switch to the Conversions tab, you can configure which Conversions should be tracked by the campaign. There are two possible options:
•All conversions will be tracked for the campaign - if chosen, any conversion hit logged on the entire website will be included in the campaign's statistics.
•Only the selected conversions will be tracked for the campaign - this option allows you to limit which conversions should be tracked. Specific conversions may be assigned to the campaign by clicking the Add conversions button and choosing from the list in the displayed dialog.
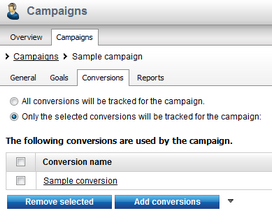
In both cases, only conversions performed by visitors who arrive on the website as a result of the given campaign will be logged.
|
Automatic campaign creation
When a visitor comes to the website through an undefined campaign (typically specified via the tracking URL parameter), it will be ignored by default and no campaign tracking will be performed.
If you wish to change this behaviour, edit your application's web.config file and add the following key to the /configuration/appSettings section:
Once this is done, unknown campaigns will automatically be added to the list of campaign objects for the given website.
Campaigns created this way will be enabled by default and active for an unlimited time interval, but they can be configured using the same approach as mentioned previously. |
