|
|

Configuration for WebDAV editing |

|

|

|

|
|
Configuration for WebDAV editing |
|
|

|
|
|
|
Configuration for WebDAV editing |
|
|
|
|
|
Configuration for WebDAV editing |
|
|
|
|
|
|
||
WebDAV editing is a feature of the solution which enables direct editing of files stored on the portal, without the need to create a local copy and re-upload the modified file back to the server. This greatly simplifies the process of editing uploaded files and can be extremely useful, especially on intranet websites. For detailed information about WebDAV integration in Kentico CMS, please refer to Developer's Guide -> Modules -> WebDAV integration.
For WebDAV integration to be functional, the following client‑side requirements must be met:
•WebDAV can be used only in Internet Explorer 6 or higher. No other web browsers are currently supported.
•Client applications with WebDAV support for particular file types need to be installed on the client machine. E.g. Microsoft Office 2003 or higher or Paint and Notepad in Windows 7 support editing of associated file types using WebDAV.
•Matching (x86) or (x64) versions of both Internet Explorer and Microsoft Office must be installed. In other words, to be able to open documents using WebDAV in Internet Explorer (x86), Microsoft Office (x86) must be installed on the client computer. For Internet Explorer (x64), you need to have Microsoft Office (x64) installed.
|
Editable file size limit
By default, WebDAV editing is only functional with files smaller than 50 MB.
In case that a user needed to edit larger files using WebDAV, they would need to go to HKEY_LOCAL_MACHINE\SYSTEM\CurrentControlSet\Services\WebClient\Parameters in their Windows registry and adjust the FileSizeLimitInBytes key to the required value.
|
For WebDAV integration to be functional, the following server‑side requirements must be met:
•Windows authentication must be enabled in IIS and the CMS must be configured to use this type of authentication.
•If you are using an older version of IIS than 7.0, the Kentico CMS website must be installed in the root of the server. This is necessary because Microsoft Office submits configuration requests to the site root and requires the server to respond properly. If the website is not installed to the root, Microsoft Office will open its associated documents as read-only.
•If you are using IIS 7.0 or higher, the website needn't be installed in the root - it can also be installed in a virtual directory.
The following paragraph guides you step-by-step through the process of enabling Windows Authentication, which is the most important pre-requisite. The Configuration for WebDAV topic in Developer's Guide -> Modules -> WebDAV integration explains the rest of the required configuration procedure.
1. Before you configure your project for Windows authentication, you need to create a user account that will be the same as your current domain name and assign administrator permissions to this user account. This will allow you to access all features as an administrator once you sign in using Windows authentication.
2. Sign in as an administrator to Site Manager and go to Administration -> Users. Create a new user with the following values:
•User name: your domain user name in format domain-username, example: office-johns
•Full name: your full name
Click OK.
3. On the General tab, set the following values:
•Is global administrator: yes
•Is external user: yes
•Is domain user: yes
Click OK.
4. Now you can switch the application to Windows authentication mode. Edit the web.config file of the web project and change the following line:
<authentication mode="Forms"> |
to:
<authentication mode="Windows"> |
5. Now you have Windows authentication enabled for the administration interface. To enable it for the live site as well, the following piece of code also needs to be present in your web.config. By default, the code is already there, but commented. So the only thing you need to do is locate it (just search for the first line) and uncomment it.
<location path=""> <system.web> <authorization> <deny users="?"/> </authorization> </system.web> </location> |
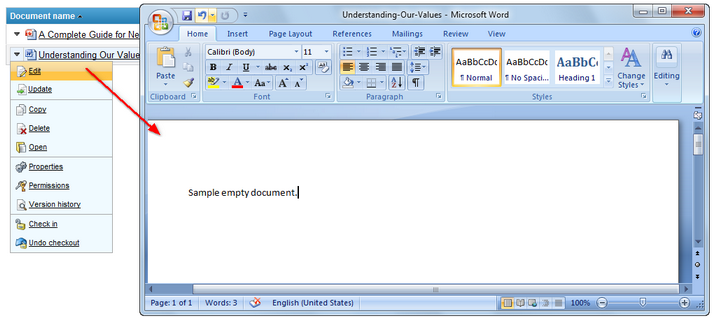
Once you have all the necessary configuration performed, you can verify that WebDAV editing is enabled. The easiest way is to verify it in any Document library on the portal. The screenshot below shows the ![]() Edit action, which is only present in the drop-down menu if WebDAV editing is enabled and if WebDAV editing of the particular file type is supported. In the screenshot, you can see how a DOCX document is opened for direct editing in Microsoft Word. Saving the changes in Microsoft Word (just by clicking the Save button or pressing Ctrl+S) replaces the original version of the file with the new one automatically.
Edit action, which is only present in the drop-down menu if WebDAV editing is enabled and if WebDAV editing of the particular file type is supported. In the screenshot, you can see how a DOCX document is opened for direct editing in Microsoft Word. Saving the changes in Microsoft Word (just by clicking the Save button or pressing Ctrl+S) replaces the original version of the file with the new one automatically.