|
|

Integration bus management UI |

|

|

|

|
|
Integration bus management UI |
|
|

|
|
|
|
Integration bus management UI |
|
|
|
|
|
Integration bus management UI |
|
|
|
|
|
|
||
User interface of the System integration bus module is located in Site Manger -> Administration -> Integration bus. In this part of the user interface, you can manage integration connectors and both outgoing and incoming integration tasks.
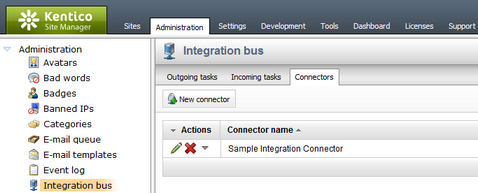
On the Connectors tab, you can see a list of defined integration connectors. An integration connector is a class which implements functionality for integration with a specific third party system.
New connectors can be defined after clicking ![]() New connector. The following actions are available for each listed connector:
New connector. The following actions are available for each listed connector:
•Edit (![]() ) - redirects you to an interface where properties of the connector can be edited.
) - redirects you to an interface where properties of the connector can be edited.
•Delete (![]() ) - deletes the connector so that it is no longer defined and available.
) - deletes the connector so that it is no longer defined and available.
Please note that when you add, edit or delete a connector, all defined connectors are reinitialized.
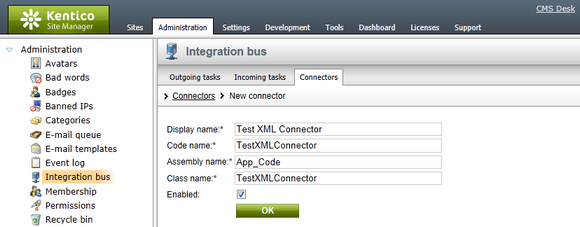
When creating a new integration connector or editing an existing one, the following properties of the connector need to be specified:
Display name |
Name of the connector used in the system's administration interface. |
Code name |
Name of the connector used in website code. This name must match the value of the ConnectorName property declared in the connector's class. For more details, see step 1 and 4 in Getting started -> Enabling the sample integration connector. |
Assembly name |
Name of the assembly within the web project in which the connector's class resides. A connector can either be implemented in a standard assembly, or in App_Code.
When it is stored in App_Code, you need to enter App_Code into this field and implement a module class with code that will ensure dynamic loading of the connector. For more details, see step 2 in Getting started -> Enabling the sample integration connector.
Please note that if you installed the project as a web application, you should use Old_App_Code instead of App_Code. |
Class name |
Name of the class which implements the connector. If the class is located in a dedicated assembly (not in App_Code), the name should be entered including the namespace. |
Enabled |
Indicates if logging and processing of tasks by this connector is enabled. Logging and processing of tasks needs to be enabled in Site Manger -> Settings -> Integration -> Integration bus as well in order for the connector to be functional. |
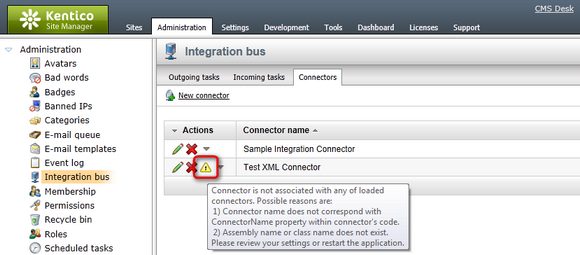
To make sure that a connector is loaded correctly, please see the listing of connectors. When something goes wrong you are notified by the warning (![]() ) icon. When you move your mouse over the icon, you will be provided with a tooltip explaining the most common causes of failure.
) icon. When you move your mouse over the icon, you will be provided with a tooltip explaining the most common causes of failure.
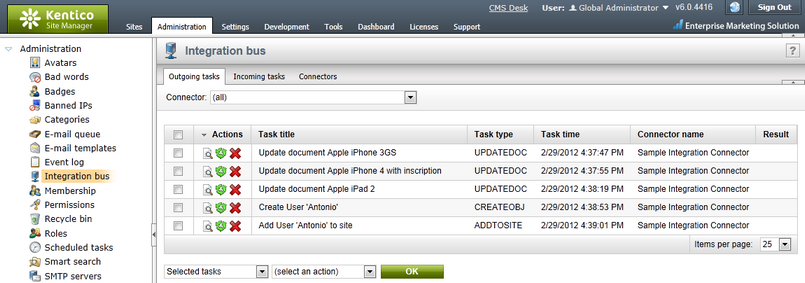
On the Outgoing tasks tab, you can see a list of logged outgoing synchronization tasks that were not processed yet. Outgoing tasks represent changes made in the Kentico CMS system that should be reflected in the target system with which Kentico CMS is integrated. By default, the tasks are listed from the oldest to the newest, i.e. in the order in which the will be processed.
Using the Connector drop-down list, you achieve that only tasks logged for the selected connector will be listed in the grid. When (all) is selected, all outgoing tasks logged for all connectors are displayed.
The following actions are available for each listed task:
•View (![]() ) - displays object or document data transferred within the integration task in a new pop-up window.
) - displays object or document data transferred within the integration task in a new pop-up window.
•Synchronize (![]() ) - starts processing of the respective single integration task.
) - starts processing of the respective single integration task.
•Delete (![]() ) - deletes the integration task without processing it.
) - deletes the integration task without processing it.
In case that there are a large number of tasks listed, you can perform the above mentioned actions with more of them at once using the two drop-down lists below the grid. Using the first one, you need to chose whether to perform the action to all listed tasks, or only to the tasks selected by the check-boxes next to them. Then you need to choose the required action from the second drop-down list and click OK to perform it. If you perform synchronization of multiple tasks, they are performed in the order in which they were created, no matter how they are currently sorted in the grid.
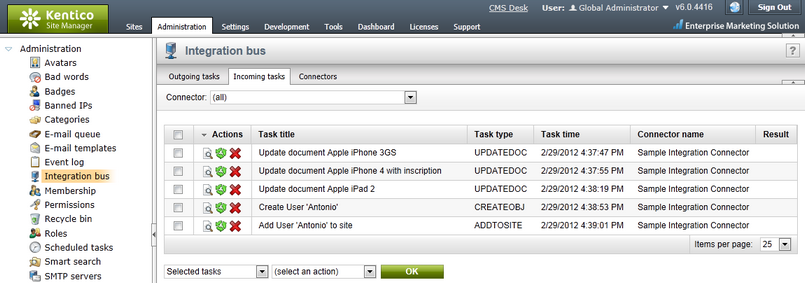
On the Incoming tasks tab, you can see a list of logged incoming synchronization tasks that were not processed yet. Incoming tasks represent changes in the external system with which Kentico CMS is integrated that should be reflected in the Kentico CMS system. By default, the tasks are listed from the oldest to the newest, i.e. in the order in which the will be processed.
Using the Connector drop-down list, you achieve that only tasks logged for the selected connector will be listed in the grid. When (all) is selected, all incoming tasks logged for all connectors are displayed.
The following actions are available for each task:
•View (![]() ) - displays document or object data transferred within the integration task in a new pop-up window.
) - displays document or object data transferred within the integration task in a new pop-up window.
•Synchronize (![]() ) - starts processing of the respective single integration task.
) - starts processing of the respective single integration task.
•Delete (![]() ) - deletes the integration task without processing it.
) - deletes the integration task without processing it.
In case that there are a large number of tasks listed, you can perform the above mentioned actions with more of them at once using the two drop-down lists below the grid. Using the first one, you need to chose whether to perform the action to all listed tasks, or only to the tasks selected by the check-boxes next to them. Then you need to choose the required action from the second drop-down list and click OK to perform it. If you perform synchronization of multiple tasks, they are performed in the order in which they were created, no matter how they are currently sorted in the grid.
After clicking the View (![]() ) icon on both of the tabs mentioned above, a pop-up window is displayed. In this window, you can see the object or document data transferred within the integration task.
) icon on both of the tabs mentioned above, a pop-up window is displayed. In this window, you can see the object or document data transferred within the integration task.

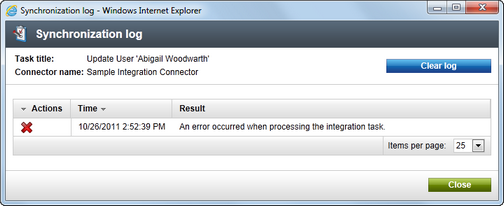
When processing of an integration task fails, the Failed link is displayed in the Result column. If you mouse‑over it, an error message explaining the issue is displayed. In case of outgoing tasks, it is the error message returned by the respective method implemented in the integration connector.
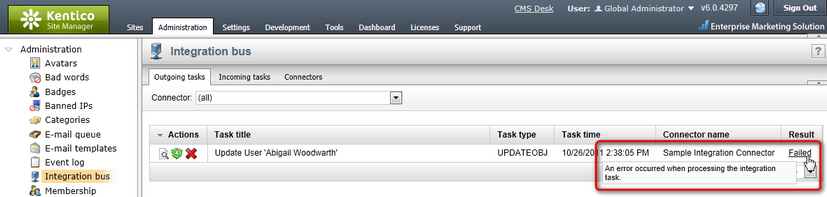
If you click the Failed link, a pop‑up window is displayed, containing a Synchronization log with detailed information about individual attempts to process the synchronization task.