|
|

Defining custom index content |

|

|

|

|
|
Defining custom index content |
|
|

|
|
|
|
Defining custom index content |
|
|
|
|
|
Defining custom index content |
|
|
|
|
|
|
||
When creating a custom index, you do not define the content on the Index tab. Instead, you must implement all functionality of the index by writing code. In the administration interface, you only need to specify the names of the assembly and class that contain the custom index logic.
To define a custom index, create a class that implements the CMS.Siteprovider.ICustomSearchIndex interface.
To integrate this type of class into the application, you can:
•Create a new assembly (Class library) in your web project and include the index class there. When using this approach, you must add the appropriate references to both the assembly and the main CMS project. You can find a sample search index in the CustomSearchIndex project located in your Kentico CMS installation directory (typically C:\Program Files\KenticoCMS\<version>\CodeSamples\CustomSearchIndex).
•Define the custom index in App_Code and load the class via the API. This ensures that the system automatically compiles the index class and you do not need to use a separate assembly. The example below demonstrates this approach.
The following example shows how to create a custom index that searches the content of text files:
1. Open your web project in Visual Studio and add a new class into the App_Code folder (or Old_App_Code if the project is installed as a web application). For example, name the class TextFileIndex.cs.
2. Edit the class and add the following references:
[C#]
using CMS.EventLog; |
3. Make the class implement the ICustomSearchIndex interface.
[C#]
public class TextFileIndex : ICustomSearchIndex |
4. Define the Rebuild method inside the class. You must always include this method when writing a custom index. It fills the index with data, which determines what kind of searches the index provides. The system calls the method when building the index for the first time and on each subsequent rebuild.
[C#]
/// <summary> // Gets an info object of the index settings. |
You need to write the code of the Rebuild method according to the specific purpose of the index, but all indexes use the following general steps:
a. Get an instance of the Lucene.Net.IndexWriter object for the search index.
b. Define search Documents (Lucene.Net.Documents.Document objects) and their fields for the items that you wish to add to the index.
c. Call the AddDocument method of the IndexWriter for every search document.
d. Optimize the index using the Optimize method of the IndexWriter once you have added all required search documents.
e. Call the Close method of the IndexWriter.
|
Index data parameters
The SearchIndexInfo parameter of the Rebuild method allows you to access the data fields of the corresponding search index object. The sample code loads the content of the Index data field and uses it to define the path to the searched text files.
When writing your own custom indexes, you can use this field as a string parameter for any required purpose. This way, you may easily modify the behavior of the index directly from the administration interface without having to edit its code. |
For indexes defined in the App_Code folder, you need to ensure that the system loads the appropriate class when building the index. You can find additional information related to this topic in Registering custom classes in App_Code.
1. Create another class in the App_Code folder (or Old_App_Code if the project is installed as a web application). For example, name the class ClassLoader.cs.
2. Edit the class and add the following reference:
[C#]
using CMS.SettingsProvider; |
3. Delete the default class declaration and its content. Instead, extend the CMSModuleLoader partial class and define a new attribute inheriting from CMS.SettingsProvider.CMSLoaderAttribute:
[C#]
[ClassLoader] |
4. Enter the following code into the ClassLoader attribute class:
[C#]
/// <summary> case "TextFileIndex": e.Object = new TextFileIndex(); break; |
For custom indexes, the value of the ClassName property of the ClassHelper_OnGetCustomClass handler's ClassEventArgs parameter matches the Class name specified for the given index on its Index tab (TextFileIndex in this example). The handler checks the class name to identify which index is being rebuilt and then passes on an instance of the appropriate class.
1. Open Kentico CMS, go to Site Manager -> Administration -> Smart Search and click ![]() New Index. Fill in the following properties:
New Index. Fill in the following properties:
•Display name: Text file index
•Index type: Custom Index
Click ![]() Save.
Save.
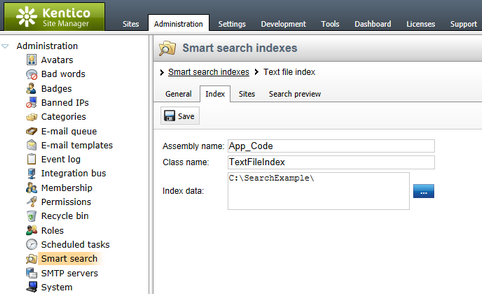
2. Switch to the Index tab and enter the names of the assembly and class where the custom index is implemented:
•Assembly name: App_Code
•Class name: TextFileIndex
3. Type any required parameters into the Index data field. In this example, you need to specify the file system path of the folder containing the text files that the index will search. You can create a new folder for this purpose, e.g. C:\SearchExample\ and add some text files into it.
Click ![]() Save.
Save.
4. Go to the General tab and ![]() Rebuild the index.
Rebuild the index.
The index is now fully functional. To test the index, switch to Search preview tab and try searching for any words from the text files created in the SearchExample folder.
