|
|

Example: Static maps |

|

|

|

|
|
Example: Static maps |
|
|

|
|
|
|
Example: Static maps |
|
|
|
|
|
Example: Static maps |
|
|
|
|
|
|
||
This example will show you how to display one object, e.g. an office, on a map. The Static Google maps web part will be used. However, the procedure is identical for the Static Bing maps web part, too. You can use any Kentico CMS sample site for the purpose of this example.
To display one object on a map, you will need to add a static map web part to a page and configure its properties. Specifically, you will need to fill in two fields for the geographical coordinates - one for longitude and one for latitude - or, alternatively, a location field in human-readable form, e.g. an address. This will ensure that the location marker is displayed on the map.
1. Sign in as an administrator to CMS Desk -> Content and click the root of the content tree.
2. Click ![]() New and choose to create a new
New and choose to create a new ![]() Page (menu item). Enter Office for Page name, choose the Create a blank page with layout option and select the Simple layout. Click
Page (menu item). Enter Office for Page name, choose the Create a blank page with layout option and select the Simple layout. Click ![]() Save.
Save.
3. Now switch to the Design tab, add the Maps/Static/Static Google maps web part to the zoneLeft web part zone and set the following properties:
•Latitude: 40.76 (The field containing the latitude position.)
•Longitude: -73.98 (The field containing the longitude position.)
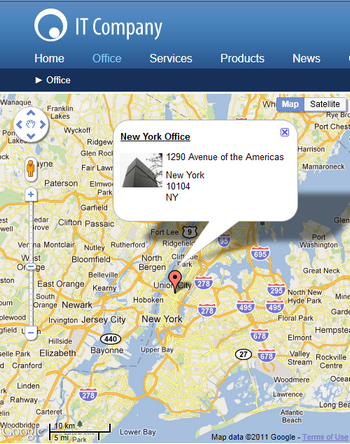
•Tooltip: New York Office (The field used for the heading of tooltips.)
•Marker content: 1290 Avenue of the Americas, New York, 10104, NY (The field containing details of the displayed object. You can use the built-in WYSIWYG editor to edit the details and you can also insert an image.)
•Large view scale: 3 (The zoom used on page load.)
•Icon URL - if you don't want to use the default location marker icon, you can alternatively choose your custom location marker icon. Click the Select button to open the Insert link dialog and set your custom location marker icon URL. For more details on how to insert a URL, please refer to the WYSIWYG editor -> Insert link chapter.
•Detailed view scale: 10 (The zoom used if the location marker is clicked.)
•Width: 500 (In pixels.)
•Height: 400 (In pixels.)
|
Geolocation values are valid in the following intervals:
•Latitude: from -90 to 90 •Longitude: from -180 to 180
|
Alternatively, you can leave the Latitude and Longitude fields undefined or set to zero and use the Location or address field instead to enter the location value in a human-readable form, e.g. an address.
|
Important!
Using geolocation values in a human-readable form involves some processing overhead and can even lead to inaccurate results. To ensure maximum performance and accuracy, it is therefore recommended to use the latitude and longitude coordinates when defining a geographical location.
|
|
Please note
You can enable geolocation translations, i.e. addresses to coordinates, on the server side by checking the Use server processing checkbox. If you decide to do so, please check that the maps services query limits (IP-based) are sufficient for your needs.
To ensure maximum efficiency, maps services results are cached if the Use server processing option is enabled. What is more, separate cache keys are used for the live site mode and for other modes.
|
Click OK.
4. Sign out and view the page. It will look like this:
You can see one baloon on the map - this is the location marker. If you mouse-over the balloon, you will see the office name. If you click the balloon, you will see the detailed view: