|
|

Example: Maps with a data source |

|

|

|

|
|
Example: Maps with a data source |
|
|

|
|
|
|
Example: Maps with a data source |
|
|
|
|
|
Example: Maps with a data source |
|
|
|
|
|
|
||
This example will show you how to display a list of offices and their location on a map using a data source. The Basic Google maps web part in combination with the Documents data source web part will be used in the example. However, the procedure is identical for Basic Bing maps web part, too.
The Corporate Site sample website will be used and you will create a page for offices directly under the website root. However, if you don't have this site installed, you can use any other available site.
To display content on a map, you need to have a data source web part configured that will provide this content for the map web part. For the purpose of this example, documents content will be used. It will be stored in the content tree as standard documents. These documents can be of any document type as long as the document type contains two fields for the geographical coordinates - one for longitude and one for latitude - or, alternatively, a human-readable location field, e.g. an address.
When you have the documents created and stored within the desired location, you will need to configure properties of the data source and map web parts to display them on a map. You will also need to specify which fields of the document type contain the coordinates or human-readable location. This ensures that location markers are displayed.
1. Sign in as an administrator to CMS Desk -> Content and click the root of the content tree.
2. Click ![]() New and choose to create a new
New and choose to create a new ![]() Page (menu item). Enter Offices for Page name, choose the Create a blank page with layout option and select the Two columns layout. Click
Page (menu item). Enter Offices for Page name, choose the Create a blank page with layout option and select the Two columns layout. Click ![]() Save.
Save.
3. First you need to add a list of offices. Switch to the Design tab and add the Listings and viewers/Documents/Datalist web part to the zoneLeft web part zone. Set the following properties:
•Path: /{0}/%
•Document types: CMS.Office
•Transformation: CMS.Office.Simple
•Selected item transformation: CMS.Office.Default
•Repeat columns: 1
•Repeat direction: Vertical
•Repeat layout: Table
•Content before: <br /> <div class="GeneralList">
•Content after: </div>
Click OK.
4. Now you will create two documents of the Office type under the document created in Step 1. Click the Offices page and click ![]() New. Choose to create a new
New. Choose to create a new ![]() Office and enter the following values:
Office and enter the following values:
•Office name: New York Office
•Address line 1: 1290 Avenue of the Americas
•City: New York
•ZIP code: 10104
•State: NY
•Country: U.S.A.
•Phone: 123456789
•E-mail: ny@example.com
•Latitude: 40.76
•Longitude: -73.98
•Office photo - please choose an image from your disk.
•Icon URL - if you don't want to use the default location marker icon for this particular document on the map, you can alternatively set URL of your custom location marker icon. Click the Select button to open the Insert link dialog and set your custom location marker icon URL. For more details on how to insert a URL, please refer to the WYSIWYG editor -> Insert link chapter.
|
Please note
The Office document type already contains the Latitude and Longitude fields. These are the fields that you will later specify in the map web part properties as the source for the geographical position of the location markers. If you use a custom document type, you will need to define these fields manually. They must be of the decimal number type. You can give them any names you want and only need to specify them in the web part properties.
Values are valid in the following intervals:
•Latitude: from -90 to 90 •Longitude: from -180 to 180
|
Click ![]() Save.
Save.
5. Create another office:
•Office name: San Francisco Office
•Address line 1: 835 Market Street
•City: San Francisco
•ZIP code: 94103
•State: CA
•Country: U.S.A.
•Phone: 123456789
•E-mail: sf@example.com
•Latitude: 37.78
•Longitude: -122.41
•Office photo - please choose an image from your disk.
•Icon URL - if you don't want to use the default location marker icon for this particular document on the map, you can alternatively set URL of your custom location marker icon. Click the Select button to open the Insert link dialog and set your custom location marker icon URL. For more details on how to insert a URL, please refer to the WYSIWYG editor -> Insert link chapter.
Click ![]() Save.
Save.
6. If you view the Offices page now, it displays only a list of offices. Switch to the Design tab and add the Data sources/Documents data source web part to the zoneRight web part zone.
You only need to configure which documents should be used by this web part to be displayed on the map. Set the following properties:
•Path: /{0}/%
•Document types: CMS.Office
It ensures that all offices in the current site section will be shown.
Click OK.
7. On the Design tab, add the Maps/Basic/Basic Google maps web part to the zoneRight web part zone.
First, you will need to configure which data source should be used. Set the following properties:
•Data source name: DocumentsDataSource
Now you need to specify the transformation used for the text displayed in the balloon:
•Transformation: CMS.Office.Preview
Finally, you will set the values that specify how the map is displayed:
•Default latitude: 39.27 (Latitude of the map center when the large view map is displayed on page load.)
•Default longitude: -98.20 (Longitude of the map center when the large view map is displayed on page load.)
•Latitude field: OfficeLatitude (The field of the document containing the latitude position.)
•Longitude field: OfficeLongitude (The field of the document containing the longitude position.)
•Large view scale: 3 (The zoom used on page load.)
•Detailed view scale: 10 (The zoom used if a location marker is clicked.)
•Width: 500 (In pixels.)
•Height: 400 (In pixels.)
•Tooltip field: OfficeName (The field used for the heading of tooltips.)
•Icon field - contains the code name of the source field whose content will be used as URL for your custom location marker icon; i.e. OfficeIconURL for the purpose of this example. If not set for a particular document or left empty, the default location marker icon will be used.
Alternatively, you can leave the Default latitude and Default longitude fields for the large view map center undefined or set to zero and use the Default location or address field instead to enter the location value in a human-readable form, e.g. an address. Similarly, you can do this for the Latitude field and Longitude field fields related to the location markers using the alternative Location field field.
|
Important!
Using geolocation values in a human-readable form involves some processing overhead and can even lead to inaccurate results. To ensure maximum performance and accuracy, it is therefore recommended to use the latitude and longitude coordinates when defining a geographical location.
|
|
Please note
You can enable geolocation translations, i.e. addresses to coordinates, on the server side by checking the Use server processing checkbox. If you decide to do so, please check that the maps services query limits (IP-based) are sufficient for your needs.
To ensure maximum efficiency, maps services results are cached if the Use server processing option is enabled. What is more, separate cache keys are used for the live site mode and for other modes.
|
Click OK.
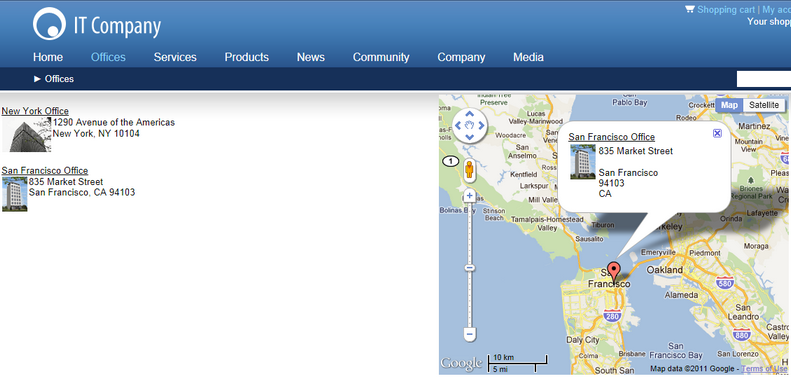
8. Sign out and view the page. It will look like this:
You can see two baloons on the map - these are the location markers. If you mouse-over a balloon, you will see the office name. If you click a balloon, you will see the office detailed view: