Developing form controls |

|

|

|

|
|
Developing form controls |

|

|

|

|
|
|
||
The following example shows how to create a form control that will allow users to choose a color from a drop-down list. The example is relatively simple, but the same basic approach can be used to create any type of custom form control or modify an existing one.
1. Open your web project in Visual Studio (or Visual Web Developer) using the WebProject.sln file or via File -> Open -> Web site in Visual Studio.
2. Right-click the CMSFormControls folder and choose Add New Item. Choose to create a new Web User Control and call it ColorSelector.ascx.
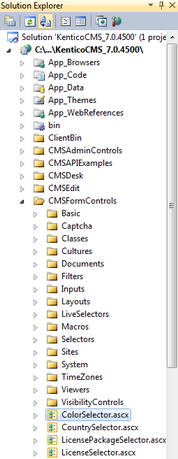
This folder (or a sub‑folder under it) should always be used to store the source files of custom form controls, since it ensures that registered form controls are exported correctly along with the site.
3. Edit the new control on the Design tab. Drag and drop a standard DropDownList control onto the form from the Toolbox:

4. Edit the properties of the DropDownList and change its ID to drpColor.
5. Switch to the code behind and add a reference to the following namespace:
[C#]
using CMS.FormControls; |
[VB.NET]
Imports CMS.FormControls |
6. Next, modify the class definition according to the following:
[C#]
public partial class CMSFormControls_ColorSelector : System.Web.UI.UserControl
to
public partial class CMSFormControls_ColorSelector : FormEngineUserControl |
[VB.NET]
Partial Class CMSFormControls_ColorSelector
to |
This ensures that our form control inherits from the CMS.FormControls.FormEngineUserControl class and can use its standard properties.
7. Now add the following members into the class:
[C#]
/// <summary> public override Object Value /// Returns an array of values of any other fields returned by the control. /// </summary> /// <returns>It returns an array where the first dimension is the attribute name and the second is its value.</returns> public override object[,] GetOtherValues() public override bool IsValid() // Applies the width specified through the parameter of the form control if it is valid. if (SelectorWidth > 0) protected void Page_Load(object sender, EventArgs e) |
[VB.NET]
''' <summary> ''' Sets values for any other fields (attributes) of the object in which the form control is used. ''' </summary> ''' <returns>Returns an array where the first dimension is the field's column name and the second is its value.</returns> Public Overrides Function GetOtherValues() As Object(,) Public Overrides Function IsValid() As Boolean ' Applies the width specified through the parameter of the form control if it is valid. If SelectorWidth > 0 Then ''' Handler for the Load event of the control. ''' </summary> ' Ensure drop down list options |
The above code overrides three members inherited from the FormEngineUserControl class that are most commonly used when developing form controls:
•Value - it is necessary to override this property for every form control. It is used to get and set the value of the field provided by the control.
•GetOtherValues() - this method is used to set values for other fields of the object in which the form control is used. It must return a two dimensional array containing the names of the fields (columns) and their assigned values. Typically used for multi‑field form controls that need to store data in multiple database columns, but only occupy a single field in the form.
•IsValid() - this method is used to implement validation for the values entered into the field. It must return true or false depending on the result of the validation.
Also notice that a SelectorWidth property was defined for the form control. It serves as a way to access the value of a parameter that will be defined for the form control later in the example. This property is used in the EnsureItems() method to set the width of the internal drop-down list .
Remember to save the changes to both code files and Build your project if it is installed as a web application.
8. Go to Site Manager -> Development -> Form controls where you can register the new form control in the system. Click the ![]() New form control button, select the Create a new form control option and enter the following values:
New form control button, select the Create a new form control option and enter the following values:
•Display name: Custom color selector
•Code name: Leave the (automatic) option
•Type: Selector
•File name: ~/CMSFormControls/ColorSelector.ascx (you can use the Select button to choose the file)
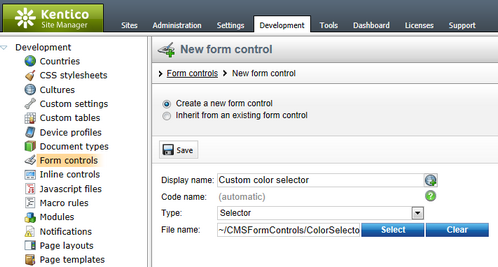
Click ![]() Save and the form control will be created.
Save and the form control will be created.
9. You will be redirected to the control's General tab. Here, check the Use control for - Text and Show control in - Document types boxes and click ![]() Save again.
Save again.
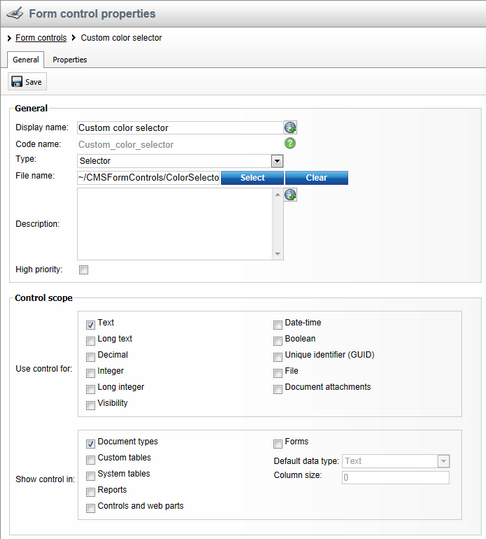
10. Switch to the Properties tab where parameters can be defined for the form control. Use the New attribute (![]() ) action and set the following values for the parameter:
) action and set the following values for the parameter:
•Column name: SelectorWidth
•Attribute type: Integer number
•Allow empty value: true (checked)
•Display attribute in editing form: true
•Field caption: Drop-down list width
•Form control: Text box
When finished, click ![]() Save.
Save.
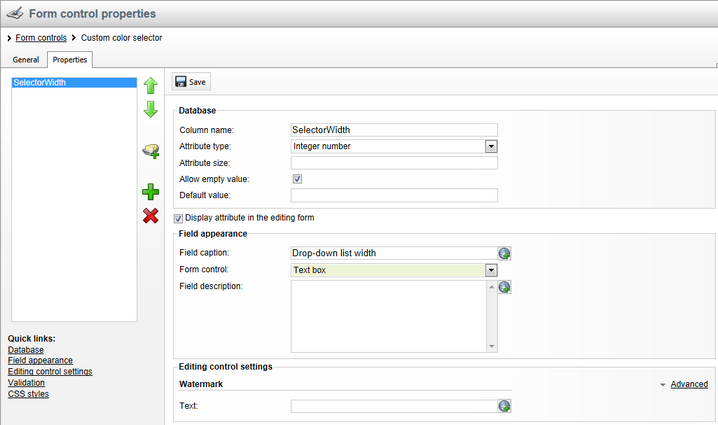
This parameter will allow users to specify the width of the color selector directly from the administration interface whenever they add this control to a form. The code of the form control already ensures that the value is properly applied.
11. Now we will test this control by placing it onto a document editing form. Go to Site Manager -> Development -> Document types and edit (![]() ) the Product document type. Select the Fields tab to access the field editor for this document type. Add two new fields using the New attribute (
) the Product document type. Select the Fields tab to access the field editor for this document type. Add two new fields using the New attribute (![]() ) action. Set the following properties for the fields:
) action. Set the following properties for the fields:
•Column name: ProductColor
•Attribute type: Text
•Attribute size: 100
•Display attribute in editing form: false
This field will store the name of the color selected for the product. It will not be available in the editing form, its value will be set automatically by the GetOtherValues() method of the ColorSelector.ascx control (notice that the Column name matches the name used in the code of the method).
Click ![]() Save and create the next field:
Save and create the next field:
•Column name: ProductHexaColor
•Attribute type: Text
•Attribute size: 100
•Allow empty value: true (checked)
•Display attribute in editing form: true
•Field caption: Color
•Form control: Custom color selector
This field will store the hexadecimal code of the selected color. In the code of the form control, this value is handled through the Value property. The field will be displayed in the document's editing form according to the design of the custom form control.
Notice that the Editing control settings section of this field contains the Drop-down list width field. This is the SelectorWidth parameter defined for the form control in the previous step. Try to specify the width of the selector by entering some number, for example 200.
Click ![]() Save again.
Save again.
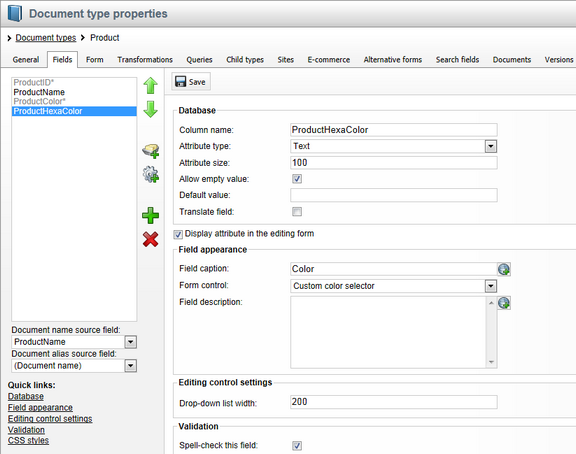
12. Go to CMS Desk -> Content and create a new document of the Product document type under the Products section. For the purposes of this example, choose the Do not create an SKU option in the SKU binding section. The document's editing form will contain the new form control as shown below:
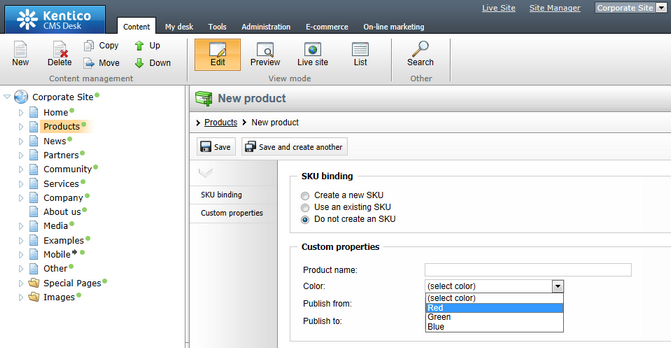
As you can see, the document field can be managed using the custom form control. The width of the displayed drop-down list will match the value that you entered into the form control's parameter. If you do not choose any color, the validation error message defined in the code of the form control will be displayed.
By implementing custom form controls as shown in this example, it is possible to create editing forms with almost unlimited flexibility, both in the administration interface and on the live site.
|
Getting and setting values of other fields using the API
The data of the current form can be accessed through the Form property of the form control inherited from the FormEngineUserControl class.
You can retrieve the values entered into other fields using the following method:
•Form.GetFieldValue(string columnName) - returns an object containing the value of the specified field.
For example, the following code could be used to get the value of the ProductName field from the current form (New product is returned if the field is empty):
[C#]
To set the value of a field, you can use the following approach:
•Form.Data.SetValue(string columnName, object value) - sets a value for the specified field.
To modify the value of a field before the form is saved, you need to place the code inside the IsValid method of your form control. |