|
|

Defining styles |

|

|

|

|
|
Defining styles |
|
|

|
|
|
|
Defining styles |
|
|
|
|
|
Defining styles |
|
|
|
|
|
|
||
The WYSIWYG editor allows you to apply a selected style to the text using the Style drop-down list. You can use either built-in styles or your custom styles:
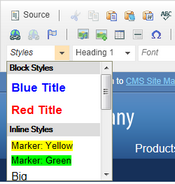
The styles offered in the list are defined in the minified <web project>\CMSAdminControls\CKeditor\plugins\styles\styles\default.js file. For illustration purposes, the structure of the unminified file looks like this:
CKEDITOR.stylesSet.add( 'default', [ { name : 'Blue Title' , element : 'h3', styles : { 'color' : 'Blue' } }, { name : 'Red Title' , element : 'h3', styles : { 'color' : 'Red' } }, { name : 'Marker: Yellow' , element : 'span', styles : { 'background-color' : 'Yellow' } }, { name : 'Marker: Green' , element : 'span', styles : { 'background-color' : 'Lime' } }, { name : 'Big' , element : 'big' }, { name : 'Small' , element : 'small' }, { name : 'Typewriter' , element : 'tt' }, { name : 'Computer Code' , element : 'code' }, { name : 'Keyboard Phrase' , element : 'kbd' }, { name : 'Sample Text' , element : 'samp' }, { name : 'Variable' , element : 'var' }, { name : 'Deleted Text' , element : 'del' }, { name : 'Inserted Text' , element : 'ins' }, { name : 'Cited Work' , element : 'cite' }, { name : 'Inline Quotation' , element : 'q' }, { name : 'Language: RTL' , element : 'span', attributes : { 'dir' : 'rtl' } }, { name : 'Language: LTR' , element : 'span', attributes : { 'dir' : 'ltr' } }, { name : 'Image on Left', element : 'img', attributes : { 'style' : 'padding: 5px; margin-right: 5px', 'border' : '2', 'align' : 'left' } }, { name : 'Image on Right', element : 'img', attributes : { 'style' : 'padding: 5px; margin-left: 5px', 'border' : '2', 'align' : 'right' } }, { name : 'Borderless Table', element : 'table', styles: { 'border-style': 'hidden', 'background-color' : '#E6E6FA' } }, { name : 'Square Bulleted List', element : 'ul', styles : { 'list-style-type' : 'square' } } ]); |
If you need to set more styles for one object, separate individual style definitions with a comma:
{ name : 'Object', element : 'element', styles : { 'style 1' : 'value' , 'style 2' : 'value' } } |
Every style has its name and element for which it is used. The styles are offered in the drop-down list based on the current position of the cursor. If you select some image, the styles for the img element will be offered. If you select some text, the styles for the h3 or span element will be offered.
If you choose to apply e.g. the Red Title style to the following HTML code:
We provide web development services. |
the result will be as follows:
<h3 style="color: red">We provide web development services.</h3> |
As you can see, the text was encapsulated with the h3 element with the style attribute set to color: red.
However, you may want to apply CSS class names instead of hard-coded styles. If you want to add a new style, the definition of the style needs to be inserted into the default.js file in front of the last square bracket. In this case, your style definition will look like this:
name : 'Green text', element : 'div', attributes : { 'class' : 'GreenText' } |
and the result will be:
<div class="GreenText">We provide web development services.</div> |
In your CSS stylesheet, you need to define the GreenText class name like this:
.GreenText { color: green; } |
|
Every time you modify the default.js file (or any other file that is used for the WYSIWYG editor), you need to clear the cache of your browser so that the changes are applied.
|
