|
|

Creating a new page template |

|

|

|

|
|
Creating a new page template |
|
|

|
|
|
|
Creating a new page template |
|
|
|
|
|
Creating a new page template |
|
|
|
|
|
|
||
There are two ways to create a new page template:
•Creating a blank page using an ad-hoc template
•Cloning and modifying an existing page template
|
What is an ad-hoc template?
An ad-hoc template is a page template that is used only by one specific page. Ad-hoc templates do not have a particular name. If you want to re-use this type of template for multiple pages, you need to save it as a named template first. |
Note: It is recommended to use the sample Corporate Site for this example.
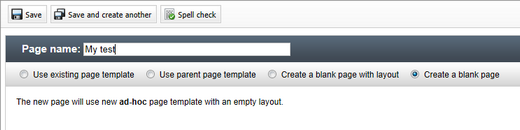
1. Go to CMS Desk -> Content, select the root of the content tree, click New and choose the Page (menu item) document type.
2. Enter My test into the Page name field, choose the Create a blank page option and click ![]() Save.
Save.
3. The page will now be added to the content tree and automatically selected. Open the Design tab and you will see an empty page as shown in the screenshot below.
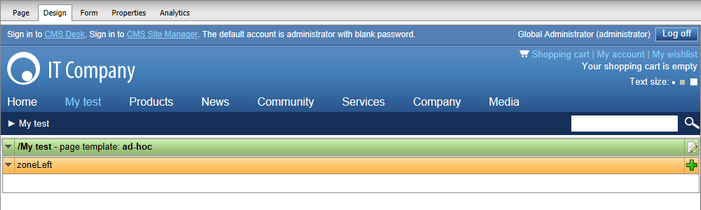
The green box with the /My test title displays the content of the current page template. As you can see, we are now using an ad-hoc template that was created specifically for this page. The yellow box with the zoneLeft title represents a web part zone, where web parts can be placed.
4. You can add web parts using the toolbar displayed on the right side of the tab (by default). Enter the word text into the search textbox (![]() ) at the top of the toolbar, which will ensure that only web parts with this word in their name are offered.
) at the top of the toolbar, which will ensure that only web parts with this word in their name are offered.
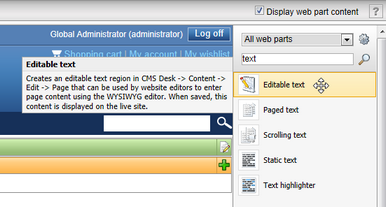
5. Now hover over the Editable text web part, hold down the mouse button and drag it from the toolbar into the zoneLeft web part zone. This web part allows you to create editable regions where editors can insert text and other content. Once you drop the web part into the zone, the Web part properties dialog will be opened.
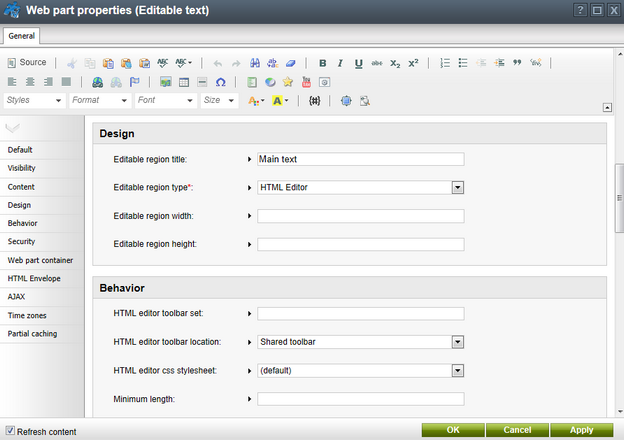
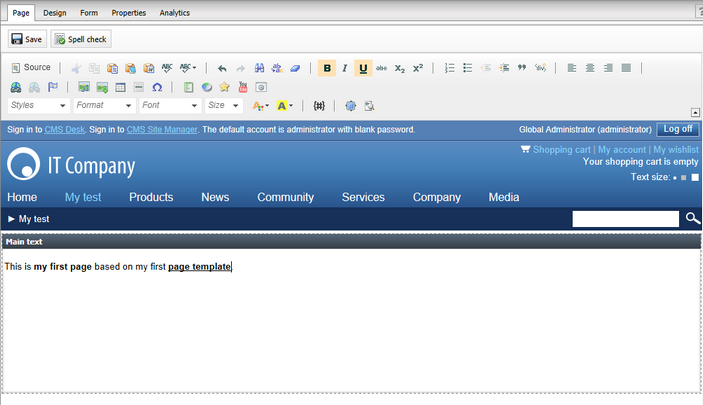
6. Scroll down to the Editable region title property, enter Main text as its value and click OK. The web part instance will now be added to the zone.

7. Next, switch to the Page tab, which displays the page in editing mode. The web part that you added provides an editable region that can be used in this mode. Enter some text into the region and click ![]() Save.
Save.
8. Click Live site in the main toolbar. You will see the live version of the page that is displayed to the website's visitors.
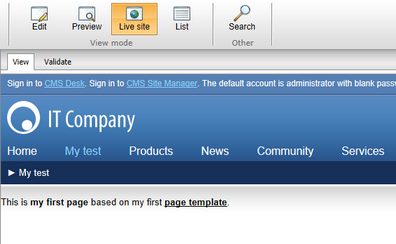
You have created a new page based on an ad-hoc page template. The page template defines the page structure and contains the editable text web part, which enables content editors to enter text onto the page.
|
Important!
Keep in mind that when you create a page based on an ad-hoc page template and later delete the page, the corresponding ad-hoc page template is deleted as well. |

