|
|

Creating a document library |

|

|

|

|
|
Creating a document library |
|
|

|
|
|
|
Creating a document library |
|
|
|
|
|
Creating a document library |
|
|
|
|
|
|
||
This topic explains how a document library can be created on your website. We will create a sample page with two Document library web parts, each of which will display files from a separate folder. Like this, we will actually have two document libraries on a single page, each for storing different types of files. The example is based on the Intranet Portal sample website. However, the procedure is analogical when performed on any other website.
The first step when creating a document library is to choose a location in the content tree where the files will be stored. A single document library web part can display documents from only a single location. As we want two separate libraries on a single page, we will create a page in the content tree where two Document library web parts will be placed. Under the page, we will create two separate folders where the actual files will be stored.
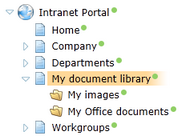
1. Go to CMS Desk -> Content, select the root of the content tree and click New. Choose the Page (menu item) document type. In the following dialog, enter My document library into the Page name field and choose the Create a blank page option. Click Save.
With the new document selected in the content tree, click New again. This time, choose the Folder document type and enter My images as its Document name. Repeat the same once again to create another folder, while this one should be called My Office documents. The final result should look as in the screenshot below.
2. Now that you have the page and folders created, we may proceed to adding the Document library web parts. Select the My document library document, switch to the Design mode and click the Add web part (![]() ) icon of the only web part zone on the page. In the Select web part pop-up dialog, choose the Document library web part, which is stored in the Document library web part category. Configure its properties as follows:
) icon of the only web part zone on the page. In the Select web part pop-up dialog, choose the Document library web part, which is stored in the Document library web part category. Configure its properties as follows:
•Library path: /My-document-library/My-images
•Page size: 15
•Document form: leave the field blank
•Web part container: Intranet simple container (with header line)
•Container title: My images
•Content after: <br/>
Click OK.
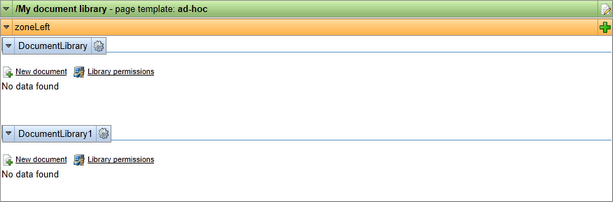
3. Repeat step 2 and add another Document library web part to the page. This time, use the following values of its properties:
•Library path: /My-document-library/My-Office-documents
•Page size: 15
•Document form: leave the field blank
•Web part container: Intranet simple container (with header line)
•Container title: My Office documents
Click OK. The web part zone should now look as in the following screenshot if viewed in the Design mode.
4. The document libraries are now configured and ready to be used by live site users. If viewed on the live site after uploading some files into the libraries, the page should look as in the screenshot below.

Please proceed to the Managing files in document libraries topic to learn more about how live site users can upload and manage document library files.